FormPanel
介绍 (Introduction)
FormPanel小部件表示将其内容包装在HTML“FORM”元素中的面板。
Class 声明 (Class Declaration)
以下是com.google.gwt.user.client.ui.FormPanel类的声明 -
public class FormPanel
   extends SimplePanel
      implements FiresFormEvents,
         com.google.gwt.user.client.ui.impl.FormPanelImplHost
类构造函数 (Class Constructors)
| Sr.No. | 构造函数和描述 |
|---|---|
| 1 | FormPanel() 创建一个新的FormPanel。 |
| 2 | protected FormPanel(Element element) 子类可以使用此构造函数来显式使用现有元素。 |
| 3 | protected FormPanel(Element element, boolean createIFrame) 子类可以使用此构造函数来显式使用现有元素。 |
| 4 | FormPanel(NamedFrame frameTarget) 创建一个以NamedFrame为目标的FormPanel。 |
| 5 | FormPanel(java.lang.String target) 创建一个新的FormPanel。 |
Class Methods
| Sr.No. | 功能名称和描述 |
|---|---|
| 1 | void add Form Handler (FormHandler handler) 已过时。 使用添加提交完整处理程序(com.google.gwt.user.client.ui.Form Panel.Submit Complete Handler)并添加Submit Handler(com.google.gwt.user.client.ui.Form Panel.Submit Handler) |
| 2 | Handler Registration addSubmit Complete Handler (FormPanel.SubmitCompleteHandler handler) 添加FormPanel.Submit完成事件处理程序。 |
| 3 | HandlerRegistration addSubmitHandler(FormPanel.SubmitHandler handler) 添加FormPanel.SubmitEvent处理程序。 |
| 4 | java.lang.String getAction() 获取与此表单关联的“操作”。 |
| 5 | java.lang.String getEncoding() 获取用于提交此表单的编码。 |
| 6 | java.lang.String getMethod() 获取用于提交此表单的HTTP方法。 |
| 7 | java.lang.String getTarget() 获取表单的“目标”。 |
| 8 | protected void onAttach() 当窗口小部件附加到浏览器的文档时,将调用此方法。 |
| 9 | protected void onDetach() 当窗口小部件与浏览器的文档分离时,将调用此方法。 |
| 10 | boolean onFormSubmit() 提交表单时触发。 |
| 11 | void onFrameLoad() |
| 12 | void removeFormHandler(FormHandler handler) 已过时。 对返回的对象使用HandlerRegistration.removeHandler()方法,然后添加* Handler方法 |
| 13 | void reset() 重置表单,清除所有字段。 |
| 14 | void setAction(java.lang.String url) 设置与此表单关联的“操作”。 |
| 15 | void setEncoding(java.lang.String encodingType) 设置用于提交此表单的编码。 |
| 16 | void setMethod(java.lang.String method) 设置用于提交此表单的HTTP方法。 |
| 17 | void submit() 提交表格。 |
| 18 | static FormPanel wrap(Element element) 创建一个包装现有 |
| 19 | static FormPanel wrap(Element element, boolean createIFrame) 创建一个包装现有 |
方法继承 (Methods Inherited)
该类继承以下类中的方法 -
com.google.gwt.user.client.ui.UIObject
com.google.gwt.user.client.ui.Widget
com.google.gwt.user.client.ui.Panel
com.google.gwt.user.client.ui.SimplePanel
java.lang.Object
FormPanel小部件示例
此示例将指导您完成在GWT中显示FormPanel窗口小部件的使用的简单步骤。 按照以下步骤更新我们在GWT - Create Application的GWT应用程序GWT - Create Application章节 -
| 步 | 描述 |
|---|---|
| 1 | 在com.iowiki包下创建一个名为HelloWorld的项目,如GWT - Create Application一章中所述。 |
| 2 | 修改HelloWorld.gwt.xml , HelloWorld.css , HelloWorld.html和HelloWorld.java ,如下所述。 保持其余文件不变。 |
| 3 | 编译并运行应用程序以验证实现的逻辑的结果。 |
以下是修改后的模块描述符src/com.iowiki/HelloWorld.gwt.xml 。
<?xml version = "1.0" encoding = "UTF-8"?>
<module rename-to = 'helloworld'>
   <!-- Inherit the core Web Toolkit stuff.                        -->
   <inherits name = 'com.google.gwt.user.User'/>
   <!-- Inherit the default GWT style sheet.                       -->
   <inherits name = 'com.google.gwt.user.theme.clean.Clean'/>
   <!-- Specify the app entry point class.                         -->
   <entry-point class = 'com.iowiki.client.HelloWorld'/>
   <!-- Specify the paths for translatable code                    -->
   <source path = 'client'/>
   <source path = 'shared'/>
</module>
以下是修改后的样式表文件war/HelloWorld.css 。
body {
   text-align: center;
   font-family: verdana, sans-serif;
}
h1 {
   font-size: 2em;
   font-weight: bold;
   color: #777777;
   margin: 40px 0px 70px;
   text-align: center;
}
以下是修改后的HTML主机文件war/HelloWorld.html 。
<html>
<head>
<title>Hello World</title>
<link rel = "stylesheet" href = "HelloWorld.css"/>
<script language = "javascript" src = "helloworld/helloworld.nocache.js">
</script>
</head>
<body>
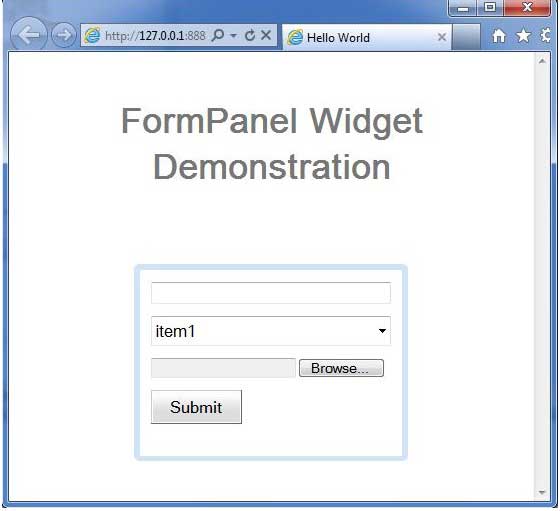
<h1>FormPanel Widget Demonstration</h1>
<div id = "gwtContainer"></div>
</body>
</html>
让我们有以下Java文件src/com.iowiki/HelloWorld.java ,它将演示FormPanel小部件的使用。
package com.iowiki.client;
import com.google.gwt.core.client.EntryPoint;
import com.google.gwt.event.dom.client.ClickEvent;
import com.google.gwt.event.dom.client.ClickHandler;
import com.google.gwt.user.client.Window;
import com.google.gwt.user.client.ui.Button;
import com.google.gwt.user.client.ui.DecoratorPanel;
import com.google.gwt.user.client.ui.FileUpload;
import com.google.gwt.user.client.ui.FormPanel;
import com.google.gwt.user.client.ui.FormPanel.SubmitCompleteEvent;
import com.google.gwt.user.client.ui.FormPanel.SubmitEvent;
import com.google.gwt.user.client.ui.ListBox;
import com.google.gwt.user.client.ui.RootPanel;
import com.google.gwt.user.client.ui.TextBox;
import com.google.gwt.user.client.ui.VerticalPanel;
public class HelloWorld implements EntryPoint {
   public void onModuleLoad() {
      // Create a FormPanel and point it at a service.
      final FormPanel form = new FormPanel();
      form.setAction("/myFormHandler");
      // Because we're going to add a FileUpload widget,
      // we'll need to set the form to use the POST method,
      // and multipart MIME encoding.
      form.setEncoding(FormPanel.ENCODING_MULTIPART);
      form.setMethod(FormPanel.METHOD_POST);
      // Create a panel to hold all of the form widgets.
      VerticalPanel panel = new VerticalPanel();
      panel.setSpacing(10);
      form.setWidget(panel);
      // Create a TextBox, giving it a name so that it will be submitted.
      final TextBox tb = new TextBox();
      tb.setWidth("220");
      tb.setName("textBoxFormElement");
      panel.add(tb);
      // Create a ListBox, giving it a name and
      // some values to be associated with its options.
      ListBox lb = new ListBox();
      lb.setName("listBoxFormElement");
      lb.addItem("item1", "item1");
      lb.addItem("item2", "item2");
      lb.addItem("item3", "item3");
      lb.setWidth("220");
      panel.add(lb);
      // Create a FileUpload widget.
      FileUpload upload = new FileUpload();
      upload.setName("uploadFormElement");
      panel.add(upload);
      // Add a 'submit' button.
      panel.add(new Button("Submit", new ClickHandler() {
         @Override
         public void onClick(ClickEvent event) {
            form.submit();
         }
      }));
      // Add an event handler to the form.
      form.addSubmitHandler(new FormPanel.SubmitHandler() {
         @Override
         public void onSubmit(SubmitEvent event) {
            // This event is fired just before the form is submitted.
            // We can take this opportunity to perform validation.
            if (tb.getText().length() == 0) {
               Window.alert("The text box must not be empty");
               event.cancel();
            }
         }
      });
      form.addSubmitCompleteHandler(new FormPanel.SubmitCompleteHandler() {
         @Override
         public void onSubmitComplete(SubmitCompleteEvent event) {
            // When the form submission is successfully completed,
            // this event is fired. Assuming the service returned
            // a response of type text/html, we can get the result
            // here.
            Window.alert(event.getResults());
         }
      });
      DecoratorPanel decoratorPanel = new DecoratorPanel();
      decoratorPanel.add(form);
      // Add the widgets to the root panel.
      RootPanel.get().add(decoratorPanel);
   }
}
一旦准备好完成所有更改,让我们像在GWT - 创建应用程序章节中那样在开发模式下编译和运行应用程序 。 如果您的应用程序一切正常,这将产生以下结果 -