DialogBox
介绍 (Introduction)
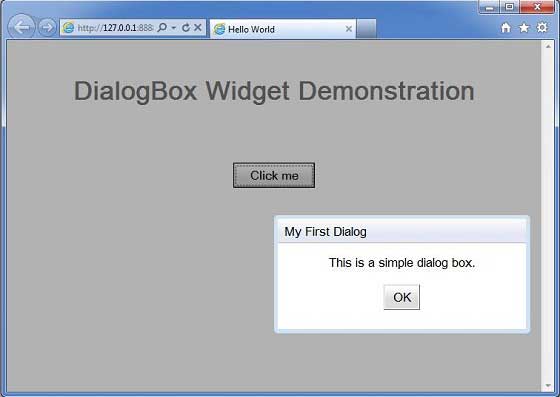
DialogBox小部件表示一种弹出形式,其顶部有一个标题区域,可由用户拖动。 与PopupPanel不同,对PopupPanel.setWidth(String)和PopupPanel.setHeight(String)的调用将设置对话框本身的宽度和高度,即使尚未添加窗口小部件。
Class 声明 (Class Declaration)
以下是com.google.gwt.user.client.ui.DialogBox类的声明 -
public class DialogBox
   extends DecoratedPopupPanel
      implements HasHTML, HasSafeHtml, MouseListener
类构造函数 (Class Constructors)
| Sr.No. | 构造函数和描述 |
|---|---|
| 1 | DialogBox() 创建一个空对话框。 |
| 2 | DialogBox(boolean autoHide) 创建一个空对话框,指定其auto-hide属性。 |
| 3 | DialogBox(boolean autoHide, boolean modal) 创建一个空对话框,指定其auto-hide和modal属性。 |
Class Methods
| Sr.No. | 功能名称和描述 |
|---|---|
| 1 | protected void beginDragging(MouseDownEvent event) 在标题区域中按下鼠标,通过打开事件捕获开始拖动循环。 |
| 2 | protected void continueDragging(MouseMoveEvent event) 在标题区域中鼠标移动时调用,如果由beginDragging(com.google.gwt.event .dom.client.MouseDownEvent)启动,则继续拖动。 |
| 3 | protected void doAttachChildren() 如果窗口小部件包含一个或多个不在逻辑窗口小部件层次结构中的子窗口小部件(子窗体仅在DOM级别上物理连接),则它必须覆盖此方法并为其每个子窗口小部件调用Widget.on Attach()。 |
| 4 | protected void doDetachChildren() 如果窗口小部件包含一个或多个不在逻辑窗口小部件层次结构中的子窗口小部件(子窗体仅在DOM级别上物理连接),则它必须覆盖此方法并为其每个子窗口小部件调用Widget.onDetach()。 |
| 5 | protected void endDragging(MouseUpEvent event) 在标题区域中鼠标向上调用,通过结束事件捕获结束拖动。 |
| 6 | DialogBox.Caption getCaption() 提供对对话框标题的访问。 |
| 7 | java.lang.String getHTML() 以HTML格式获取此对象的内容。 |
| 8 | java.lang.String getText() 获取此对象的文本。 |
| 9 | void hide() 隐藏弹出窗口并将其与页面分离。 |
| 10 | void onBrowserEvent(Event event) 收到浏览器事件时触发。 |
| 11 | protected void onEnsureDebugId(java.lang.String baseID) 受影响的元素:-caption = DialogBox顶部的文本。 -content =内容周围的容器。 |
| 12 | void on Mouse Down(Widget sender, int x, int y) 已过时。 使用开始拖动(com.google.gwt.event.dom.client.Mouse Down Event)并获取Caption() |
| 13 | void on Mouse Enter(Widget sender) 已过时。 使用鼠标悬停处理程序。 添加鼠标悬停处理程序(com.google.gwt.event.dom.client.Mouse Over Handler) |
| 14 | void onMouseLeave(Widget sender) 已过时。 使用Has Mouse Out Handlers.add Mouse Out Handler(com.google.gwt.event.dom.client.Mouse Out Handler)代替 |
| 15 | void onMouseMove(Widget sender, int x, int y) 已过时。 使用continueDragging(com.google.gwt.event.dom。client.MouseMoveEvent)和getCaption()代替 |
| 16 | void onMouseUp(Widget sender, int x, int y) 已过时。 使用endDragging(com.google.gwt.event.dom .client.MouseUpEvent)和getCaption()代替 |
| 17 | protected void onPreviewNativeEvent(Event.NativePreviewEvent event) |
| 18 | void setHTML(SafeHtml html) 设置标题内的html字符串。 |
| 19 | void setHTML(java.lang.String html) 设置标题内的html字符串。 |
| 20 | void setText(java.lang.String text) 设置标题内的文本。 |
| 21 | void show() 显示弹出窗口并将其附加到页面。 |
方法继承 (Methods Inherited)
该类继承以下类中的方法 -
com.google.gwt.user.client.ui.UIObject
com.google.gwt.user.client.ui.Widget
com.google.gwt.user.client.ui.Panel
com.google.gwt.user.client.ui.SimplePanel
com.google.gwt.user.client.ui.PopupPanel
com.google.gwt.user.client.ui.DecoratedPopupPanel
java.lang.Object
DialogBox小部件示例
此示例将指导您完成在GWT中显示DialogBox Widget的使用的简单步骤。 按照以下步骤更新我们在GWT - Create Application的GWT应用程序GWT - Create Application章节 -
| 步 | 描述 |
|---|---|
| 1 | 在com.iowiki包下创建一个名为HelloWorld的项目,如GWT - Create Application一章中所述。 |
| 2 | 修改HelloWorld.gwt.xml , HelloWorld.css , HelloWorld.html和HelloWorld.java ,如下所述。 保持其余文件不变。 |
| 3 | 编译并运行应用程序以验证实现的逻辑的结果。 |
以下是修改后的模块描述符src/com.iowiki/HelloWorld.gwt.xml 。
<?xml version = "1.0" encoding = "UTF-8"?>
<module rename-to = 'helloworld'>
   <!-- Inherit the core Web Toolkit stuff.                        -->
   <inherits name = 'com.google.gwt.user.User'/>
   <!-- Inherit the default GWT style sheet.                       -->
   <inherits name = 'com.google.gwt.user.theme.clean.Clean'/>
   <!-- Specify the app entry point class.                         -->
   <entry-point class = 'com.iowiki.client.HelloWorld'/>
   <!-- Specify the paths for translatable code                    -->
   <source path = 'client'/>
   <source path = 'shared'/>
</module>
以下是修改后的样式表文件war/HelloWorld.css 。
body {
   text-align: center;
   font-family: verdana, sans-serif;
}
h1 {
   font-size: 2em;
   font-weight: bold;
   color: #777777;
   margin: 40px 0px 70px;
   text-align: center;
}
.gwt-DialogBox .Caption {
   background: #e3e8f3 url(images/hborder.png) repeat-x 0px -2003px;
   padding: 4px 4px 4px 8px;
   cursor: default;
   border-bottom: 1px solid #bbbbbb;
   border-top: 5px solid #d0e4f6;
}
.gwt-DialogBox .dialogContent {
}
.gwt-DialogBox .dialogMiddleCenter {
   padding: 3px;
   background: white;
}
.gwt-DialogBox .dialogBottomCenter {
   background: url(images/hborder.png) repeat-x 0px -4px;
   -background: url(images/hborder_ie6.png) repeat-x 0px -4px;
}
.gwt-DialogBox .dialogMiddleLeft {
   background: url(images/vborder.png) repeat-y;
}
.gwt-DialogBox .dialogMiddleRight {
   background: url(images/vborder.png) repeat-y -4px 0px;
   -background: url(images/vborder_ie6.png) repeat-y -4px 0px;
}
.gwt-DialogBox .dialogTopLeftInner {
   width: 5px;
   zoom: 1;
}
.gwt-DialogBox .dialogTopRightInner {
   width: 8px;
   zoom: 1;
}
.gwt-DialogBox .dialogBottomLeftInner {
   width: 5px;
   height: 8px;
   zoom: 1;
}
.gwt-DialogBox .dialogBottomRightInner {
   width: 5px;
   height: 8px;
   zoom: 1;
}
.gwt-DialogBox .dialogTopLeft {
   background: url(images/corner.png) no-repeat -13px 0px;
   -background: url(images/corner_ie6.png) no-repeat -13px 0px;
}
.gwt-DialogBox .dialogTopRight {
   background: url(images/corner.png) no-repeat -18px 0px;
   -background: url(images/corner_ie6.png) no-repeat -18px 0px;
}
.gwt-DialogBox .dialogBottomLeft {
   background: url(images/corner.png) no-repeat 0px -15px;
   -background: url(images/corner_ie6.png) no-repeat 0px -15px;
}
.gwt-DialogBox .dialogBottomRight {
   background: url(images/corner.png) no-repeat -5px -15px;
   -background: url(images/corner_ie6.png) no-repeat -5px -15px;
}
html>body .gwt-DialogBox {
}
* html .gwt-DialogBox .dialogTopLeftInner {
   width: 5px;
   overflow: hidden;
}
* html .gwt-DialogBox .dialogTopRightInner {
   width: 8px;
   overflow: hidden;
}
* html .gwt-DialogBox .dialogBottomLeftInner {
   width: 5px;
   height: 8px;
   overflow: hidden;
}
* html .gwt-DialogBox .dialogBottomRightInner {
   width: 8px;
   height: 8px;
   overflow: hidden;
}
以下是修改后的HTML主机文件war/HelloWorld.html 。
<html>
   <head>
      <title>Hello World</title>
      <link rel = "stylesheet" href = "HelloWorld.css"/>
      <script language = "javascript" src = "helloworld/helloworld.nocache.js">
      </script>
   </head>
   <body>
      <h1>DialogBox Widget Demonstration</h1>
      <div id = "gwtContainer"></div>
   </body>
</html>
让我们有以下Java文件src/com.iowiki/HelloWorld.java ,它将演示DialogBox小部件的使用。
package com.iowiki.client;
import com.google.gwt.core.client.EntryPoint;
import com.google.gwt.event.dom.client.ClickEvent;
import com.google.gwt.event.dom.client.ClickHandler;
import com.google.gwt.user.client.Window;
import com.google.gwt.user.client.ui.Button;
import com.google.gwt.user.client.ui.DialogBox;
import com.google.gwt.user.client.ui.HasHorizontalAlignment;
import com.google.gwt.user.client.ui.Label;
import com.google.gwt.user.client.ui.RootPanel;
import com.google.gwt.user.client.ui.VerticalPanel;
public class HelloWorld implements EntryPoint {
   private static class MyDialog extends DialogBox {
      public MyDialog() {
         // Set the dialog box's caption.
         setText("My First Dialog");
         // Enable animation.
         setAnimationEnabled(true);
         // Enable glass background.
         setGlassEnabled(true);
         // DialogBox is a SimplePanel, so you have to set its widget
         // property to whatever you want its contents to be.
         Button ok = new Button("OK");
         ok.addClickHandler(new ClickHandler() {
            public void onClick(ClickEvent event) {
               MyDialog.this.hide();
            }
         });
         Label label = new Label("This is a simple dialog box.");
         VerticalPanel panel = new VerticalPanel();
         panel.setHeight("100");
         panel.setWidth("300");
         panel.setSpacing(10);
         panel.setHorizontalAlignment(HasHorizontalAlignment.ALIGN_CENTER);
         panel.add(label);
         panel.add(ok);
         setWidget(panel);
      }
   }
   public void onModuleLoad() {
      Button b = new Button("Click me");
      b.addClickHandler(new ClickHandler() {
         @Override
         public void onClick(ClickEvent event) {
            // Instantiate the dialog box and show it.
            MyDialog myDialog = new MyDialog();
            int left = Window.getClientWidth()/ 2;
            int top = Window.getClientHeight()/ 2;
            myDialog.setPopupPosition(left, top);
            myDialog.show();
         }
      });
      RootPanel.get().add(b);
   }
}
一旦准备好完成所有更改,让我们像在GWT - 创建应用程序章节中那样在开发模式下编译和运行应用程序 。 如果您的应用程序一切正常,这将产生以下结果 -