JPA - 实体关系( Entity Relationships)
本章将向您介绍实体之间的关系。 通常,关系在数据库中的表之间更有效。 这里实体类被视为关系表(JPA的概念),因此实体类之间的关系如下:
- @ManyToOne关系
- @OneToMany关系
- @OneToOne关系
- @ManyToMany关系
@ManyToOne关系
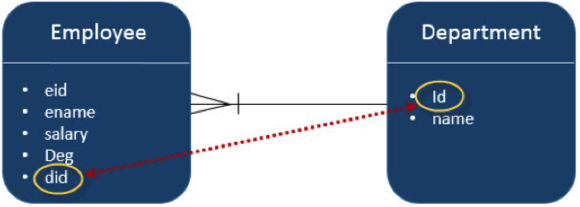
实体之间的多对一关系:其中一个实体(列或列集)被包含唯一值的另一个实体(列或列集)引用。 在关系数据库中,通过在表之间使用外键/主键可以应用这些关系。
让我们考虑一下Employee和Department实体之间关系的一个例子。 以单向方式,员工与部门,多对一关系适用。 这意味着员工的每条记录都包含一个部门ID,该部门ID应该是Department表中的主键。 在Employee表中,Department id是外键。
该图解释了多对一关系如下:
在eclipse IDE中创建一个名为JPA_Eclipselink_MTO的JPA项目。 该项目的所有模块如下所示:
创建实体 (Creating Entities)
按照上面给出的图表来创建实体。 在'src'包下创建一个名为'com.tutorialspoin.eclipselink.entity' 'src'包。 在给定的包下创建一个名为Department.java的类。 类Department实体如下所示:
package com.iowiki.eclipselink.entity;
import javax.persistence.Entity;
import javax.persistence.GeneratedValue;
import javax.persistence.GenerationType;
import javax.persistence.Id;
@Entity
public class Department {
   @Id
   @GeneratedValue( strategy=GenerationType.AUTO )
   private int id;
   private String name;
   public int getId() {
      return id;
   }
   public void setId(int id) {
      this.id = id;
   }
   public String getName( ){
      return name;
   }
   public void setName( String deptName ){
      this.name = deptName;
   }
}
在此关系中创建第二个实体 - 名为Employee.java Employee实体类位于'com.iowiki.eclipselink.entity'包下。 Employee实体类如下所示:
package com.iowiki.eclipselink.entity;
import javax.persistence.Entity;
import javax.persistence.GeneratedValue;
import javax.persistence.GenerationType;
import javax.persistence.Id;
import javax.persistence.ManyToOne;
@Entity
public class Employee{
   @Id
   @GeneratedValue( strategy= GenerationType.AUTO )
   private int eid;
   private String ename;
   private double salary;
   private String deg;
   @ManyToOne
   private Department department;
   public Employee(int eid, String ename, double salary, String deg) {
      super( );
      this.eid = eid;
      this.ename = ename;
      this.salary = salary;
      this.deg = deg;
   }
   public Employee( ) {
      super();
   }
   public int getEid( ) {
      return eid;
   }
   public void setEid(int eid)  {
      this.eid = eid;
   }
   public String getEname( ) {
      return ename;
   }
   public void setEname(String ename) {
      this.ename = ename;
   }
   public double getSalary( ) {
      return salary;
   }
   public void setSalary(double salary) {
      this.salary = salary;
   }
   public String getDeg( ) {
      return deg;
   }
   public void setDeg(String deg) {
      this.deg = deg;
   }
   public Department getDepartment() {
      return department;
   }
   public void setDepartment(Department department) {
      this.department = department;
   }
}
Persistence.xml
需要Persistence.xml文件来配置数据库和实体类的注册。
在创建JPA项目时,eclipse IDE将创建Persitence.xml。 配置详细信息是用户规范。 persistence.xml文件如下所示:
<?xml version="1.0" encoding = "UTF-8"?>
<persistence version = "2.0"
   xmlns = "http://java.sun.com/xml/ns/persistence"
   xmlns:xsi = "http://www.w3.org/2001/XMLSchema-instance"
   xsi:schemaLocation = "http://java.sun.com/xml/ns/persistence
   http://java.sun.com/xml/ns/persistence/persistence_2_0.xsd">
   <persistence-unit name = "Eclipselink_JPA" transaction-type = "RESOURCE_LOCAL">
      <class>com.iowiki.eclipselink.entity.Employee</class>
      <class>com.iowiki.eclipselink.entity.Department</class>
      <properties>
         <property name = "javax.persistence.jdbc.url" value = "jdbc:mysql://localhost:3306/jpadb"/>
         <property name = "javax.persistence.jdbc.user" value = "root"/>
         <property name = "javax.persistence.jdbc.password" value="root"/>
         <property name = "javax.persistence.jdbc.driver" value="com.mysql.jdbc.Driver"/>
         <property name = "eclipselink.logging.level" value = "FINE"/>
         <property name = "eclipselink.ddl-generation" value = "create-tables"/>
      </properties>
   </persistence-unit>
</persistence>
服务类
此模块包含服务类,它使用属性初始化实现关系部分。 在'src'包下创建一个名为'com.iowiki.eclipselink.service' 'src'包。 在给定包下创建名为ManyToOne.java的DAO类。 DAO类如下所示:
package com.iowikieclipselink.service;
import javax.persistence.EntityManager;
import javax.persistence.EntityManagerFactory;
import javax.persistence.Persistence;
import com.iowiki.eclipselink.entity.Department;
import com.iowiki.eclipselink.entity.Employee;
public class ManyToOne {
   public static void main( String[ ] args ) {
   EntityManagerFactory emfactory = Persistence.createEntityManagerFactory( "Eclipselink_JPA" );
   EntityManager entitymanager = emfactory.createEntityManager( );
   entitymanager.getTransaction( ).begin( );
   //Create Department Entity
   Department department = new Department();
   department.setName("Development");
   //Store Department
   entitymanager.persist(department);
   //Create Employee1 Entity
   Employee employee1 = new Employee();
   employee1.setEname("Satish");
   employee1.setSalary(45000.0);
   employee1.setDeg("Technical Writer");
   employee1.setDepartment(department);
   //Create Employee2 Entity
   Employee employee2 = new Employee();
   employee2.setEname("Krishna");
   employee2.setSalary(45000.0);
   employee2.setDeg("Technical Writer");
   employee2.setDepartment(department);
   //Create Employee3 Entity
   Employee employee3 = new Employee();
   employee3.setEname("Masthanvali");
   employee3.setSalary(50000.0);
   employee3.setDeg("Technical Writer");
   employee3.setDepartment(department);
   //Store Employees
   entitymanager.persist(employee1);
   entitymanager.persist(employee2);
   entitymanager.persist(employee3);
   entitymanager.getTransaction().commit();
   entitymanager.close();
   emfactory.close();
   }
}
编译和执行上述程序后,您将在Eclipse IDE的控制台面板中收到通知。 对于输出,请检查MySQL工作台。 在此示例中,创建了两个表。
在MySQL界面中传递以下查询,以表格格式显示Department表的结果如下所示:
Select * from department;
Id	Name
101	Development
在MySQL接口中传递以下查询,表格格式的Employee表的结果如下所示:
Select * from employee;
Eid Deg                 Ename	        Salary	Department_Id
102 Technical Writer	Satish	        45000	101
103 Technical Writer	Krishna	        45000	101
104 Technical Writer	Masthan Wali	50000	101
在上表中,Deparment_Id是Department表中的外键(引用字段)。
@OneToMany关系
在此关系中,一个实体的每一行都引用其他实体中的许多子记录。 重要的是,儿童记录不能有多个父母。 在表A和表B之间的一对多关系中,表A中的每一行都链接到表B中的0,1行或多行。
让我们考虑上面的例子。 如果Employee和Department处于反向单向方式,则关系是多对一关系。 在eclipse IDE中创建一个名为JPA_Eclipselink_OTM的JPA项目。 该项目的所有模块如下所示:
创建实体 (Creating Entities)
按照上面给出的图表来创建实体。 在'src'包下创建一个名为'com.tutorialspoin.eclipselink.entity' 'src'包。 在给定的包下创建一个名为Department.java的类。 类Department实体如下所示:
package com.iowiki.eclipselink.entity;
import java.util.List;
import javax.persistence.Entity;
import javax.persistence.GeneratedValue;
import javax.persistence.GenerationType;
import javax.persistence.Id;
import javax.persistence.OneToMany;
@Entity
public class Department {
    @Id
    @GeneratedValue( strategy=GenerationType.AUTO )
    private int id;
    private String name;
    @OneToMany( targetEntity=Employee.class )
    private List employeelist;
    public int getId() {
    	return id;
    }
    public void setId(int id) {
    	this.id = id;
    }
    public String getName( ) {
    	return name;
    }
    public void setName( String deptName ) {
    	this.name = deptName;
    }
    public List getEmployeelist() {
      return employeelist;
    }
   public void setEmployeelist(List employeelist) {
      this.employeelist = employeelist;
   }
}
在此关系中创建第二个实体'com.iowiki.eclipselink.entity'实体类,名为Employee.java位于'com.iowiki.eclipselink.entity'包下。 Employee实体类如下所示:
package com.iowiki.eclipselink.entity;
import javax.persistence.Entity;
import javax.persistence.GeneratedValue;
import javax.persistence.GenerationType;
import javax.persistence.Id;
@Entity
public class Employee {
   @Id
   @GeneratedValue( strategy= GenerationType.AUTO )
   private int eid;
   private String ename;
   private double salary;
   private String deg;
   public Employee(int eid, String ename, double salary, String deg) {
      super( );
      this.eid = eid;
      this.ename = ename;
      this.salary = salary;
      this.deg = deg;
   }
   public Employee( ) {
      super();
   }
   public int getEid( ) {
      return eid;
   }
   public void setEid(int eid) {
      this.eid = eid;
   }
   public String getEname( ) {
      return ename;
   }
   public void setEname(String ename) {
      this.ename = ename;
   }
   public double getSalary( ) {
      return salary;
   }
   public void setSalary(double salary) {
      this.salary = salary;
   }
   public String getDeg( ) {
      return deg;
   }
   public void setDeg(String deg) {
      this.deg = deg;
   }
}
Persistence.xml
在创建JPA项目时,eclipse IDE将创建Persistence.xml。 配置详细信息是用户规范。 persistence.xml文件如下所示:
<?xml version = "1.0" encoding = "UTF-8"?>
<persistence version = "2.0" xmlns = "http://java.sun.com/xml/ns/persistence"
   xmlns:xsi = "http://www.w3.org/2001/XMLSchema-instance"
   xsi:schemaLocation = "http://java.sun.com/xml/ns/persistence
   http://java.sun.com/xml/ns/persistence/persistence_2_0.xsd">
   <persistence-unit name = "Eclipselink_JPA" transaction-type = "RESOURCE_LOCAL">
      <class>com.iowiki.eclipselink.entity.Employee</class>
      <class>com.iowiki.eclipselink.entity.Department</class>
      <properties>
         <property name = "javax.persistence.jdbc.url" value = "jdbc:mysql://localhost:3306/jpadb"/>
         <property name = "javax.persistence.jdbc.user" value = "root"/>
         <property name = "javax.persistence.jdbc.password" value = "root"/>
         <property name = "javax.persistence.jdbc.driver" value = "com.mysql.jdbc.Driver"/>
         <property name = "eclipselink.logging.level" value = "FINE"/>
         <property name = "eclipselink.ddl-generation" value = "create-tables"/>
      </properties>
   </persistence-unit>
</persistence>
服务类
此模块包含服务类,它使用属性初始化实现关系部分。 在'src'包下创建一个名为'com.iowiki.eclipselink.service' 'src'包。 名为OneToMany.java的DAO类是在给定包下创建的。 DAO类如下所示:
package com.iowikieclipselink.service;
import java.util.List;
import java.util.ArrayList;
import javax.persistence.EntityManager;
import javax.persistence.EntityManagerFactory;
import javax.persistence.Persistence;
import com.iowiki.eclipselink.entity.Department;
import com.iowiki.eclipselink.entity.Employee;
public class OneToMany {
   public static void main(String[] args) {
   EntityManagerFactory emfactory = Persistence.createEntityManagerFactory( "Eclipselink_JPA" );
   EntityManager entitymanager = emfactory.createEntityManager( );
   entitymanager.getTransaction( ).begin( );
   //Create Employee1 Entity
   Employee employee1 = new Employee();
   employee1.setEname("Satish");
   employee1.setSalary(45000.0);
   employee1.setDeg("Technical Writer");
   //Create Employee2 Entity
   Employee employee2 = new Employee();
   employee2.setEname("Krishna");
   employee2.setSalary(45000.0);
   employee2.setDeg("Technical Writer");
   //Create Employee3 Entity
   Employee employee3 = new Employee();
   employee3.setEname("Masthanvali");
   employee3.setSalary(50000.0);
   employee3.setDeg("Technical Writer");
   //Store Employee
   entitymanager.persist(employee1);
   entitymanager.persist(employee2);
   entitymanager.persist(employee3);
   //Create Employeelist
   List<Employee> emplist = new ArrayList();
   emplist.add(employee1);
   emplist.add(employee2);
   emplist.add(employee3);
   //Create Department Entity
   Department department = new Department();
   department.setName("Development");
   department.setEmployeelist(emplist);
   //Store Department
   entitymanager.persist(department);
   entitymanager.getTransaction().commit();
   entitymanager.close();
   emfactory.close();
   }
}
编译和执行上述程序后,您将在Eclipse IDE的控制台面板中收到通知。 对于输出检查MySQL工作台如下。 在这个项目中,创建了三个表。
在MySQL界面中传递以下查询,并以表格格式显示department_employee表的结果,如下所示:
Select * from department_Id;
Department_Id	Employee_Eid
254	        251
254	        252
254	        253
在上表中,deparment_id和employee_id字段是department和employee表中的外键(引用字段)。
在MySQL界面中传递以下查询,并以表格格式显示department表的结果,如下所示:
Select * from department;
Id	Name
254	Development
在MySQL界面中传递以下查询,并以表格格式显示employee表的结果,如下所示:
Select * from employee;
Eid	Deg	                Ename	       Salary
251	Technical Writer	Satish	       45000
252	Technical Writer	Krishna	       45000
253	Technical Writer	Masthanvali    50000
@OneToOne关系
在一对一关系中,一个项目只能属于另一个项目。 这意味着一个实体的每一行被称为另一个实体的一行且仅一行。
让我们考虑上面的例子。 Employee和Department以反向单向的方式,关系是一对一的关系。 这意味着每个员工只属于一个部门。 在eclipse IDE中创建一个名为JPA_Eclipselink_OTO的JPA项目。 该项目的所有模块如下所示:
创建实体 (Creating Entities)
按照上面给出的图表来创建实体。 在'src'包下创建一个名为'com.tutorialspoin.eclipselink.entity' 'src'包。 在给定的包下创建一个名为Department.java的类。 类Department实体如下所示:
package com.iowiki.eclipselink.entity;
import javax.persistence.Entity;
import javax.persistence.GeneratedValue;
import javax.persistence.GenerationType;
import javax.persistence.Id;
@Entity
public class Department {
   @Id
   @GeneratedValue( strategy=GenerationType.AUTO )
   private int id;
   private String name;
   public int getId() {
      return id;
   }
   public void setId(int id) {
      this.id = id;
   }
   public String getName( ) {
      return name;
   }
   public void setName( String deptName ) {
      this.name = deptName;
   }
}
在此关系中创建第二个实体'com.iowiki.eclipselink.entity'实体类,名为Employee.java位于'com.iowiki.eclipselink.entity'包下。 Employee实体类如下所示:
package com.iowiki.eclipselink.entity;
import javax.persistence.Entity;
import javax.persistence.GeneratedValue;
import javax.persistence.GenerationType;
import javax.persistence.Id;
import javax.persistence.OneToOne;
@Entity
public class Employee {
   @Id
   @GeneratedValue( strategy= GenerationType.AUTO )
   private int eid;
   private String ename;
   private double salary;
   private String deg;
   @OneToOne
   private Department department;
   public Employee(int eid, String ename, double salary, String deg) {
      super( );
      this.eid = eid;
      this.ename = ename;
      this.salary = salary;
      this.deg = deg;
   }
   public Employee( ) {
      super();
   }
   public int getEid( ) {
      return eid;
   }
   public void setEid(int eid) {
      this.eid = eid;
   }
   public String getEname( ) {
      return ename;
   }
   public void setEname(String ename) {
      this.ename = ename;
   }
   public double getSalary( ) {
      return salary;
   }
   public void setSalary(double salary) {
      this.salary = salary;
   }
   public String getDeg( ) {
      return deg;
   }
   public void setDeg(String deg) {
      this.deg = deg;
   }
   public Department getDepartment() {
      return department;
   }
   public void setDepartment(Department department) {
      this.department = department;
   }
}
Persistence.xml
在创建JPA项目时,eclipse IDE将创建Persistence.xml。 配置详细信息是用户规范。 persistence.xml文件如下所示:
<?xml version = "1.0" encoding = "UTF-8"?>
<persistence version = "2.0" xmlns = "http://java.sun.com/xml/ns/persistence"
   xmlns:xsi = "http://www.w3.org/2001/XMLSchema-instance"
   xsi:schemaLocation = "http://java.sun.com/xml/ns/persistence
   http://java.sun.com/xml/ns/persistence/persistence_2_0.xsd">
   <persistence-unit name = "Eclipselink_JPA" transaction-type = "RESOURCE_LOCAL">
      <class>com.iowiki.eclipselink.entity.Employee</class>
      <class>com.iowiki.eclipselink.entity.Department</class>
      <properties>
         <property name = "javax.persistence.jdbc.url" value = "jdbc:mysql://localhost:3306/jpadb"/>
         <property name = "javax.persistence.jdbc.user" value = "root"/>
         <property name = "javax.persistence.jdbc.password" value = "root"/>
         <property name = "javax.persistence.jdbc.driver" value = "com.mysql.jdbc.Driver"/>
         <property name = "eclipselink.logging.level" value = "FINE"/>
         <property name = "eclipselink.ddl-generation" value = "create-tables"/>
      </properties>
   </persistence-unit>
</persistence>
服务类
此模块包含服务类,它使用属性初始化实现关系部分。 在'src'包下创建一个名为'com.iowiki.eclipselink.service' 'src'包。 名为OneToOne.java的DAO类是在给定包下创建的。 DAO类如下所示:
package com.iowikieclipselink.service;
import javax.persistence.EntityManager;
import javax.persistence.EntityManagerFactory;
import javax.persistence.Persistence;
import com.iowiki.eclipselink.entity.Department;
import com.iowiki.eclipselink.entity.Employee;
public class OneToOne {
   public static void main(String[] args) {
   EntityManagerFactory emfactory = Persistence.createEntityManagerFactory( "Eclipselink_JPA" );
   EntityManager entitymanager = emfactory.createEntityManager( );
   entitymanager.getTransaction( ).begin( );
   //Create Department Entity
   Department department = new Department();
   department.setName("Development");
   //Store Department
   entitymanager.persist(department);
   //Create Employee Entity
   Employee employee = new Employee();
   employee.setEname("Satish");
   employee.setSalary(45000.0);
   employee.setDeg("Technical Writer");
   employee.setDepartment(department);
   //Store Employee
   entitymanager.persist(employee);
   entitymanager.getTransaction().commit();
   entitymanager.close();
   emfactory.close();
   }
}
编译和执行上述程序后,您将在Eclipse IDE的控制台面板中收到通知。 对于输出,请按如下方式检查MySQL工作台。 在上面的示例中,创建了两个表。
在MySQL界面中传递以下查询,并以表格格式显示department表的结果,如下所示:
Select * from department
Id	Name
301	Development
在MySQL界面中传递以下查询,并以表格格式显示employee表的结果,如下所示:
Select * from employee
Eid	Deg	                Ename	Salary	Department_id
302	Technical Writer	Satish	45000	301
@ManyToMany关系
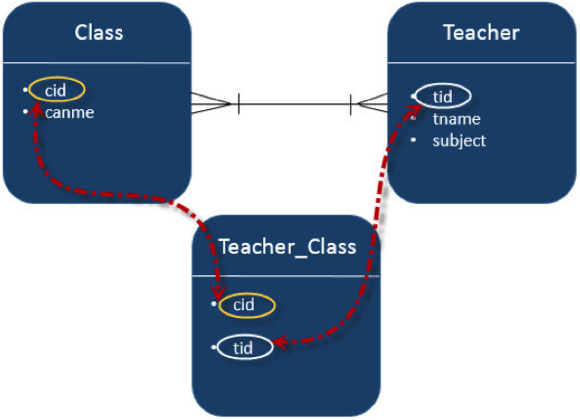
多对多关系是来自一个实体的一个或多个行与其他实体中的多个行相关联的位置。
让我们考虑一下Class和Teacher实体之间关系的一个例子。 以双向方式,class和教师都有多对一的关系。 这意味着Class的每个记录都由Teacher set(teacher id)引用,它应该是Teacher表中的主键并存储在Teacher_Class表中,反之亦然。 这里,Teachers_Class表包含两个外键字段。 在eclipse IDE中创建一个名为JPA_Eclipselink_MTM的JPA项目。 该项目的所有模块如下所示:
创建实体 (Creating Entities)
按照上面给出的图表来创建实体。 在'src'包下创建一个名为'com.tutorialspoin.eclipselink.entity' 'src'包。 在给定的包下创建一个名为Clas.java的类。 类Department实体如下所示:
package com.iowiki.eclipselink.entity;
import java.util.Set;
import javax.persistence.Entity;
import javax.persistence.GeneratedValue;
import javax.persistence.GenerationType;
import javax.persistence.Id;
import javax.persistence.ManyToMany;
@Entity
public class Clas {
   @Id
   @GeneratedValue( strategy = GenerationType.AUTO )
   private int cid;
   private String cname;
   @ManyToMany(targetEntity=Teacher.class)
   private Set teacherSet;
   public Clas(){
      super();
   }
   public Clas(int cid, String cname, Set teacherSet) {
      super();
      this.cid = cid;
      this.cname = cname;
      this.teacherSet = teacherSet;
   }
   public int getCid(){
      return cid;
   }
   public void setCid(int cid) {
      this.cid = cid;
   }
   public String getCname() {
      return cname;
   }
   public void setCname(String cname) {
      this.cname = cname;
   }
   public Set getTeacherSet() {
      return teacherSet;
   }
   public void setTeacherSet(Set teacherSet) {
      this.teacherSet = teacherSet;
   }
}
在此关系中创建第二个实体Teacher.java实体类,名为Teacher.java位于'com.iowiki.eclipselink.entity'包下。 Employee实体类如下所示:
package com.iowiki.eclipselink.entity;
import java.util.Set;
import javax.persistence.Entity;
import javax.persistence.GeneratedValue;
import javax.persistence.GenerationType;
import javax.persistence.Id;
import javax.persistence.ManyToMany;
@Entity
public class Teacher {
   @Id
   @GeneratedValue( strategy = GenerationType.AUTO )
   private int tid;
   private String tname;
   private String subject;
   @ManyToMany(targetEntity = Clas.class)
   private Set clasSet;
   public Teacher(){
      super();
   }
   public Teacher(int tid, String tname, String subject, Set clasSet) {
      super();
      this.tid = tid;
      this.tname = tname;
      this.subject = subject;
      this.clasSet = clasSet;
   }
   public int getTid() {
      return tid;
   }
   public void setTid(int tid) {
      this.tid = tid;
   }
   public String getTname() {
      return tname;
   }
   public void setTname(String tname) {
      this.tname = tname;
   }
   public String getSubject() {
      return subject;
   }
   public void setSubject(String subject) {
      this.subject = subject;
   }
   public Set getClasSet() {
      return clasSet;
   }
   public void setClasSet(Set clasSet) {
      this.clasSet = clasSet;
   }
}
Persistence.xml
Persistence.xml将由eclipse IDE在创建JPA项目时创建。 配置详细信息是用户规范。 persistence.xml文件如下所示:
<?xml version = "1.0" encoding = "UTF-8"?>
<persistence version = "2.0" xmlns = "http://java.sun.com/xml/ns/persistence"
   xmlns:xsi = "http://www.w3.org/2001/XMLSchema-instance"
   xsi:schemaLocation = "http://java.sun.com/xml/ns/persistence
   http://java.sun.com/xml/ns/persistence/persistence_2_0.xsd">
   <persistence-unit name = "Eclipselink_JPA" transaction-type = "RESOURCE_LOCAL">
      <class>com.iowiki.eclipselink.entity.Employee</class>
      <class>com.iowiki.eclipselink.entity.Department</class>
      <properties>
      <property name = "javax.persistence.jdbc.url" value = "jdbc:mysql://localhost:3306/jpadb"/>
      <property name = "javax.persistence.jdbc.user" value = "root"/>
      <property name = "javax.persistence.jdbc.password" value = "root"/>
      <property name = "javax.persistence.jdbc.driver" value = "com.mysql.jdbc.Driver"/>
      <property name = "eclipselink.logging.level" value = "FINE"/>
      <property name = "eclipselink.ddl-generation" value = "create-tables"/>
      </properties>
   </persistence-unit>
</persistence>
服务类
此模块包含服务类,它使用属性初始化实现关系部分。 在'src'包下创建一个名为'com.iowiki.eclipselink.service' 'src'包。 名为ManyToMany.java的DAO类是在给定包下创建的。 DAO类如下所示:
package com.iowiki.eclipselink.service;
import java.util.HashSet;
import java.util.Set;
import javax.persistence.EntityManager;
import javax.persistence.EntityManagerFactory;
import javax.persistence.Persistence;
import com.iowiki.eclipselink.entity.Clas;
import com.iowiki.eclipselink.entity.Teacher;
public class ManyToMany {
   public static void main(String[] args) {
   EntityManagerFactory emfactory = Persistence.createEntityManagerFactory( "Eclipselink_JPA" );
   EntityManager entitymanager = emfactory.createEntityManager( );
   entitymanager.getTransaction( ).begin( );
   //Create Clas Entity
   Clas clas1 = new Clas(0, "1st", null);
   Clas clas2 = new Clas(0, "2nd", null);
   Clas clas3 = new Clas(0, "3rd", null);
   //Store Clas
   entitymanager.persist(clas1);
   entitymanager.persist(clas2);
   entitymanager.persist(clas3);
   //Create Clas Set1
   Set<Clas> classSet1 = new HashSet();
   classSet1.add(clas1);
   classSet1.add(clas2);
   classSet1.add(clas3);
   //Create Clas Set2
   Set<Clas> classSet2 = new HashSet();
   classSet2.add(clas3);
   classSet2.add(clas1);
   classSet2.add(clas2);
   //Create Clas Set3
   Set<Clas> classSet3 = new HashSet();
   classSet3.add(clas2);
   classSet3.add(clas3);
   classSet3.add(clas1);
   //Create Teacher Entity
   Teacher teacher1 = new Teacher(0, "Satish","Java",classSet1);
   Teacher teacher2 = new Teacher(0, "Krishna","Adv Java",classSet2);
   Teacher teacher3 = new Teacher(0, "Masthanvali","DB2",classSet3);
   //Store Teacher
   entitymanager.persist(teacher1);
   entitymanager.persist(teacher2);
   entitymanager.persist(teacher3);
   entitymanager.getTransaction( ).commit( );
   entitymanager.close( );
   emfactory.close( );
   }
}
编译和执行上述程序后,您将在Eclipse IDE的控制台面板中收到通知。 对于输出,请按如下方式检查MySQL工作台。 在此示例项目中,创建了三个表。
在MySQL界面中传递以下查询,并以表格格式显示teacher_clas表的结果,如下所示。
Select * form teacher_clas;
Teacher _tid	Classet_cid
354	        351
355	        351
356	        351
354	        352
355	        352
356	        352
354	        353
355	        353
356	        353
在上表中,teacher_tid是来自teacher表的外键,classet_cid是来自类表的外键。 因此,不同的教师被分配到不同的class。
在MySQL界面中传递以下查询,表格格式的教师表结果如下所示:
Select * from teacher;
Tid	Subject	    Tname
354	Java	    Satish
355	Adv Java    Krishna
356	DB2         Masthanvali
在MySQL接口中传递以下查询,并以表格格式显示clas表的结果,如下所示:
Select * from clas;
cid	Cname
351	1st
352	2nd
353	3rd
