Relationships
Ember.js提供关系类型以指定模型彼此之间的关系。 有一些不同的关系类型,如一对一的关系可以与DS.hasMany一起使用, DS.hasMany关系可以与DS.hasMany一起使用DS.belongsTo和多对多关系可以使用DS.hasMany 。
语法 (Syntax)
import DS from 'ember-data';
export default DS.Model.extend ({
   var_name1: DS.belongsTo('model_name1'),
   var_name2: DS.hasMany('model_name2')
});
例子 (Example)
下面给出的示例显示了关系类型的使用。 使用以下命令创建名称帐户和staff的两个适配器 -
ember generate adapter adapter_name
现在打开app/adapters/account.js文件并添加以下代码 -
import ApplicationAdapter from './application';
//created an "account" array to store relationship data
const account = {
   "data": {
      "type": "account",
      "id": "100",
      "relationships": {
         "secondVal": {
            "data": {
               "type": "staff",
               "id": "2"
            }
         },
         "firstVal": {
            "data": {
               "type": "staff",
               "id": "1"
            }
         }
      }
   }
};
export default ApplicationAdapter.extend ({
   //this method fetches data from 'staff' adapter
   findRecord() {
      //returns the data from array
      return account;
   }
});
打开app/adapters/staff.js文件并添加以下代码 -
import ApplicationAdapter from './application';
import Ember from 'ember';
//values given for type and id
const relval1 = {
   data: {
      type: "staff",
      id: "1",
      attributes: {
         name: 'JavaScript'
      }
   }
};
const relval2 = {
   data: {
      type: "staff",
      id: "2",
      attributes: {
         name: 'jQuery'
      }
   }
};
//the variable 'relval3' pushes the data to 'relval1' and 'relval2'
const relval3 = Ember.A();
relval3.pushObject(relval1);
relval3.pushObject(relval2);
export default ApplicationAdapter.extend ({
   findRecord(store, type, id) {
      //finds the item id and returns to 'relval3' variable
      let valret = relval3.find(function (item) {
         return id === Ember.get(item, 'data.id');
      });
      //the searched item will passed to 'relval3' from 'valret' variable
      return valret;
   }
});
使用名称帐户和staff创建两个模型。 打开app/models/account.js文件并包含以下代码 -
import DS from 'ember-data';
import Model from "ember-data/model";
import attr from "ember-data/attr";
//defines one-to-one and one-to-many relationship between models
import { belongsTo, hasMany } from "ember-data/relationships";
export default DS.Model.extend({
   //when async is 'true', it will fetch related entries
   firstVal: belongsTo('staff', {async: true}),
   secondVal: belongsTo('staff', {async: true})
});
现在打开app/models/staff.js文件并包含以下代码 -
import DS from 'ember-data';
import Model from "ember-data/model";
import attr from "ember-data/attr";
import { belongsTo, hasMany } from "ember-data/relationships";
export default DS.Model.extend ({
   //specifying attributes using 'attr()' method
   name: attr()
});
接下来,创建一个路由并将其命名为application.js 。 打开此文件,该文件在app/routes/下创建,并添加以下代码 -
import Ember from 'ember';
export default Ember.Route.extend ({
   model(){
      //returns the value of model() hook
      return this.get('store').findRecord('account', 100);  //retrieve a record for specific id
   }
});
使用以下命令创建名为application的序列化程序 -
ember generate serializer serializer_name
打开app/serializers/application.js文件并添加以下代码 -
import DS from 'ember-data';
//it is the default serializer and works with JSON API backends
export default DS.JSONAPISerializer.extend ({
   //keyForRelationship() method overwrites the naming conventions
   keyForRelationship: function(key, relationship, method) {
      return Ember.String.camelize(key);  //returns the lowerCamelCase form of a string
   }
});
使用以下代码打开在app/templates /下创建的application.hbs文件 -
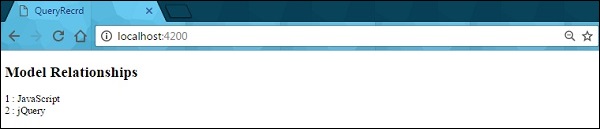
<h2>Model Relationships</h2>
//display the id along with the name
{{model.firstVal.id}} : {{model.firstVal.name}}
<br>
{{model.secondVal.id}} : {{model.secondVal.name}}
{{outlet}}
输出 (Output)
运行ember服务器; 你会收到以下输出 -