AngularJS - 快速指南
AngularJS - Overview
什么是AngularJS?
AngularJS是一个开源Web应用程序框架。 它最初由Misko Hevery和Adam Abrons于2009年开发。 它现在由谷歌维护。 它的最新版本是1.4.3。
AngularJS的定义如其official documentation所示 - 如下 -
AngularJS是动态Web应用程序的结构框架。 它允许您使用HTML作为模板语言,并允许您扩展HTML的语法,以清晰简洁地表达您的应用程序的组件。 Angular的数据绑定和依赖注入消除了您当前必须编写的大部分代码。 这一切都发生在浏览器中,使其成为任何服务器技术的理想合作伙伴。
特点 (Features)
AngularJS是一个功能强大的基于JavaScript的开发框架,用于创建RICH Internet Application(RIA)。
AngularJS为开发人员提供了以干净的MVC(模型视图控制器)方式编写客户端应用程序(使用JavaScript)的选项。
用AngularJS编写的应用程序是跨浏览器兼容的。 AngularJS自动处理适合每个浏览器的JavaScript代码。
AngularJS是开源的,完全免费,并被全球数千名开发人员使用。 它是根据Apache许可证2.0版许可的。
总的来说,AngularJS是一个构建大规模和高性能Web应用程序的框架,同时使它们易于维护。
核心功能
以下是AngularJS最重要的核心功能 -
Data-binding - 它是模型和视图组件之间数据的自动同步。
Scope - 这些是引用模型的对象。 它们充当控制器和视图之间的粘合剂。
Controller - 这些是绑定到特定范围的JavaScript函数。
Services - AngularJS带有几个内置服务,例如$ https:来创建XMLHttpRequests。 这些是在app中仅实例化一次的单例对象。
Filters - 这些Filters从数组中选择项的子集并返回一个新数组。
Directives - 指令是DOM元素的标记(例如元素,属性,css等)。 这些可用于创建自定义HTML标记,用作新的自定义窗口小部件。 AngularJS有内置指令(ngBind,ngModel ......)
Templates - 这些是包含来自控制器和模型的信息的渲染视图。 这些可以是单个文件(如index.html)或使用“partials”在一个页面中的多个视图。
Routing - 这是切换视图的概念。
Model View Whatever - MVC是一种将应用程序划分为不同部分(称为模型,视图和控制器)的设计模式,每个部分都有不同的职责。 AngularJS没有实现传统意义上的MVC,而是更接近MVVM(Model-View-ViewModel)。 Angular JS团队将它幽默地称为Model View Whatever。
Deep Linking - 深层链接允许您对URL中的应用程序状态进行编码,以便对其进行书签。 然后,可以将应用程序从URL还原到相同的状态。
Dependency Injection - AngularJS具有内置的依赖注入子系统,通过使应用程序更易于开发,理解和测试来帮助开发人员。
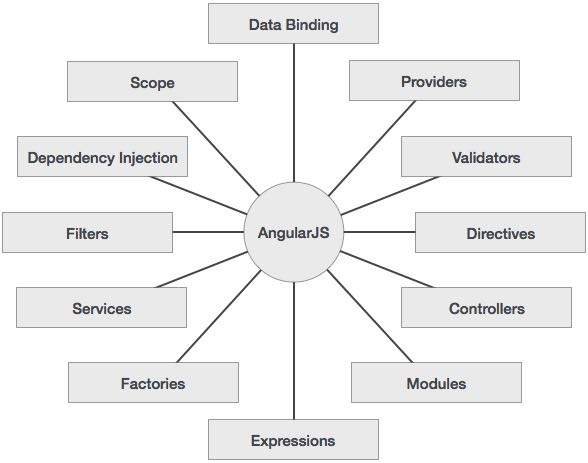
概念 (Concepts)
下图描绘了AngularJS的一些重要部分,我们将在后续章节中详细讨论。
AngularJS的优点
AngularJS提供了以非常干净和可维护的方式创建单页应用程序的功能。
AngularJS为HTML提供数据绑定功能,从而为用户提供丰富的响应体验
AngularJS代码是可单元测试的。
AngularJS使用依赖注入并利用关注点分离。
AngularJS提供可重用的组件。
使用AngularJS,开发人员可以编写更少的代码并获得更多功能。
在AngularJS中,视图是纯html页面,用JavaScript编写的控制器进行业务处理。
除此之外,AngularJS应用程序可以在所有主流浏览器和智能手机上运行,包括基于Android和iOS的手机/平板电脑。
AngularJS的缺点
虽然AngularJS有很多加分,但同时我们应该考虑以下几点 -
不安全 - 仅限JavaScript框架,用AngularJS编写的应用程序并不安全。 服务器端身份验证和授权必须保证应用程序的安全。
Not degradable - 如果您的应用程序用户禁用JavaScript,那么用户只会看到基本页面而已。
AngularJS组件
AngularJS框架可分为以下三个主要部分 -
ng-app - 该指令定义AngularJS应用程序并将其链接到HTML。
ng-model - 该指令将AngularJS应用程序数据的值绑定到HTML输入控件。
ng-bind - 该指令将AngularJS Application数据绑定到HTML标记。
AngularJS - Environment Setup
在本章中,我们将讨论如何设置AngularJS库以用于Web应用程序开发。 我们还将简要研究目录结构及其内容。
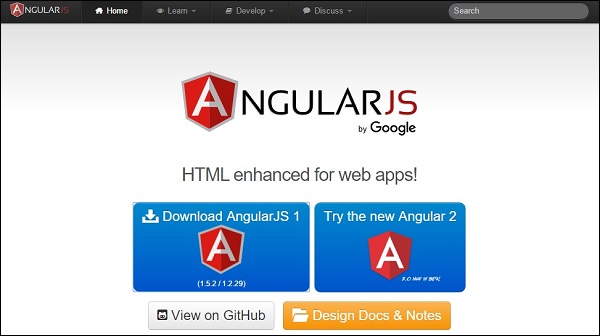
当您打开链接https://angularjs.org/ ,您会看到有两个选项可供下载AngularJS库 -
View on GitHub - 单击此按钮转到GitHub并获取所有最新脚本。
Download AngularJS 1 - 或点击此按钮,将显示如下屏幕 -
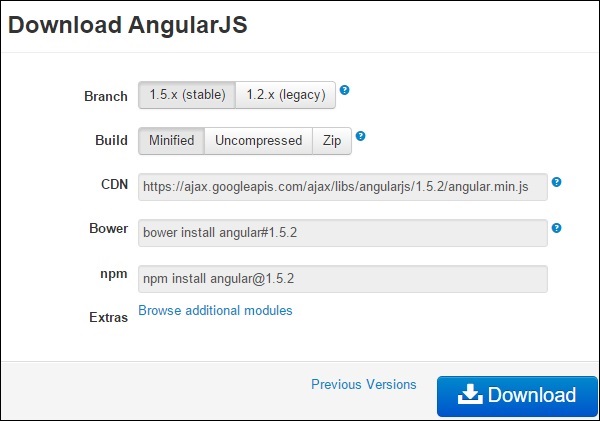
此屏幕提供了使用Angular JS的各种选项,如下所示 -
Downloading and hosting files locally
legacy和latest有两种不同的选择。 名称本身是自我描述性的。 legacy版本低于1.2.x, latest版本为1.5.x。
我们也可以使用缩小版,未压缩版或压缩版。
CDN access - 您还可以访问CDN。 CDN将让您访问世界各地的区域数据中心,在这种情况下,Google主机。 这意味着使用CDN将托管文件的责任从您自己的服务器转移到一系列外部服务器。 这也提供了一个优势,如果您的网页访问者已经从同一CDN下载了AngularJS的副本,则无需重新下载。
Try the new angularJS 2 - 点击这个按钮下载Angular JS beta 2版本。这个版本非常快,移动支持和灵活性比较传统和最新的AngularJS 1
我们在本教程中使用了库的CDN版本。
例子 (Example)
现在让我们使用AngularJS库编写一个简单的示例。 让我们创建一个HTML文件myfirstexample.html如下 -
<!doctype html>
<html>
   <head>
      <script src = "https://ajax.googleapis.com/ajax/libs/angularjs/1.5.2/angular.min.js"></script>
   </head>
   <body ng-app = "myapp">
      <div ng-controller = "HelloController" >
         <h2>Welcome {{helloTo.title}} to the world of IoWiki!</h2>
      </div>
      <script>
         angular.module("myapp", [])
         .controller("HelloController", function($scope) {
            $scope.helloTo = {};
            $scope.helloTo.title = "AngularJS";
         });
      </script>
   </body>
</html>
以下部分详细描述了上述代码 -
包括AngularJS
我们在HTML页面中包含了AngularJS JavaScript文件,因此我们可以使用AngularJS -
<head>
   <script src = "https://ajax.googleapis.com/ajax/libs/angularjs/1.4.8/angular.min.js"></script>
</head>
如果要更新到最新版本的Angular JS,请使用以下脚本源,或者在其官方网站上查看最新版本的AngularJS。
<head>
   <script src = "https://ajax.googleapis.com/ajax/libs/angularjs/1.5.2/angular.min.js"></script>
</head>
指向AngularJS应用程序
接下来我们告诉HTML的哪一部分包含AngularJS应用程序。 这是通过将ng-app属性添加到AngularJS应用程序的根HTML元素来完成的。 您可以将其添加到html元素或body元素,如下所示 -
<body ng-app = "myapp">
</body>
View
视图是这部分 -
<div ng-controller = "HelloController" >
   <h2>Welcome {{helloTo.title}} to the world of IoWiki!</h2>
</div>
ng-controller告诉AngularJS该视图使用什么控制器。 helloTo.title告诉AngularJS将名为helloTo.title的“模型”值写入此位置的HTML。
控制器 (Controller)
控制器部分是 -
<script>
   angular.module("myapp", [])
   .controller("HelloController", function($scope) {
      $scope.helloTo = {};
      $scope.helloTo.title = "AngularJS";
   });
</script>
此代码在名为myapp的角度模块中注册名为HelloController的控制器函数。 我们将在各自的章节中更多地了解modules和controllers 。 控制器功能通过angular.module(...)。controller(...)函数调用以角度注册。
传递给控制器函数的$ scope参数是model 。 控制器函数添加一个helloTo JavaScript对象,并在该对象中添加一个title字段。
Execution
将上述代码保存为myfirstexample.html并在任何浏览器中打开它。 您将看到如下输出 -
Welcome AngularJS to the world of IoWiki!
当页面在浏览器中加载时,会发生以下事情 -
HTML文档被加载到浏览器中,并由浏览器进行评估。 加载AngularJS JavaScript文件,创建角度global对象。 接下来,执行注册控制器功能的JavaScript。
接下来,AngularJS扫描HTML以查找AngularJS应用程序和视图。 找到视图后,它会将该视图连接到相应的控制器功能。
接下来,AngularJS执行控制器功能。 然后,它使用控制器填充的模型中的数据呈现视图。 该页面现已准备就绪。
AngularJS - MVC Architecture
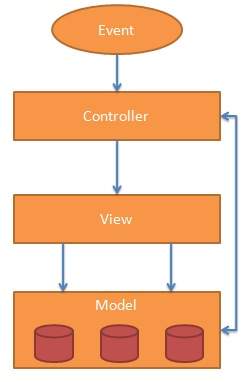
M称为M odel V iew C ontroller或MVC,是用于开发Web应用程序的软件设计模式。 模型视图控制器模式由以下三个部分组成 -
Model - 它是负责维护数据的模式的最低级别。
View - 它负责向用户显示全部或部分数据。
Controller - 它是一个控制模型和视图之间交互的软件代码。
MVC很受欢迎,因为它将应用程序逻辑与用户界面层隔离开来,并支持关注点的分离。 控制器接收对应用程序的所有请求,然后使用该模型准备视图所需的任何数据。 然后,视图使用控制器准备的数据生成最终的可呈现响应。 MVC抽象可以用图形表示如下。
该模型
该模型负责管理应用程序数据。 它响应来自视图的请求和来自控制器的指令以更新自身。
风景
由控制器决定呈现数据触发的特定格式的数据表示。 它们是基于脚本的模板系统,如JSP,ASP,PHP,非常容易与AJAX技术集成。
控制器
控制器响应用户输入并对数据模型对象执行交互。 控制器接收输入,验证它,然后执行修改数据模型状态的业务操作。
AngularJS是一个基于MVC的框架。 在接下来的章节中,我们将看到AngularJS如何使用MVC方法。
AngularJS - First Application
在我们开始使用AngularJS创建实际的HelloWorld应用程序之前,让我们看看AngularJS应用程序的实际部分是什么。 AngularJS应用程序包含以下三个重要部分 -
ng-app - 该指令定义AngularJS应用程序并将其链接到HTML。
ng-model - 该指令将AngularJS应用程序数据的值绑定到HTML输入控件。
ng-bind - 该指令将AngularJS Application数据绑定到HTML标记。
创建AngularJS应用程序的步骤
第1步:加载框架
作为纯JavaScript框架,可以使用
<script src = "https://ajax.googleapis.com/ajax/libs/angularjs/1.3.14/angular.min.js">
</script>
第2步:使用ng-app指令定义AngularJS应用程序
<div ng-app = "">
   ...
</div>
第3步:使用ng-model指令定义模型名称
<p>Enter your Name: <input type = "text" ng-model = "name"></p>
步骤4:绑定使用ng-bind指令定义的上述模型的值。
<p>Hello <span ng-bind = "name"></span>!</p>
运行AngularJS Application的步骤
在HTML页面中使用上述三个步骤。
testAngularJS.htm
<html>
   <head>
      <title>AngularJS First Application</title>
   </head>
   <body>
      <h1>Sample Application</h1>
      <div ng-app = "">
         <p>Enter your Name: <input type = "text" ng-model = "name"></p>
         <p>Hello <span ng-bind = "name"></span>!</p>
      </div>
      <script src = "https://ajax.googleapis.com/ajax/libs/angularjs/1.3.14/angular.min.js">
      </script>
   </body>
</html>
输出 (Output)
在Web浏览器中打开textAngularJS.htm。 输入您的姓名并查看结果。
新页面打开AngularJS如何与HTML集成
ng-app指令指示AngularJS应用程序的开始。
然后,ng-model指令创建一个名为“name”的模型变量,该变量可以与html页面一起使用,也可以在具有ng-app指令的div中使用。
每当用户在文本框中输入内容时,ng-bind就会使用名称模型显示在html span标记中。
关闭 div>标记表示AngularJS应用程序的结束。
AngularJS - Directives
AngularJS指令用于扩展HTML。 这些是以ng-前缀开头的特殊属性。 我们将讨论以下指令 -
ng-app - 该指令启动AngularJS应用程序。
ng-init - 该指令初始化应用程序数据。
ng-model - 该指令将AngularJS应用程序数据的值绑定到HTML输入控件。
ng-repeat - 该指令为集合中的每个项重复html元素。
ng-app directive
ng-app指令启动AngularJS应用程序。 它定义了根元素。 当加载包含AngularJS Application的网页时,它会自动初始化或引导应用程序。 它还用于在AngularJS Application中加载各种AngularJS模块。 在下面的示例中,我们使用div元素的ng-app属性定义了一个默认的AngularJS应用程序。
<div ng-app = "">
   ...
</div>
ng-init directive
ng-init指令初始化AngularJS应用程序数据。 它用于将值放入要在应用程序中使用的变量。 在下面的示例中,我们将初始化一组国家/地区。 我们使用JSON语法来定义国家/地区的数组。
<div ng-app = "" ng-init = "countries = [{locale:'en-US',name:'United States'},
   {locale:'en-GB',name:'United Kingdom'}, {locale:'en-FR',name:'France'}]">
   ...
</div>
ng-model directive
该指令将AngularJS应用程序数据的值绑定到HTML输入控件。 在下面的示例中,我们定义了一个名为“name”的模型。
<div ng-app = "">
   ...
   <p>Enter your Name: <input type = "text" ng-model = "name"></p>
</div>
ng-repeat directive
ng-repeat指令为集合中的每个项重复html元素。 在下面的示例中,我们迭代了一系列国家/地区。
<div ng-app = "">
   ...
   <p>List of Countries with locale:</p>
   <ol>
      <li ng-repeat = "country in countries">
         {{ 'Country: ' + country.name + ', Locale: ' + country.locale }}
      </li>
   </ol>
</div>
例子 (Example)
以下示例将展示上述所有指令。
testAngularJS.htm
<html>
   <head>
      <title>AngularJS Directives</title>
   </head>
   <body>
      <h1>Sample Application</h1>
      <div ng-app = "" ng-init = "countries = [{locale:'en-US',name:'United States'},
         {locale:'en-GB',name:'United Kingdom'}, {locale:'en-FR',name:'France'}]">
         <p>Enter your Name: <input type = "text" ng-model = "name"></p>
         <p>Hello <span ng-bind = "name"></span>!</p>
         <p>List of Countries with locale:</p>
         <ol>
            <li ng-repeat = "country in countries">
               {{ 'Country: ' + country.name + ', Locale: ' + country.locale }}
            </li>
         </ol>
      </div>
      <script src = "https://ajax.googleapis.com/ajax/libs/angularjs/1.3.14/angular.min.js">
      </script>
   </body>
</html>
输出 (Output)
在Web浏览器中打开textAngularJS.htm。 输入您的姓名并查看结果。
新页面打开AngularJS - Expressions
表达式用于将应用程序数据绑定到html。 表达式写在{{expression}}之类的双括号内。 表达式的行为与ng-bind指令的行为相同。 AngularJS应用程序表达式是纯javascript表达式,并输出使用它们的数据。
使用数字
<p>Expense on Books : {{cost * quantity}} Rs</p>
使用字符串
<p>Hello {{student.firstname + " " + student.lastname}}!</p>
使用对象
<p>Roll No: {{student.rollno}}</p>
使用数组
<p>Marks(Math): {{marks[3]}}</p>
例子 (Example)
以下示例将展示上述所有表达式。
testAngularJS.htm
<html>
   <head>
      <title>AngularJS Expressions</title>
   </head>
   <body>
      <h1>Sample Application</h1>
      <div ng-app = "" ng-init = "quantity = 1;cost = 30;
         student = {firstname:'Mahesh',lastname:'Parashar',rollno:101};
         marks = [80,90,75,73,60]">
         <p>Hello {{student.firstname + " " + student.lastname}}!</p>
         <p>Expense on Books : {{cost * quantity}} Rs</p>
         <p>Roll No: {{student.rollno}}</p>
         <p>Marks(Math): {{marks[3]}}</p>
      </div>
      <script src = "https://ajax.googleapis.com/ajax/libs/angularjs/1.3.14/angular.min.js">
      </script>
   </body>
</html>
输出 (Output)
在Web浏览器中打开textAngularJS.htm。 看到结果。
新页面打开AngularJS - Controllers
AngularJS应用程序主要依靠控制器来控制应用程序中的数据流。 使用ng-controller指令定义控制器。 控制器是包含属性/属性和函数的JavaScript对象。 每个控制器接受$ scope作为参数,该参数指控制器要控制的应用程序/模块。
<div ng-app = "" ng-controller = "studentController">
   ...
</div>
这里我们使用ng-controller指令声明了一个控制器studentController 。 作为下一步,我们将如下定义studentController -
<script>
   function studentController($scope) {
      $scope.student = {
         firstName: "Mahesh",
         lastName: "Parashar",
         fullName: function() {
            var studentObject;
            studentObject = $scope.student;
            return studentObject.firstName + " " + studentObject.lastName;
         }
      };
   }
</script>
studentController被定义为一个JavaScript对象,其中$ scope作为参数。
$ scope指的是使用studentController对象的应用程序。
$ scope.student是studentController对象的属性。
firstName和lastName是$ scope.student对象的两个属性。 我们已经将默认值传递给它们。
fullName是$ scope.student对象的函数,其任务是返回组合名称。
在fullName函数中,我们获取学生对象,然后返回组合名称。
作为注释,我们还可以在单独的JS文件中定义控制器对象,并在html页面中引用该文件。
现在我们可以使用ng-model或使用表达式来使用studentController的学生属性,如下所示。
Enter first name: <input type = "text" ng-model = "student.firstName"><br>
Enter last name: <input type = "text" ng-model = "student.lastName"><br>
<br>
You are entering: {{student.fullName()}}
我们将student.firstName和student.lastname绑定到两个输入框。
我们将student.fullName()绑定到HTML。
现在,无论何时在名字和姓氏输入框中输入任何内容,您都可以看到全名自动更新。
例子 (Example)
以下示例将展示控制器的使用。
testAngularJS.htm
<html>
   <head>
      <title>Angular JS Controller</title>
      <script src = "https://ajax.googleapis.com/ajax/libs/angularjs/1.3.14/angular.min.js">
      </script>
   </head>
   <body>
      <h2>AngularJS Sample Application</h2>
      <div ng-app = "mainApp" ng-controller = "studentController">
         Enter first name: <input type = "text" ng-model = "student.firstName"><br>
         <br>
         Enter last name: <input type = "text" ng-model = "student.lastName"><br>
         <br>
         You are entering: {{student.fullName()}}
      </div>
      <script>
         var mainApp = angular.module("mainApp", []);
         mainApp.controller('studentController', function($scope) {
            $scope.student = {
               firstName: "Mahesh",
               lastName: "Parashar",
               fullName: function() {
                  var studentObject;
                  studentObject = $scope.student;
                  return studentObject.firstName + " " + studentObject.lastName;
               }
            };
         });
      </script>
   </body>
</html>
输出 (Output)
在Web浏览器中打开textAngularJS.htm。 看到结果。
新页面打开AngularJS - Filters
过滤器用于更改修改数据,可以使用管道字符在表达式或指令中进行分组。 以下是常用过滤器列表。
| Sr.No. | 名称和描述 |
|---|---|
| 1 | uppercase 将文本转换为大写文本。 |
| 2 | lowercase 将文本转换为小写文本。 |
| 3 | currency 格式化货币格式的文本。 |
| 4 | filter 根据提供的条件将数组过滤为其子集。 |
| 5 | orderby 根据提供的标准对数组进行排序。 |
大写过滤器
使用管道符添加大写过滤器到表达式。 在这里,我们添加了大写过滤器,以所有大写字母打印学生姓名。
Enter first name:<input type = "text" ng-model = "student.firstName">
Enter last name: <input type = "text" ng-model = "student.lastName">
Name in Upper Case: {{student.fullName() | uppercase}}
小写过滤器
使用管道字符将小写过滤器添加到表达式。 在这里,我们添加了小写过滤器,以全小写字母打印学生姓名。
Enter first name:<input type = "text" ng-model = "student.firstName">
Enter last name: <input type = "text" ng-model = "student.lastName">
Name in Lower Case: {{student.fullName() | lowercase}}
货币过滤器
使用管道符添加货币过滤器到表达式返回数字。 在这里,我们添加了货币过滤器以使用货币格式打印费用。
Enter fees: <input type = "text" ng-model = "student.fees">
fees: {{student.fees | currency}}
过滤器
为了只显示所需的主题,我们使用subjectName作为过滤器。
Enter subject: <input type = "text" ng-model = "subjectName">
Subject:
<ul>
   <li ng-repeat = "subject in student.subjects | filter: subjectName">
      {{ subject.name + ', marks:' + subject.marks }}
   </li>
</ul>
orderby过滤器
为了按标记订购主题,我们使用了orderBy标记。
Subject:
<ul>
   <li ng-repeat = "subject in student.subjects | orderBy:'marks'">
      {{ subject.name + ', marks:' + subject.marks }}
   </li>
</ul>
例子 (Example)
以下示例将展示上述所有过滤器。
testAngularJS.htm
<html>
   <head>
      <title>Angular JS Filters</title>
      <script src = "https://ajax.googleapis.com/ajax/libs/angularjs/1.3.14/angular.min.js">
      </script>
   </head>
   <body>
      <h2>AngularJS Sample Application</h2>
      <div ng-app = "mainApp" ng-controller = "studentController">
         <table border = "0">
            <tr>
               <td>Enter first name:</td>
               <td><input type = "text" ng-model = "student.firstName"></td>
            </tr>
            <tr>
               <td>Enter last name: </td>
               <td><input type = "text" ng-model = "student.lastName"></td>
            </tr>
            <tr>
               <td>Enter fees: </td>
               <td><input type = "text" ng-model = "student.fees"></td>
            </tr>
            <tr>
               <td>Enter subject: </td>
               <td><input type = "text" ng-model = "subjectName"></td>
            </tr>
         </table>
         <br/>
         <table border = "0">
            <tr>
               <td>Name in Upper Case: </td><td>{{student.fullName() | uppercase}}</td>
            </tr>
            <tr>
               <td>Name in Lower Case: </td><td>{{student.fullName() | lowercase}}</td>
            </tr>
            <tr>
               <td>fees: </td><td>{{student.fees | currency}}
               </td>
            </tr>
            <tr>
               <td>Subject:</td>
               <td>
                  <ul>
                     <li ng-repeat = "subject in student.subjects | filter: subjectName |orderBy:'marks'">
                        {{ subject.name + ', marks:' + subject.marks }}
                     </li>
                  </ul>
               </td>
            </tr>
         </table>
      </div>
      <script>
         var mainApp = angular.module("mainApp", []);
         mainApp.controller('studentController', function($scope) {
            $scope.student = {
               firstName: "Mahesh",
               lastName: "Parashar",
               fees:500,
               subjects:[
                  {name:'Physics',marks:70},
                  {name:'Chemistry',marks:80},
                  {name:'Math',marks:65}
               ],
               fullName: function() {
                  var studentObject;
                  studentObject = $scope.student;
                  return studentObject.firstName + " " + studentObject.lastName;
               }
            };
         });
      </script>
   </body>
</html>
输出 (Output)
在Web浏览器中打开textAngularJS.htm。 看到结果。
新页面打开AngularJS - Tables
表数据通常是可重复的。 ng-repeat指令可用于轻松绘制表格。 以下示例说明使用ng-repeat指令绘制表格。
<table>
   <tr>
      <th>Name</th>
      <th>Marks</th>
   </tr>
   <tr ng-repeat = "subject in student.subjects">
      <td>{{ subject.name }}</td>
      <td>{{ subject.marks }}</td>
   </tr>
</table>
可以使用CSS样式设置表格样式。
<style>
   table, th , td {
      border: 1px solid grey;
      border-collapse: collapse;
      padding: 5px;
   }
   table tr:nth-child(odd) {
      background-color: #f2f2f2;
   }
   table tr:nth-child(even) {
      background-color: #ffffff;
   }
</style>
例子 (Example)
以下示例将展示上述所有指令。
testAngularJS.htm
<html>
   <head>
      <title>Angular JS Table</title>
      <script src = "https://ajax.googleapis.com/ajax/libs/angularjs/1.3.14/angular.min.js"></script>
      <style>
         table, th , td {
            border: 1px solid grey;
            border-collapse: collapse;
            padding: 5px;
         }
         table tr:nth-child(odd) {
            background-color: #f2f2f2;
         }
         table tr:nth-child(even) {
            background-color: #ffffff;
         }
      </style>
   </head>
   <body>
      <h2>AngularJS Sample Application</h2>
      <div ng-app = "mainApp" ng-controller = "studentController">
         <table border = "0">
            <tr>
               <td>Enter first name:</td>
               <td><input type = "text" ng-model = "student.firstName"></td>
            </tr>
            <tr>
               <td>Enter last name: </td>
               <td>
                  <input type = "text" ng-model = "student.lastName">
               </td>
            </tr>
            <tr>
               <td>Name: </td>
               <td>{{student.fullName()}}</td>
            </tr>
            <tr>
               <td>Subject:</td>
               <td>
                  <table>
                     <tr>
                        <th>Name</th>.
                        <th>Marks</th>
                     </tr>
                     <tr ng-repeat = "subject in student.subjects">
                        <td>{{ subject.name }}</td>
                        <td>{{ subject.marks }}</td>
                     </tr>
                  </table>
               </td>
            </tr>
         </table>
      </div>
      <script>
         var mainApp = angular.module("mainApp", []);
         mainApp.controller('studentController', function($scope) {
            $scope.student = {
               firstName: "Mahesh",
               lastName: "Parashar",
               fees:500,
               subjects:[
                  {name:'Physics',marks:70},
                  {name:'Chemistry',marks:80},
                  {name:'Math',marks:65},
                  {name:'English',marks:75},
                  {name:'Hindi',marks:67}
               ],
               fullName: function() {
                  var studentObject;
                  studentObject = $scope.student;
                  return studentObject.firstName + " " + studentObject.lastName;
               }
            };
         });
      </script>
   </body>
</html>
输出 (Output)
在Web浏览器中打开textAngularJS.htm。 看到结果。
新页面打开AngularJS - HTML DOM
以下指令可用于将应用程序数据绑定到HTML DOM元素的属性。
| Sr.No. | 名称和描述 |
|---|---|
| 1 | ng-disabled 禁用给定的控件。 |
| 2 | ng-show 显示给定的控件。 |
| 3 | ng-hide 隐藏一个给定的控件。 |
| 4 | ng-click 表示AngularJS单击事件。 |
ng-disabled指令
将ng-disabled属性添加到HTML按钮并将其传递给模型。 将模型绑定到复选框并查看变体。
<input type = "checkbox" ng-model = "enableDisableButton">Disable Button
<button ng-disabled = "enableDisableButton">Click Me!</button>
ng-show指令
将ng-show属性添加到HTML按钮并将其传递给模型。 将模型绑定到复选框并查看变体。
<input type = "checkbox" ng-model = "showHide1">Show Button
<button ng-show = "showHide1">Click Me!</button>
ng-hide指令
将ng-hide属性添加到HTML按钮并将其传递给模型。 将模型绑定到复选框并查看变体。
<input type = "checkbox" ng-model = "showHide2">Hide Button
<button ng-hide = "showHide2">Click Me!</button>
ng-click指令
将ng-click属性添加到HTML按钮并更新模型。 将模型绑定到html并查看变体。
<p>Total click: {{ clickCounter }}</p>
<button ng-click = "clickCounter = clickCounter + 1">Click Me!</button>
例子 (Example)
以下示例将展示上述所有指令。
testAngularJS.htm
<html>
   <head>
      <title>AngularJS HTML DOM</title>
   </head>
   <body>
      <h2>AngularJS Sample Application</h2>
      <div ng-app = "">
         <table border = "0">
            <tr>
               <td><input type = "checkbox" ng-model = "enableDisableButton">Disable Button</td>
               <td><button ng-disabled = "enableDisableButton">Click Me!</button></td>
            </tr>
            <tr>
               <td><input type = "checkbox" ng-model = "showHide1">Show Button</td>
               <td><button ng-show = "showHide1">Click Me!</button></td>
            </tr>
            <tr>
               <td><input type = "checkbox" ng-model = "showHide2">Hide Button</td>
               <td><button ng-hide = "showHide2">Click Me!</button></td>
            </tr>
            <tr>
               <td><p>Total click: {{ clickCounter }}</p></td>
               <td><button ng-click = "clickCounter = clickCounter + 1">Click Me!</button></td>
            </tr>
         </table>
      </div>
      <script src = "https://ajax.googleapis.com/ajax/libs/angularjs/1.3.14/angular.min.js">
      </script>
   </body>
</html>
输出 (Output)
在Web浏览器中打开textAngularJS.htm。 看到结果。
新页面打开AngularJS - Modules
AngularJS支持模块化方法。 模块用于分离逻辑,例如服务,控制器,应用程序等,并保持代码清洁。 我们在单独的js文件中定义模块,并根据module.js文件命名它们。 在这个例子中,我们将创建两个模块。
Application Module - 用于使用控制器初始化应用程序。
Controller Module - 用于定义控制器。
应用模块
mainApp.js
var mainApp = angular.module("mainApp", []);
这里我们使用angular.module函数声明了一个应用程序mainApp模块。 我们已经传递了一个空数组。 该数组通常包含依赖模块。
控制器模块
studentController.js
mainApp.controller("studentController", function($scope) {
   $scope.student = {
      firstName: "Mahesh",
      lastName: "Parashar",
      fees:500,
      subjects:[
         {name:'Physics',marks:70},
         {name:'Chemistry',marks:80},
         {name:'Math',marks:65},
         {name:'English',marks:75},
         {name:'Hindi',marks:67}
      ],
      fullName: function() {
         var studentObject;
         studentObject = $scope.student;
         return studentObject.firstName + " " + studentObject.lastName;
      }
   };
});
这里我们使用mainApp.controller函数声明了一个控制器studentController模块。
使用模块
<div ng-app = "mainApp" ng-controller = "studentController">
   ...
   <script src = "mainApp.js"></script>
   <script src = "studentController.js"></script>
</div>
这里我们使用了使用ng-app指令的应用程序模块和使用ng-controller指令的控制器。 我们在主html页面中导入了mainApp.js和studentController.js。
例子 (Example)
以下示例将展示所有上述模块。
testAngularJS.htm
<html>
   <head>
      <title>Angular JS Modules</title>
      <script src = "https://ajax.googleapis.com/ajax/libs/angularjs/1.3.14/angular.min.js"></script>
      <script src = "/angularjs/src/module/mainApp.js"></script>
      <script src = "/angularjs/src/module/studentController.js"></script>
      <style>
         table, th , td {
            border: 1px solid grey;
            border-collapse: collapse;
            padding: 5px;
         }
         table tr:nth-child(odd) {
            background-color: #f2f2f2;
         }
         table tr:nth-child(even) {
            background-color: #ffffff;
         }
      </style>
   </head>
   <body>
      <h2>AngularJS Sample Application</h2>
      <div ng-app = "mainApp" ng-controller = "studentController">
         <table border = "0">
            <tr>
               <td>Enter first name:</td>
               <td><input type = "text" ng-model = "student.firstName"></td>
            </tr>
            <tr>
               <td>Enter last name: </td>
               <td><input type = "text" ng-model = "student.lastName"></td>
            </tr>
            <tr>
               <td>Name: </td>
               <td>{{student.fullName()}}</td>
            </tr>
            <tr>
               <td>Subject:</td>
               <td>
                  <table>
                     <tr>
                        <th>Name</th>
                        <th>Marks</th>
                     </tr>
                     <tr ng-repeat = "subject in student.subjects">
                        <td>{{ subject.name }}</td>
                        <td>{{ subject.marks }}</td>
                     </tr>
                  </table>
               </td>
            </tr>
         </table>
      </div>
   </body>
</html>
mainApp.js
var mainApp = angular.module("mainApp", []);
studentController.js
mainApp.controller("studentController", function($scope) {
   $scope.student = {
      firstName: "Mahesh",
      lastName: "Parashar",
      fees:500,
      subjects:[
         {name:'Physics',marks:70},
         {name:'Chemistry',marks:80},
         {name:'Math',marks:65},
         {name:'English',marks:75},
         {name:'Hindi',marks:67}
      ],
      fullName: function() {
         var studentObject;
         studentObject = $scope.student;
         return studentObject.firstName + " " + studentObject.lastName;
      }
   };
});
输出 (Output)
在Web浏览器中打开textAngularJS.htm。 看到结果。
新页面打开AngularJS - Forms
AngularJS丰富了表单填写和验证。 我们可以使用ng-click处理AngularJS点击按钮并使用$ dirty和$ invalid标志以无缝的方式进行验证。 将novalidate与表单声明一起使用可禁用任何特定于浏览器的验证。 表单控件大量使用Angular事件。 让我们先看看事件。
事件 (Events)
AngularJS提供了多个可与HTML控件关联的事件。 例如,ng-click通常与按钮相关联。 以下是Angular JS中支持的事件。
- ng-click
- ng-dbl-click
- ng-mousedown
- ng-mouseup
- ng-mouseenter
- ng-mouseleave
- ng-mousemove
- ng-mouseover
- ng-keydown
- ng-keyup
- ng-keypress
- ng-change
ng-click
使用按钮的单击指令重置表单的数据。
<input name = "firstname" type = "text" ng-model = "firstName" required>
<input name = "lastname" type = "text" ng-model = "lastName" required>
<input name = "email" type = "email" ng-model = "email" required>
<button ng-click = "reset()">Reset</button>
<script>
   function studentController($scope) {
      $scope.reset = function() {
         $scope.firstName = "Mahesh";
         $scope.lastName = "Parashar";
         $scope.email = "MaheshParashar@iowiki.com";
      }
      $scope.reset();
   }
</script>
验证数据
以下可用于跟踪错误。
$dirty - 说明价值已经改变。
$invalid - 表示输入的值无效。
$error - 说明确切的错误。
例子 (Example)
以下示例将展示上述所有指令。
testAngularJS.htm
<html>
   <head>
      <title>Angular JS Forms</title>
      <script src = "https://ajax.googleapis.com/ajax/libs/angularjs/1.3.14/angular.min.js"></script>
      <style>
         table, th , td {
            border: 1px solid grey;
            border-collapse: collapse;
            padding: 5px;
         }
         table tr:nth-child(odd) {
            background-color: #f2f2f2;
         }
         table tr:nth-child(even) {
            background-color: #ffffff;
         }
      </style>
   </head>
   <body>
      <h2>AngularJS Sample Application</h2>
      <div ng-app = "mainApp" ng-controller = "studentController">
         <form name = "studentForm" novalidate>
            <table border = "0">
               <tr>
                  <td>Enter first name:</td>
                  <td><input name = "firstname" type = "text" ng-model = "firstName" required>
                     <span style = "color:red" ng-show = "studentForm.firstname.$dirty && studentForm.firstname.$invalid">
                        <span ng-show = "studentForm.firstname.$error.required">First Name is required.</span>
                     </span>
                  </td>
               </tr>
               <tr>
                  <td>Enter last name: </td>
                  <td><input name = "lastname"  type = "text" ng-model = "lastName" required>
                     <span style = "color:red" ng-show = "studentForm.lastname.$dirty && studentForm.lastname.$invalid">
                        <span ng-show = "studentForm.lastname.$error.required">Last Name is required.</span>
                     </span>
                  </td>
               </tr>
               <tr>
                  <td>Email: </td><td><input name = "email" type = "email" ng-model = "email" length = "100" required>
                     <span style = "color:red" ng-show = "studentForm.email.$dirty && studentForm.email.$invalid">
                        <span ng-show = "studentForm.email.$error.required">Email is required.</span>
                        <span ng-show = "studentForm.email.$error.email">Invalid email address.</span>
                     </span>
                  </td>
               </tr>
               <tr>
                  <td>
                     <button ng-click = "reset()">Reset</button>
                  </td>
                  <td>
                     <button ng-disabled = "studentForm.firstname.$dirty &&
                        studentForm.firstname.$invalid || studentForm.lastname.$dirty &&
                        studentForm.lastname.$invalid || studentForm.email.$dirty &&
                        studentForm.email.$invalid" ng-click="submit()">Submit</button>
                  </td>
               </tr>
            </table>
         </form>
      </div>
      <script>
         var mainApp = angular.module("mainApp", []);
         mainApp.controller('studentController', function($scope) {
            $scope.reset = function() {
               $scope.firstName = "Mahesh";
               $scope.lastName = "Parashar";
               $scope.email = "MaheshParashar@iowiki.com";
            }
            $scope.reset();
         });
      </script>
   </body>
</html>
输出 (Output)
在Web浏览器中打开textAngularJS.htm。 看到结果。
新页面打开AngularJS - Includes
HTML不支持在html页面中嵌入html页面。 要使用以下方式实现此功能 -
Using Ajax - 进行服务器调用以获取相应的html页面并将其设置在html控件的innerHTML中。
Using Server Side Includes - JSP,PHP和其他Web端服务器技术可以包含动态页面中的html页面。
使用AngularJS,我们可以使用ng-include指令在HTML页面中嵌入HTML页面。
<div ng-app = "" ng-controller = "studentController">
   <div ng-include = "'main.htm'"></div>
   <div ng-include = "'subjects.htm'"></div>
</div>
例子 (Example)
tryAngularJS.htm
<html>
   <head>
      <title>Angular JS Includes</title>
      <script src = "https://ajax.googleapis.com/ajax/libs/angularjs/1.3.14/angular.min.js">
      </script>
      <style>
         table, th , td {
            border: 1px solid grey;
            border-collapse: collapse;
            padding: 5px;
         }
         table tr:nth-child(odd) {
            background-color: #f2f2f2;
         }
         table tr:nth-child(even) {
            background-color: #ffffff;
         }
      </style>
   </head>
   <body>
      <h2>AngularJS Sample Application</h2>
      <div ng-app = "mainApp" ng-controller = "studentController">
         <div ng-include = "'/angularjs/src/include/main.htm'"></div>
         <div ng-include = "'/angularjs/src/include/subjects.htm'"></div>
      </div>
      <script>
         var mainApp = angular.module("mainApp", []);
         mainApp.controller('studentController', function($scope) {
            $scope.student = {
               firstName: "Mahesh",
               lastName: "Parashar",
               fees:500,
               subjects:[
                  {name:'Physics',marks:70},
                  {name:'Chemistry',marks:80},
                  {name:'Math',marks:65},
                  {name:'English',marks:75},
                  {name:'Hindi',marks:67}
               ],
               fullName: function() {
                  var studentObject;
                  studentObject = $scope.student;
                  return studentObject.firstName + " " + studentObject.lastName;
               }
            };
         });
      </script>
   </body>
</html>
main.htm
<table border = "0">
   <tr>
      <td>Enter first name:</td>
      <td><input type = "text" ng-model = "student.firstName"></td>
   </tr>
   <tr>
      <td>Enter last name: </td>
      <td><input type = "text" ng-model = "student.lastName"></td>
   </tr>
   <tr>
      <td>Name: </td>
      <td>{{student.fullName()}}</td>
   </tr>
</table>
subjects.htm
<p>Subjects:</p>
<table>
   <tr>
      <th>Name</th>
      <th>Marks</th>
   </tr>
   <tr ng-repeat = "subject in student.subjects">
      <td>{{ subject.name }}</td>
      <td>{{ subject.marks }}</td>
   </tr>
</table>
输出 (Output)
要运行此示例,您需要将textAngularJS.htm,main.htm和subjects.htm部署到Web服务器。 在Web浏览器中使用服务器的url打开textAngularJS.htm。 看到结果。
新页面打开AngularJS - Ajax
AngularJS提供$ https:control,作为从服务器读取数据的服务。 服务器进行数据库调用以获取所需的记录。 AngularJS需要JSON格式的数据。 数据准备好后,$ https:可用于以下列方式从服务器获取数据 -
function studentController($scope,$https:) {
   var url = "data.txt";
   $https:.get(url).success( function(response) {
      $scope.students = response;
   });
}
这里,文件data.txt包含学生记录。 $ https:service进行ajax调用并设置对其属性学生的响应。 students模型可用于在HTML中绘制表格。
例子 (Examples)
data.txt
[
   {
      "Name" : "Mahesh Parashar",
      "RollNo" : 101,
      "Percentage" : "80%"
   },
   {
      "Name" : "Dinkar Kad",
      "RollNo" : 201,
      "Percentage" : "70%"
   },
   {
      "Name" : "Robert",
      "RollNo" : 191,
      "Percentage" : "75%"
   },
   {
      "Name" : "Julian Joe",
      "RollNo" : 111,
      "Percentage" : "77%"
   }
]
testAngularJS.htm
<html>
   <head>
      <title>Angular JS Includes</title>
      <style>
         table, th , td {
            border: 1px solid grey;
            border-collapse: collapse;
            padding: 5px;
         }
         table tr:nth-child(odd) {
            background-color: #f2f2f2;
         }
         table tr:nth-child(even) {
            background-color: #ffffff;
         }
      </style>
   </head>
   <body>
      <h2>AngularJS Sample Application</h2>
      <div ng-app = "" ng-controller = "studentController">
         <table>
            <tr>
               <th>Name</th>
               <th>Roll No</th>
               <th>Percentage</th>
            </tr>
            <tr ng-repeat = "student in students">
               <td>{{ student.Name }}</td>
               <td>{{ student.RollNo }}</td>
               <td>{{ student.Percentage }}</td>
            </tr>
         </table>
      </div>
      <script>
         function studentController($scope,$http) {
            var url = "data.txt";
            $http.get(url).then( function(response) {
               $scope.students = response.data;
            });
         }
      </script>
      <script src = "https://ajax.googleapis.com/ajax/libs/angularjs/1.2.15/angular.min.js">
      </script>
   </body>
</html>
输出 (Output)
要执行此示例,您需要将testAngularJS.htm和data.txt文件部署到Web服务器。 在Web浏览器中使用服务器的URL打开文件testAngularJS.htm并查看结果。
新页面打开AngularJS - Views
AngularJS通过单个页面上的多个视图支持单页面应用程序。 为此,AngularJS提供了ng-view和ng-template指令以及$ routeProvider服务。
ng-view
ng-view标签只是创建一个占位符,可以根据配置放置相应的视图(html或ng-template视图)。
用法 (Usage)
在主模块中使用ng-view定义div。
<div ng-app = "mainApp">
   ...
   <div ng-view></div>
</div>
ng-template
ng-template指令用于使用脚本标记创建html视图。 它包含“id”属性,$ routeProvider使用该属性将视图映射到控制器。
用法 (Usage)
在主模块中定义类型为ng-template的脚本块。
<div ng-app = "mainApp">
   ...
   <script type = "text/ng-template" id = "addStudent.htm">
      <h2> Add Student </h2>
      {{message}}
   </script>
</div>
$routeProvider
$ routeProvider是设置url配置的关键服务,用相应的html页面或ng-template映射它们,并附加一个具有相同的控制器。
用法 (Usage)
使用主模块定义脚本块并设置路由配置。
var mainApp = angular.module("mainApp", ['ngRoute']);
mainApp.config(['$routeProvider', function($routeProvider) {
   $routeProvider
   .when('/addStudent', {
      templateUrl: 'addStudent.htm', controller: 'AddStudentController'
   })
   .when('/viewStudents', {
      templateUrl: 'viewStudents.htm', controller: 'ViewStudentsController'
   })
   .otherwise ({
      redirectTo: '/addStudent'
   });
}]);
以下是上述例子中要考虑的重点。
$ routeProvider被定义为mainApp模块配置下的一个函数,使用key作为'$ routeProvider'。
$ routeProvider.when定义了一个url“/ addStudent”,然后将其映射到“addStudent.htm”。 addStudent.htm应该与主html页面存在于同一路径中。如果未定义htm页面,那么ng-template将与id =“addStudent.htm”一起使用。 我们使用过ng-template。
“otherwise”用于设置默认视图。
“controller”用于为视图设置相应的控制器。
例子 (Example)
以下示例将展示上述所有指令。
testAngularJS.htm
<html>
   <head>
      <title>Angular JS Views</title>
      <script src = "https://ajax.googleapis.com/ajax/libs/angularjs/1.3.14/angular.min.js"></script>
      <script src = "https://ajax.googleapis.com/ajax/libs/angularjs/1.3.14/angular-route.min.js">
      </script>
   </head>
   <body>
      <h2>AngularJS Sample Application</h2>
      <div ng-app = "mainApp">
         <p><a href = "#addStudent">Add Student</a></p>
         <p><a href = "#viewStudents">View Students</a></p>
         <div ng-view></div>
         <script type = "text/ng-template" id = "addStudent.htm">
            <h2> Add Student </h2>
            {{message}}
         </script>
         <script type = "text/ng-template" id = "viewStudents.htm">
            <h2> View Students </h2>
            {{message}}
         </script>
      </div>
      <script>
         var mainApp = angular.module("mainApp", ['ngRoute']);
         mainApp.config(['$routeProvider', function($routeProvider) {
            $routeProvider
            .when('/addStudent', {
               templateUrl: 'addStudent.htm',
               controller: 'AddStudentController'
            })
            .when('/viewStudents', {
               templateUrl: 'viewStudents.htm',
               controller: 'ViewStudentsController'
            })
            .otherwise({
               redirectTo: '/addStudent'
            });
         }]);
         mainApp.controller('AddStudentController', function($scope) {
            $scope.message = "This page will be used to display add student form";
         });
         mainApp.controller('ViewStudentsController', function($scope) {
            $scope.message = "This page will be used to display all the students";
         });
      </script>
   </body>
</html>
结果 (Result)
在Web浏览器中打开textAngularJS.htm。 看到结果。
新页面打开AngularJS - Scopes
Scope是一个特殊的javascript对象,它扮演着将控制器与视图连接的角色。 范围包含模型数据。 在控制器中,模型数据通过$ scope对象访问。
<script>
   var mainApp = angular.module("mainApp", []);
   mainApp.controller("shapeController", function($scope) {
      $scope.message = "In shape controller";
      $scope.type = "Shape";
   });
</script>
以下是上述例子中要考虑的重点。
$ scope在构造函数定义期间作为第一个参数传递给controller。
$ scope.message和$ scope.type是要在HTML页面中使用的模型。
我们已经将值设置为模型,这些模型将反映在其控制器为shapeController的应用程序模块中。
我们也可以在$ scope中定义函数。
范围继承
范围是控制器特定的。 如果我们定义嵌套控制器,那么子控制器将继承其父控制器的范围。
<script>
   var mainApp = angular.module("mainApp", []);
   mainApp.controller("shapeController", function($scope) {
      $scope.message = "In shape controller";
      $scope.type = "Shape";
   });
   mainApp.controller("circleController", function($scope) {
      $scope.message = "In circle controller";
   });
</script>
以下是上述例子中要考虑的重点。
我们在shapeController中为模型设置了值。
我们在子控制器circleController中覆盖了消息。 当在控制器circleController的模块内使用“message”时,将使用被覆盖的消息。
例子 (Example)
以下示例将展示上述所有指令。
testAngularJS.htm
<html>
   <head>
      <title>Angular JS Forms</title>
   </head>
   <body>
      <h2>AngularJS Sample Application</h2>
      <div ng-app = "mainApp" ng-controller = "shapeController">
         <p>{{message}} <br/> {{type}} </p>
         <div ng-controller = "circleController">
            <p>{{message}} <br/> {{type}} </p>
         </div>
         <div ng-controller = "squareController">
            <p>{{message}} <br/> {{type}} </p>
         </div>
      </div>
      <script src = "https://ajax.googleapis.com/ajax/libs/angularjs/1.3.14/angular.min.js">
      </script>
      <script>
         var mainApp = angular.module("mainApp", []);
         mainApp.controller("shapeController", function($scope) {
            $scope.message = "In shape controller";
            $scope.type = "Shape";
         });
         mainApp.controller("circleController", function($scope) {
            $scope.message = "In circle controller";
         });
         mainApp.controller("squareController", function($scope) {
            $scope.message = "In square controller";
            $scope.type = "Square";
         });
      </script>
   </body>
</html>
结果 (Result)
在Web浏览器中打开textAngularJS.htm。 看到结果。
新页面打开AngularJS - Services
AngularJS使用服务架构支持“关注点分离”的概念。 服务是javascript函数,仅负责执行特定任务。 这使它们成为可维护和可测试的独立实体。 控制器,过滤器可以根据需要调用它们。 通常使用AngularJS的依赖注入机制注入服务。
AngularJS提供了许多内置服务,例如$ https:,$ route,$ window,$ location等。每个服务负责一个特定的任务,例如,$ https:用于进行ajax调用以获取服务器数据。 $ route用于定义路由信息等。 内置服务始终以$符号为前缀。
有两种方法可以创建服务。
- factory
- service
使用工厂方法
使用工厂方法,我们首先定义工厂,然后为其分配方法。
var mainApp = angular.module("mainApp", []);
mainApp.factory('MathService', function() {
   var factory = {};
   factory.multiply = function(a, b) {
      return a * b
   }
   return factory;
});
使用服务方法
使用服务方法,我们定义一个服务,然后为它分配方法。 我们还为它注入了一项已经可用的服务。
mainApp.service('CalcService', function(MathService) {
   this.square = function(a) {
      return MathService.multiply(a,a);
   }
});
例子 (Example)
以下示例将展示上述所有指令。
testAngularJS.htm
<html>
   <head>
      <title>Angular JS Services</title>
      <script src = "https://ajax.googleapis.com/ajax/libs/angularjs/1.3.14/angular.min.js">
      </script>
   </head>
   <body>
      <h2>AngularJS Sample Application</h2>
      <div ng-app = "mainApp" ng-controller = "CalcController">
         <p>Enter a number: <input type = "number" ng-model = "number" /></p>
         <button ng-click = "square()">X<sup>2</sup></button>
         <p>Result: {{result}}</p>
      </div>
      <script>
         var mainApp = angular.module("mainApp", []);
         mainApp.factory('MathService', function() {
            var factory = {};
            factory.multiply = function(a, b) {
               return a * b
            }
            return factory;
         });
         mainApp.service('CalcService', function(MathService) {
            this.square = function(a) {
               return MathService.multiply(a,a);
            }
         });
         mainApp.controller('CalcController', function($scope, CalcService) {
            $scope.square = function() {
               $scope.result = CalcService.square($scope.number);
            }
         });
      </script>
   </body>
</html>
结果 (Result)
在Web浏览器中打开textAngularJS.htm。 看到结果。
新页面打开AngularJS - Dependency Injection
依赖注入是一种软件设计模式,其中组件被赋予其依赖性,而不是在组件内对它们进行硬编码。 这可以减轻组件定位依赖关系的负担,并使依赖关系可配置。 这有助于使组件可重用,可维护和可测试。
AngularJS提供了一种最高的依赖注入机制。 它提供了以下核心组件,这些组件可以作为依赖项互相注入。
- value
- factory
- service
- provider
- constant
值
value是简单的javascript对象,用于在配置阶段将值传递给控制器。
//define a module
var mainApp = angular.module("mainApp", []);
//create a value object as "defaultInput" and pass it a data.
mainApp.value("defaultInput", 5);
...
//inject the value in the controller using its name "defaultInput"
mainApp.controller('CalcController', function($scope, CalcService, defaultInput) {
   $scope.number = defaultInput;
   $scope.result = CalcService.square($scope.number);
   $scope.square = function() {
      $scope.result = CalcService.square($scope.number);
   }
});
厂
factory是一个用于返回值的函数。 无论何时服务或控制器需要,它都可以按需创建价值。 它通常使用工厂函数来计算和返回值。
//define a module
var mainApp = angular.module("mainApp", []);
//create a factory "MathService" which provides a method multiply to return multiplication of two numbers
mainApp.factory('MathService', function() {
   var factory = {};
   factory.multiply = function(a, b) {
      return a * b
   }
   return factory;
});
//inject the factory "MathService" in a service to utilize the multiply method of factory.
mainApp.service('CalcService', function(MathService) {
   this.square = function(a) {
      return MathService.multiply(a,a);
   }
});
...
服务
service是一个单例javascript对象,包含一组执行某些任务的函数。 使用service()函数定义服务,然后将其注入控制器。
//define a module
var mainApp = angular.module("mainApp", []);
...
//create a service which defines a method square to return square of a number.
mainApp.service('CalcService', function(MathService) {
   this.square = function(a) {
      return MathService.multiply(a,a);
   }
});
//inject the service "CalcService" into the controller
mainApp.controller('CalcController', function($scope, CalcService, defaultInput) {
   $scope.number = defaultInput;
   $scope.result = CalcService.square($scope.number);
   $scope.square = function() {
      $scope.result = CalcService.square($scope.number);
   }
});
提供商
AngularJS内部使用provider来在配置阶段(AngularJS引导自身的阶段)创建服务,工厂等。 下面提到的脚本可用于创建我们之前创建的MathService。 Provider是一个特殊的工厂方法,带有get()方法,用于返回值/ service/factory。
//define a module
var mainApp = angular.module("mainApp", []);
...
//create a service using provider which defines a method square to return square of a number.
mainApp.config(function($provide) {
   $provide.provider('MathService', function() {
      this.$get = function() {
         var factory = {};
         factory.multiply = function(a, b) {
            return a * b;
         }
         return factory;
      };
   });
});
不变
考虑到在配置阶段不能使用值传递的事实,常量用于在配置阶段传递值。
mainApp.constant("configParam", "constant value");
例子 (Example)
以下示例将展示上述所有指令。
testAngularJS.htm
<html>
   <head>
      <title>AngularJS Dependency Injection</title>
   </head>
   <body>
      <h2>AngularJS Sample Application</h2>
      <div ng-app = "mainApp" ng-controller = "CalcController">
         <p>Enter a number: <input type = "number" ng-model = "number" /></p>
         <button ng-click = "square()">X<sup>2</sup></button>
         <p>Result: {{result}}</p>
      </div>
      <script src = "https://ajax.googleapis.com/ajax/libs/angularjs/1.3.14/angular.min.js">
      </script>
      <script>
         var mainApp = angular.module("mainApp", []);
         mainApp.config(function($provide) {
            $provide.provider('MathService', function() {
               this.$get = function() {
                  var factory = {};
                  factory.multiply = function(a, b) {
                     return a * b;
                  }
                  return factory;
               };
            });
         });
         mainApp.value("defaultInput", 5);
         mainApp.factory('MathService', function() {
            var factory = {};
            factory.multiply = function(a, b) {
               return a * b;
            }
            return factory;
         });
         mainApp.service('CalcService', function(MathService) {
            this.square = function(a) {
               return MathService.multiply(a,a);
            }
         });
         mainApp.controller('CalcController', function($scope, CalcService, defaultInput) {
            $scope.number = defaultInput;
            $scope.result = CalcService.square($scope.number);
            $scope.square = function() {
               $scope.result = CalcService.square($scope.number);
            }
         });
      </script>
   </body>
</html>
结果 (Result)
在Web浏览器中打开textAngularJS.htm。 看到结果。
新页面打开AngularJS - Custom Directives
AngularJS中使用自定义指令来扩展HTML的功能。 自定义指令使用“指令”功能定义。 自定义指令只是替换了激活它的元素。 引导期间的AngularJS应用程序找到匹配的元素,并使用其自定义指令的compile()方法执行一次活动,然后根据指令的范围使用自定义指令的link()方法处理该元素。 AngularJS支持为以下类型的元素创建自定义指令。
Element directives - 当遇到匹配元素时,指令激活。
Attribute - 遇到匹配属性时激活指令。
CSS - 指令在遇到匹配的CSS样式时激活。
Comment - 当遇到匹配的注释时,指令激活。
了解自定义指令
定义自定义html标记。
<student name = "Mahesh"></student><br/>
<student name = "Piyush"></student>
定义自定义指令以处理上述自定义html标记。
var mainApp = angular.module("mainApp", []);
//Create a directive, first parameter is the html element to be attached.
//We are attaching student html tag.
//This directive will be activated as soon as any student element is encountered in html
mainApp.directive('student', function() {
   //define the directive object
   var directive = {};
   //restrict = E, signifies that directive is Element directive
   directive.restrict = 'E';
   //template replaces the complete element with its text.
   directive.template = "Student: <b>{{student.name}}</b> ,
      Roll No: <b>{{student.rollno}}</b>";
   //scope is used to distinguish each student element based on criteria.
   directive.scope = {
      student : "=name"
   }
   //compile is called during application initialization. AngularJS calls
      it once when html page is loaded.
   directive.compile = function(element, attributes) {
      element.css("border", "1px solid #cccccc");
      //linkFunction is linked with each element with scope to get the element specific data.
      var linkFunction = function($scope, element, attributes) {
         element.html("Student: <b>"+$scope.student.name +"</b> ,
            Roll No: <b>"+$scope.student.rollno+"</b><br/>");
         element.css("background-color", "#ff00ff");
      }
      return linkFunction;
   }
   return directive;
});
定义控制器以更新指令的范围。 这里我们使用name属性的值作为范围的子项。
mainApp.controller('StudentController', function($scope) {
   $scope.Mahesh = {};
   $scope.Mahesh.name = "Mahesh Parashar";
   $scope.Mahesh.rollno  = 1;
   $scope.Piyush = {};
   $scope.Piyush.name = "Piyush Parashar";
   $scope.Piyush.rollno  = 2;
});
例子 (Example)
<html>
   <head>
      <title>Angular JS Custom Directives</title>
   </head>
   <body>
      <h2>AngularJS Sample Application</h2>
      <div ng-app = "mainApp" ng-controller = "StudentController">
         <student name = "Mahesh"></student><br/>
         <student name = "Piyush"></student>
      </div>
      <script src = "https://ajax.googleapis.com/ajax/libs/angularjs/1.3.14/angular.min.js">
      </script>
      <script>
         var mainApp = angular.module("mainApp", []);
         mainApp.directive('student', function() {
            var directive = {};
            directive.restrict = 'E';
            directive.template = "Student: <b>{{student.name}}</b> ,
               Roll No: <b>{{student.rollno}}</b>";
            directive.scope = {
               student : "=name"
            }
            directive.compile = function(element, attributes) {
               element.css("border", "1px solid #cccccc");
               var linkFunction = function($scope, element, attributes) {
                  element.html("Student: <b>"+$scope.student.name +"</b> ,
                     Roll No: <b>"+$scope.student.rollno+"</b><br/>");
                  element.css("background-color", "#ff00ff");
               }
               return linkFunction;
            }
            return directive;
         });
         mainApp.controller('StudentController', function($scope) {
            $scope.Mahesh = {};
            $scope.Mahesh.name = "Mahesh Parashar";
            $scope.Mahesh.rollno  = 1;
            $scope.Piyush = {};
            $scope.Piyush.name = "Piyush Parashar";
            $scope.Piyush.rollno  = 2;
         });
      </script>
   </body>
</html>
结果 (Result)
在Web浏览器中打开textAngularJS.htm。 看到结果。
新页面打开AngularJS - Internalization
AngularJS支持三种类型的过滤器货币,日期和数字的内置国际化。 我们只需要根据国家的地区包含相应的js。 默认情况下,它处理浏览器的区域设置。 例如,要使用丹麦语语言环境,请使用以下脚本。
<script src = "https://code.angularjs.org/1.2.5/i18n/angular-locale_da-dk.js">
</script>
使用丹麦语语言环境的示例
testAngularJS.htm
<html>
   <head>
      <title>Angular JS Forms</title>
   </head>
   <body>
      <h2>AngularJS Sample Application</h2>
      <div ng-app = "mainApp" ng-controller = "StudentController">
         {{fees | currency }}  <br/><br/>
         {{admissiondate | date }}  <br/><br/>
         {{rollno | number }}
      </div>
      <script src = "https://ajax.googleapis.com/ajax/libs/angularjs/1.3.14/angular.min.js">
      </script>
      <script src = "https://code.angularjs.org/1.3.14/i18n/angular-locale_da-dk.js">
      </script>
      <script>
         var mainApp = angular.module("mainApp", []);
         mainApp.controller('StudentController', function($scope) {
            $scope.fees = 100;
            $scope.admissiondate  = new Date();
            $scope.rollno = 123.45;
         });
      </script>
   </body>
</html>
结果 (Result)
在Web浏览器中打开textAngularJS.htm。 看到结果。
新页面打开使用浏览器的语言环境的示例
testAngularJS.htm
<html>
   <head>
      <title>Angular JS Forms</title>
   </head>
   <body>
      <h2>AngularJS Sample Application</h2>
      <div ng-app = "mainApp" ng-controller = "StudentController">
         {{fees | currency }}  <br/><br/>
         {{admissiondate | date }}  <br/><br/>
         {{rollno | number }}
      </div>
      <script src = "https://ajax.googleapis.com/ajax/libs/angularjs/1.3.14/angular.min.js">
      </script>
      <!-- <script src = "https://code.angularjs.org/1.3.14/i18n/angular-locale_da-dk.js">
      </script> -->
      <script>
         var mainApp = angular.module("mainApp", []);
         mainApp.controller('StudentController', function($scope) {
            $scope.fees = 100;
            $scope.admissiondate  = new Date();
            $scope.rollno = 123.45;
         });
      </script>
   </body>
</html>
结果 (Result)
在Web浏览器中打开textAngularJS.htm。 看到结果。
新页面打开AngularJS - Internationalization
AngularJS支持三种类型的过滤器的内置国际化:货币,日期和数字。 我们只需要根据国家的区域设置合并相应的java脚本。 默认情况下,它会考虑浏览器的区域设置。 例如,对于丹麦语语言环境,请使用以下脚本 -
<script src = "https://code.angularjs.org/1.2.5/i18n/angular-locale_da-dk.js">
</script>
使用丹麦语语言环境的示例
testAngularJS.htm
<html>
   <head>
      <title>Angular JS Forms</title>
   </head>
   <body>
      <h2>AngularJS Sample Application</h2>
      <div ng-app = "mainApp" ng-controller = "StudentController">
         {{fees | currency }}  <br/><br/>
         {{admissiondate | date }}  <br/><br/>
         {{rollno | number }}
      </div>
      <script src = "https://ajax.googleapis.com/ajax/libs/angularjs/1.3.14/angular.min.js">
      </script>
      <script src = "https://code.angularjs.org/1.3.14/i18n/angular-locale_da-dk.js">
      </script>
      <script>
         var mainApp = angular.module("mainApp", []);
         mainApp.controller('StudentController', function($scope) {
            $scope.fees = 100;
            $scope.admissiondate  = new Date();
            $scope.rollno = 123.45;
         });
      </script>
   </body>
</html>
输出 (Output)
在Web浏览器中打开文件testAngularJS.htm并查看结果。
新页面打开示例使用浏览器区域设置
testAngularJS.htm
<html>
   <head>
      <title>Angular JS Forms</title>
   </head>
   <body>
      <h2>AngularJS Sample Application</h2>
      <div ng-app = "mainApp" ng-controller = "StudentController">
         {{fees | currency }}  <br/><br/>
         {{admissiondate | date }}  <br/><br/>
         {{rollno | number }}
      </div>
      <script src = "https://ajax.googleapis.com/ajax/libs/angularjs/1.3.14/angular.min.js">
      </script>
      <!-- <script src = "https://code.angularjs.org/1.3.14/i18n/angular-locale_da-dk.js">
      </script> -->
      <script>
         var mainApp = angular.module("mainApp", []);
         mainApp.controller('StudentController', function($scope) {
            $scope.fees = 100;
            $scope.admissiondate  = new Date();
            $scope.rollno = 123.45;
         });
      </script>
   </body>
</html>
输出 (Output)
在Web浏览器中打开文件testAngularJS.htm并查看结果。
新页面打开