Spring MVC - Generate XML
以下示例说明如何使用Spring Web MVC Framework生成XML。 首先,让我们使用一个可用的Eclipse IDE,并坚持以下步骤,使用Spring Web Framework开发基于动态表单的Web应用程序。
| 步 | 描述 |
|---|---|
| 1 | 在Spring MVC - Hello World章节中解释,在com.iowiki包下创建一个名为TestWeb的项目。 |
| 2 | 在com.iowikipackage下创建Java类User和UserController。 |
| 3 | 最后一步是创建源文件和配置文件的内容并导出应用程序,如下所述。 |
User.java
package com.iowiki;
import javax.xml.bind.annotation.XmlElement;
import javax.xml.bind.annotation.XmlRootElement;
@XmlRootElement(name = "user")
public class User {
   private String name;
   private int id;
   public String getName() {
      return name;
   }
   @XmlElement
   public void setName(String name) {
      this.name = name;
   }
   public int getId() {
      return id;
   }
   @XmlElement
   public void setId(int id) {
      this.id = id;
   }
}
UserController.java)/h2>
package com.iowiki;
import org.springframework.stereotype.Controller;
import org.springframework.web.bind.annotation.PathVariable;
import org.springframework.web.bind.annotation.RequestMapping;
import org.springframework.web.bind.annotation.RequestMethod;
import org.springframework.web.bind.annotation.ResponseBody;
@Controller
@RequestMapping("/user")
public class UserController {
   @RequestMapping(value="{name}", method = RequestMethod.GET)
   public @ResponseBody User getUser(@PathVariable String name) {
      User user = new User();
      user.setName(name);
      user.setId(1);
      return user;
   }
}
TestWeb-servlet.xml
<beans xmlns = "http://www.springframework.org/schema/beans"
   xmlns:context = "http://www.springframework.org/schema/context"
   xmlns:xsi = "http://www.w3.org/2001/XMLSchema-instance"
   xmlns:mvc = "http://www.springframework.org/schema/mvc"
   xsi:schemaLocation = "
   http://www.springframework.org/schema/beans
   http://www.springframework.org/schema/beans/spring-beans-3.0.xsd
   http://www.springframework.org/schema/context
   http://www.springframework.org/schema/context/spring-context-3.0.xsd
   http://www.springframework.org/schema/mvc
   http://www.springframework.org/schema/mvc/spring-mvc-3.0.xsd">
   <context:component-scan base-package = "com.iowiki" />
   <mvc:annotation-driven />
</beans>
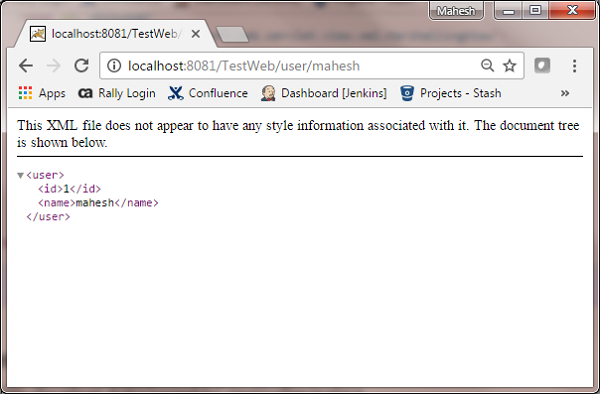
在这里,我们创建了一个XML Mapped POJO User,在UserController中,我们返回了User。 Spring自动处理基于RequestMapping的XML转换。
完成创建源文件和配置文件后,导出应用程序。 右键单击您的应用程序,使用Export → WAR File选项并将TestWeb.war文件保存在Tomcat的webapps文件夹中。
现在,启动Tomcat服务器并确保您可以使用标准浏览器从webapps文件夹访问其他网页。 尝试一个URL - http://localhost:8080/TestWeb/mahesh ,我们将看到以下屏幕。

