Koa.js - 快速指南
Koa.js - Overview
Web应用程序框架为您提供了构建网站,Web应用程序和后端的简单API。 您无需担心低级协议,进程等。
什么是Koa?
Koa提供了构建应用程序的最小接口。 它是一个非常小的框架(600 LoC),它提供了构建应用程序所需的工具,并且非常灵活。 npm为Koa提供了许多模块,可以直接插入其中。 Koa可以被认为是express.js的核心,没有所有的花里胡哨。
为什么Koa?
Koa占用空间小(600 LoC),是节点上非常薄的抽象层,用于创建服务器端应用程序。 它完全可插拔,拥有庞大的社区。 这也使我们可以轻松扩展Koa并根据我们的需要使用它。 它采用尖端技术(ES6)构建,使其比旧式框架(如express)更具优势。
Pug
Pug(以前称为Jade)是一种用于编写HTML模板的简洁语言。
- 生成HTML
- 支持动态代码
- Supports reusability (DRY)
它是与Koa一起使用的最流行的模板语言之一。
MongoDB和Mongoose
MongoDB是一个开源的文档数据库,旨在简化开发和扩展。 我们将使用此数据库来存储数据。
Mongoose是node.js的客户端API,可以很容易地从我们的Koa应用程序访问我们的数据库。
Koa.js - Environment
要开始使用Koa框架进行开发,您需要安装Node和npm(节点包管理器)。 如果您还没有这些,请转到节点设置以在本地系统上安装节点。 通过在终端中运行以下命令,确认已安装节点和npm。
$ node --version
$ npm --version
您应该收到类似于 - 的输出
v5.0.0
3.5.2
请确保您的节点版本高于6.5.0。 现在我们已经设置了Node和npm,让我们了解npm是什么以及如何使用它。
Node Package Manager (npm)
npm是节点的包管理器。 npm Registry是Node.js,前端Web应用程序,移动应用程序,机器人,路由器以及JavaScript社区无数其他需求的开源代码包的公共集合。 npm允许我们访问所有这些包并在本地安装它们。 您可以在npmJS上浏览npm上可用的软件包列表。
如何使用npm?
使用npm安装程序包有两种方法 - 全局和本地。
Globally - 此方法通常用于安装开发工具和基于CLI的程序包。 要全局安装软件包,请使用以下命令。
$ npm install -g <package-name>
Locally - 此方法通常用于安装框架和库。 本地安装的软件包只能在其安装的目录中使用。 要在本地安装软件包,请使用与上面相同的命令,而不使用g标志。
$ npm install <package-name>
每当我们使用npm创建项目时,我们需要提供一个package.json文件,该文件包含有关我们项目的所有详细信息。 npm使我们可以轻松设置此文件。 让我们建立我们的开发项目。
Step 1 - 启动终端/ cmd,创建一个名为hello-world的新文件夹并将其插入其中 -

Step 2 - 现在使用npm创建package.json文件,使用以下命令。
npm init
它会询问您以下信息 -
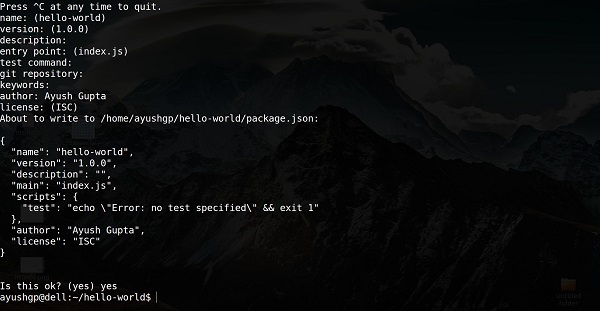
只需按住回车键,然后在“作者姓名”字段中输入您的姓名即可。
Step 3 - 现在我们设置了package.json文件,我们将安装Koa。 要安装Koa并将其添加到我们的package.json文件中,请使用以下命令。
$ npm install --save koa
要确认Koa安装正确,请运行以下命令。
$ ls node_modules #(dir node_modules for windows)
Tip - --save标志可以替换为-S标志。 此标志确保将Koa添加为package.json文件的依赖项。 这有一个优点,下次我们需要安装项目的所有依赖项时,我们只需要运行命令npm install,它将在这个文件中找到依赖项并为我们安装它们。
这就是我们使用Koa框架开始开发所需的全部内容。 为了使我们的开发过程更容易,我们将从npm,nodemon安装一个工具。 这个工具的作用是,只要我们对任何文件进行更改,它就会重新启动我们的服务器,否则我们需要在每次修改文件后手动重启服务器。 要安装nodemon,请使用以下命令。
$ npm install -g nodemon
现在我们都准备好潜入Koa了!
Koa.js - Hello World
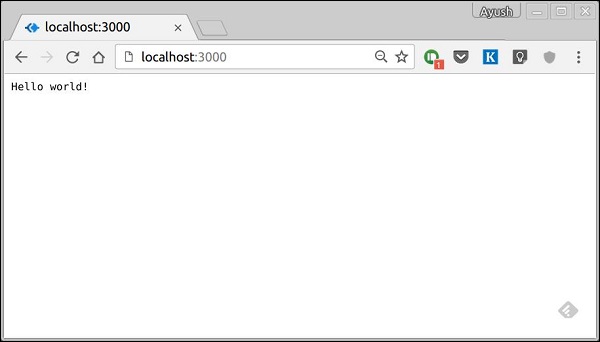
一旦我们设置了开发,就该开始使用Koa开发我们的第一个应用程序了。 创建一个名为app.js的新文件,并在其中键入以下内容。
var koa = require('koa');
var app = koa();
app.use(function* (){
   this.body = 'Hello world!';
});
app.listen(3000, function(){
   console.log('Server running on https://localhost:3000')
});
保存文件,转到终端并输入。
$ nodemon app.js
这将启动服务器。 要测试此应用程序,请打开浏览器并转到https://localhost:3000 ,您应该收到以下消息。
这个程序如何工作?
第一行在我们的文件中导入Koa。 我们可以通过变量Koa访问其API。 我们使用它来创建应用程序并将其分配给var app。
app.use(function) - 这个函数是一个中间件,只要我们的服务器收到请求就会被调用。 我们将在后续章节中详细了解中间件。 回调函数是一个生成器,我们将在下一章中看到。 这个生成器的上下文在Koa中称为上下文。 此上下文用于访问和修改请求和响应对象。 我们将此响应的主体设置为Hello world! 。
app.listen(port, function) - 此函数绑定并侦听指定端口上的连接。 端口是此处唯一必需的参数。 如果应用程序成功运行,则执行回调函数。
Koa.js - Generators
JavaScript ES6最令人兴奋的新功能之一是一种新的功能,称为生成器。 在生成器之前,整个脚本通常用于从上到下的顺序执行,没有简单的方法来停止代码执行并在以后使用相同的堆栈重新启动。 生成器是可以退出并稍后重新输入的功能。 他们的上下文(变量绑定)将在重新入口处保存。
生成器允许我们在两者之间停止代码执行。 因此,让我们来看一个简单的生成器。
var generator_func = function* (){
   yield 1;
   yield 2;
};
var itr = generator_func();
console.log(itr.next());
console.log(itr.next());
console.log(itr.next());
运行上面的代码时,结果如下。
{ value: 1, done: false }
{ value: 2, done: false }
{ value: undefined, done: true }
让我们看看上面的代码。 我们首先创建一个名为generator_func()的生成generator_func() 。 我们创建了这个奇怪的外观函数的实例并将其分配给itr 。 然后我们开始在这个itr变量上调用next() 。
调用next()启动生成器并运行直到达到yield。 然后它返回带有value和done的对象,其中值具有表达式值。 这个表达可以是任何东西。 此时,它暂停执行。 再次当我们调用此函数(下一个)时,生成器从最后一个屈服点恢复执行,其中函数状态在暂停时是相同的,直到下一个屈服点。 这样做直到代码中没有更多的屈服点。
Koa的发电机
那么为什么我们在本教程中讨论生成器。 您可能还记得hello world程序,我们使用function* ()表示法将回调传递给app.use()。 Koa是一个对象,它包含一系列中间件生成器函数,所有这些函数都是在每次请求时以堆栈方式组合和执行的。 Koa还实现了下游,然后是控制流的上游。
请查看以下示例,以更好的方式理解这一点。
var koa = require('koa');
var app = koa();
app.use(function* (next) {
   //do something before yielding to next generator function
   //in line which will be 1st event in downstream
   console.log("1");
   yield next;
   //do something when the execution returns upstream,
   //this will be last event in upstream
   console.log("2");
});
app.use(function* (next) {
   // This shall be 2nd event downstream
   console.log("3");
   yield next;
   // This would be 2nd event upstream
   console.log("4");
});
app.use(function* () {
   // Here it would be last function downstream
   console.log("5");
   // Set response body
   this.body = "Hello Generators";
   // First event of upstream (from the last to first)
   console.log("6");
});
app.listen(3000);
运行上面的代码并导航到https://localhost:3000/我们在控制台上获得以下输出。
1
3
5
6
4
2
这基本上是Koa使用发电机的方式。 它允许我们使用此属性创建紧凑的中间件,并为上游和下游功能编写代码,从而使我们免于回调。
Koa.js - Routing
Web框架在不同的路由上提供诸如HTML页面,脚本,图像等的资源。 Koa不支持核心模块中的路由。 我们需要使用Koa-router模块在Koa中轻松创建路由。 使用以下命令安装此模块。
npm install --save koa-router
现在我们已经安装了Koa-router,让我们看一个简单的GET路由示例。
var koa = require('koa');
var router = require('koa-router');
var app = koa();
var _ = router(); //Instantiate the router
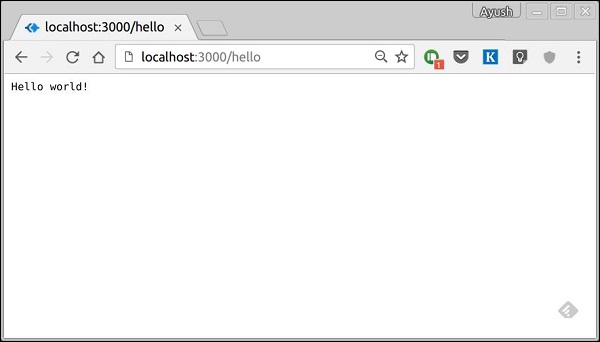
_.get('/hello', getMessage); // Define routes
function *getMessage() {
this.body = "Hello world!";
};
app.use(_.routes()); //Use the routes defined using the router
app.listen(3000);
如果我们运行我们的应用程序并转到localhost:3000/hello,服务器将在路由“/ hello”处收到get请求。 我们的Koa app执行附加到此路由的回调函数并发送“Hello World!” 作为回应。
我们也可以在同一路线上有多种不同的方法。 例如,
var koa = require('koa');
var router = require('koa-router');
var app = koa();
var _ = router(); //Instantiate the router
_.get('/hello', getMessage);
_.post('/hello', postMessage);
function *getMessage() {
	this.body = "Hello world!";
};
function *postMessage() {
   this.body = "You just called the post method at '/hello'!\n";
};
app.use(_.routes()); //Use the routes defined using the router
app.listen(3000);
要测试此请求,请打开终端并使用cURL执行以下请求
curl -X POST "https://localhost:3000/hello"

express提供了一种特殊方法,用于使用相同的函数处理特定路径上的所有类型的http方法。 要使用此方法,请尝试以下方法 -
_.all('/test', allMessage);
function *allMessage(){
   this.body = "All HTTP calls regardless of the verb will get this response";
};
Koa.js - URL Building
我们现在可以定义路线; 它们是静态的或固定的。 要使用动态路由,我们需要提供不同类型的路由。 使用动态路由允许我们根据它们传递参数和过程。 以下是动态路线的示例。
var koa = require('koa');
var router = require('koa-router');
var app = koa();
var _ = router();
_.get('/:id', sendID);
function *sendID() {
   this.body = 'The id you specified is ' + this.params.id;
}
app.use(_.routes());
app.listen(3000);
要测试这个,请转到https://localhost:3000/123 。 您将得到以下回复。

您可以用其他任何内容替换URL中的“123”,它将反映在响应中。 以下是上述的复杂示例。
var koa = require('koa');
var router = require('koa-router');
var app = koa();
var _ = router();
_.get('/things/:name/:id', sendIdAndName);
function *sendIdAndName(){
   this.body = 'id: ' + this.params.id + ' and name: ' + this.params.name;
};
app.use(_.routes());
app.listen(3000);
要测试这个,请转到https://localhost:3000/things/iowiki/12345 。
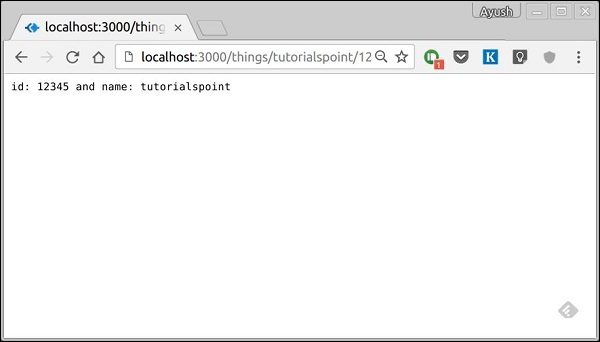
您可以使用this.params对象访问您在URL中传递的所有参数。 请注意,上述两个路径不同。 他们永远不会重叠。 此外,如果你想在获得'/ things'时执行代码,那么你需要单独定义它。
模式匹配路由
您还可以使用正则表达式来限制URL参数匹配。 假设您需要id为五位数的长号。 您可以使用以下路由定义。
var koa = require('koa');
var router = require('koa-router');
var app = koa();
var _ = router();
_.get('/things/:id([0-9]{5})', sendID);
function *sendID(){
   this.body = 'id: ' + this.params.id;
}
app.use(_.routes());
app.listen(3000);
请注意,这only匹配具有5位长ID的请求。 您可以使用更复杂的正则表达式来匹配/验证您的路由。 如果您的所有路由都不匹配该请求,您将收到一条未找到的消息作为响应。
例如,如果我们定义与上面相同的路由,请求使用有效的URL,我们得到 -

Koa.js - HTTP Methods
HTTP方法在请求中提供,并指定客户端请求的操作。 下表总结了常用的HTTP方法。
| Sr.No. | 方法和描述 |
|---|---|
| 1 | GET GET方法请求指定资源的表示。 使用GET的请求应该只检索数据,不应该有其他影响。 |
| 2 | POST POST方法请求服务器接受请求中包含的数据,作为URI标识的资源的新对象/实体。 |
| 3 | PUT PUT方法请求服务器接受请求中包含的数据,作为对URI标识的现有对象的修改。 如果它不存在,那么PUT方法应该创建一个。 |
| 4 | DELETE DELETE方法请求服务器删除指定的资源。 |
这些是最常见的HTTP方法。 要了解有关它们的更多信息,请访问https://www.iowiki.com/http/http_methods.htm 。
Koa.js - Request Object
Koa Request对象是节点的vanilla请求对象之上的抽象,提供了对日常HTTP服务器开发有用的附加功能。 Koa请求对象嵌入在上下文对象中, this 。 每当我们收到请求时,让我们注销请求对象。
var koa = require('koa');
var router = require('koa-router');
var app = koa();
var _ = router();
_.get('/hello', getMessage);
function *getMessage(){
console.log(this.request);
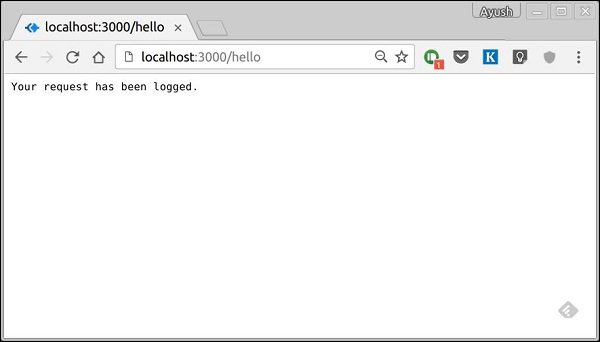
this.body = 'Your request has been logged.';
}
app.use(_.routes());
app.listen(3000);
当您运行此代码并导航到https://localhost:3000/hello ,您将收到以下响应。
在您的控制台上,您将获得注销的请求对象。
{
   method: 'GET',
   url: '/hello/',
   header:
   {
      host: 'localhost:3000',
      connection: 'keep-alive',
      'upgrade-insecure-requests': '1',
      'user-agent': 'Mozilla/5.0 (X11; Linux x86_64)
         AppleWebKit/537.36 (KHTML, like Gecko) Chrome/52.0.2743.116 Safari/537.36',
      accept: 'text/html,application/xhtml+xml,
         application/xml;q = 0.9,image/webp,*/*;q = 0.8',
      dnt: '1',
      'accept-encoding': 'gzip, deflate, sdch',
      'accept-language': 'en-US,en;q = 0.8'
   }
}
我们可以使用此对象访问请求的许多有用属性。 我们来看一些例子。
request.header
提供所有请求标头。
request.method
提供请求方法(GET,POST等)
request.href
提供完整的请求URL。
request.path
提供请求的路径。 没有查询字符串和基本URL。
request.query
提供已解析的查询字符串。 例如,如果我们在https://localhost:3000/hello/?name=Ayush&age=20&country=India等请求上记录此项,那么我们将得到以下对象。
{
   name: 'Ayush',
   age: '20',
   country: 'India'
}
request.accepts(type)
此函数根据请求的资源是否接受给定的请求类型返回true或false。
您可以在Request的文档中阅读有关请求对象的Request 。
Koa.js - Response Object
Koa Response对象是节点的vanilla响应对象之上的抽象,提供了对日常HTTP服务器开发有用的附加功能。 Koa响应对象嵌入在上下文对象中, this 。 每当我们收到请求时,让我们注销响应对象。
var koa = require('koa');
var router = require('koa-router');
var app = koa();
var _ = router();
_.get('/hello', getMessage);
function *getMessage(){
   this.body = 'Your request has been logged.';
   console.log(this.response);
}
app.use(_.routes());
app.listen(3000);
当您运行此代码并导航到https://localhost:3000/hello您将收到以下响应。
在您的控制台上,您将获得注销的请求对象。
{
   status: 200,
   message: 'OK',
   header:
   {
      'content-type': 'text/plain; charset=utf-8',
      'content-length': '12'
   },
   body: 'Your request has been logged.'
}
状态和消息由Koa自动设置,但我们可以修改。 如果我们不设置响应主体,则状态代码设置为404.一旦我们设置了响应主体,默认情况下状态设置为200。 我们可以明确地覆盖这种行为。
我们可以使用此对象访问响应的许多有用属性。 让我们看看一些例子 -
response.header
提供所有响应标头。
response.status
提供响应状态(200,404,500等)。 此属性还用于设置响应状态。
response.message
提供响应消息。 此属性还用于设置具有响应的自定义消息。 它与response.status相关联。
response.body
获取或设置响应正文。 通常,我们使用上下文对象访问它。 这只是访问它的另一种方式。 主体可以是以下类型:String,Buffer,Stream,Object或Null。
response.type
获取或设置当前响应的内容类型。
response.get(field)
此函数用于获取具有不区分大小写的值字段的标头值。
response.set(field, value)
此函数用于使用字段和值对在响应上设置标头。
response.remove(field)
此函数用于使用字段名称取消设置响应上的标头。
您可以在Response的文档中阅读有关响应对象的更多信息。
Koa.js - Redirects
创建网站时,重定向非常重要。 如果请求格式错误的URL或服务器上存在某些错误,则应将其重定向到相应的错误页面。 重定向还可用于阻止人们进入您网站的受限区域。
让我们创建一个错误页面,并在有人请求格式错误的URL时重定向到该页面。
var koa = require('koa');
var router = require('koa-router');
var app = koa();
var _ = router();
_.get('/not_found', printErrorMessage);
_.get('/hello', printHelloMessage);
app.use(_.routes());
app.use(handle404Errors);
function *printErrorMessage() {
   this.status = 404;
   this.body = "Sorry we do not have this resource.";
}
function *printHelloMessage() {
   this.status = 200;
   this.body = "Hey there!";
}
function *handle404Errors(next) {
   if (404 != this.status) return;
   this.redirect('/not_found');
}
app.listen(3000);
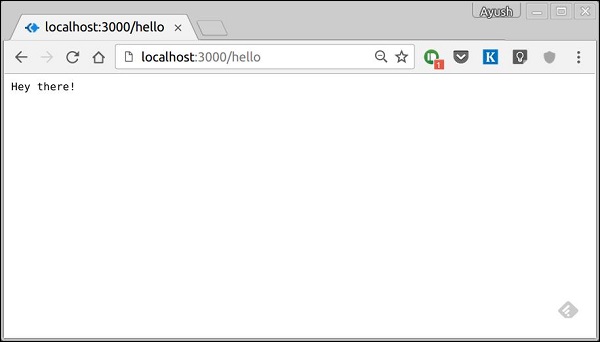
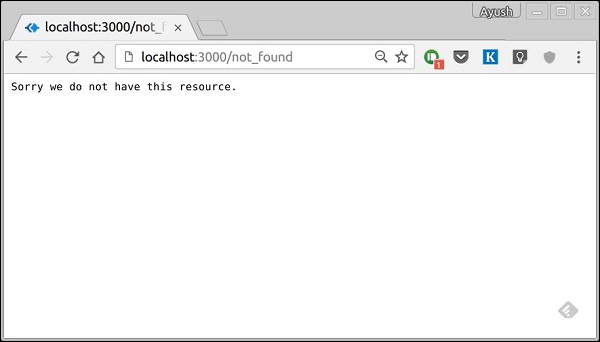
当我们运行此代码并导航到/ hello以外的任何路由时,我们将被重定向到/ not_found。 我们已将中间件放在最后(app.use函数调用此中间件)。 这可以确保我们最终到达中间件并发送相应的响应。 以下是我们运行上述代码时看到的结果。
当我们导航到https://localhost:3000/hello ,我们得到 -
如果我们导航到任何其他路线,我们得到 -
Koa.js - Error Handling
错误处理在构建Web应用程序中起着重要作用。 Koa也为此目的使用中间件。
在Koa中,您添加了一个try { yield next }作为第一个中间件之一的中间件。 如果我们在下游遇到任何错误,我们将返回相关的catch子句并在此处理错误。 例如 -
var koa = require('koa');
var app = koa();
//Error handling middleware
app.use(function *(next) {
   try {
      yield next;
   } catch (err) {
      this.status = err.status || 500;
      this.body = err.message;
      this.app.emit('error', err, this);
   }
});
//Create an error in the next middleware
//Set the error message and status code and throw it using context object
app.use(function *(next) {
   //This will set status and message
   this.throw('Error Message', 500);
});
app.listen(3000);
我们故意在上面的代码中创建了一个错误,并在我们的第一个中间件的catch块中处理错误。 然后将其发送到我们的控制台,并作为响应发送给我们的客户端。 以下是我们触发此错误时收到的错误消息。
InternalServerError: Error Message
   at Object.module.exports.throw
      (/home/ayushgp/learning/koa.js/node_modules/koa/lib/context.js:91:23)
   at Object.<anonymous> (/home/ayushgp/learning/koa.js/error.js:18:13)
   at next (native)
   at onFulfilled (/home/ayushgp/learning/koa.js/node_modules/co/index.js:65:19)
   at /home/ayushgp/learning/koa.js/node_modules/co/index.js:54:5
   at Object.co (/home/ayushgp/learning/koa.js/node_modules/co/index.js:50:10)
   at Object.toPromise (/home/ayushgp/learning/koa.js/node_modules/co/index.js:118:63)
   at next (/home/ayushgp/learning/koa.js/node_modules/co/index.js:99:29)
   at onFulfilled (/home/ayushgp/learning/koa.js/node_modules/co/index.js:69:7)
   at /home/ayushgp/learning/koa.js/node_modules/co/index.js:54:5
现在,发送到服务器的任何请求都将导致此错误。
Koa.js - Cascading
中间件函数是可以在应用程序的请求 - 响应周期中访问context object和下一个中间件函数的函数。 这些函数用于修改任务的请求和响应对象,例如解析请求主体,添加响应头等。Koa更进一步,产生'downstream' ,然后将控制回流'upstream' 。 此效果称为cascading 。
以下是一个中间件功能的简单示例。
var koa = require('koa');
var app = koa();
var _ = router();
//Simple request time logger
app.use(function* (next) {
   console.log("A new request received at " + Date.now());
   //This function call is very important. It tells that more processing is
   //required for the current request and is in the next middleware function/route handler.
   yield next;
});
app.listen(3000);
为服务器上的每个请求调用上述中间件。 因此,在每次请求之后,我们将在控制台中收到以下消息。
A new request received at 1467267512545
要将其限制为特定路由(及其所有子路由),我们只需要像路由一样创建路由。 实际上它的这些中间件只能处理我们的请求。
例如,
var koa = require('koa');
var router = require('koa-router');
var app = koa();
var _ = router();
//Simple request time logger
_.get('/request/*', function* (next) {
   console.log("A new request received at " + Date.now());
   yield next;
});
app.use(_.routes());
app.listen(3000);
现在,每当您请求'/ request'的任何子路由时,只有它才会记录时间。
中间件调用顺序
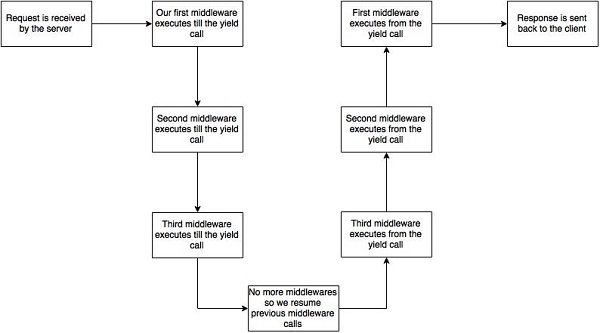
Koa中间件最重要的一点是它们在文件中写入/包含的顺序是它们在下游执行的顺序。 一旦我们在中间件中达到yield语句,它就会切换到下一个中间件,直到我们到达最后一个。 然后我们再次开始向上移动并从yield语句恢复函数。
例如,在下面的代码片段中,第一个函数首先执行直到yield,然后第二个中间件执行到yield,然后执行第三个。 由于我们这里没有更多的中间件,我们开始向后移动,以相反的顺序执行,即第三,第二,第一。 这个例子总结了如何使用Koa方式的中间件。
var koa = require('koa');
var app = koa();
//Order of middlewares
app.use(first);
app.use(second);
app.use(third);
function *first(next) {
   console.log("I'll be logged first. ");
   //Now we yield to the next middleware
   yield next;
   //We'll come back here at the end after all other middlewares have ended
   console.log("I'll be logged last. ");
};
function *second(next) {
   console.log("I'll be logged second. ");
   yield next;
   console.log("I'll be logged fifth. ");
};
function *third(next) {
   console.log("I'll be logged third. ");
   yield next;
   console.log("I'll be logged fourth. ");
};
app.listen(3000);
当我们在运行此代码后访问'/'时,在我们的控制台上我们将获得 -
I'll be logged first.
I'll be logged second.
I'll be logged third.
I'll be logged fourth.
I'll be logged fifth.
I'll be logged last.
下图总结了上例中实际发生的情况。
现在我们知道如何创建自己的中间件,让我们讨论一些最常用的社区创建的中间件。
第三方中间件
here.提供了Express的第三方中间件列表here. 以下是一些最常用的中间件 -
- koa-bodyparser
- koa-router
- koa-static
- koa-compress
我们将在后续章节中讨论多个中间件。
Koa.js - Templating
帕格是一个模板引擎。 模板引擎用于通过HTML消除我们的服务器代码的混乱,将字符串与现有的HTML模板串联起来。 帕格是一个非常强大的模板引擎,它具有各种功能,如filters, includes, inheritance, interpolation等。有很多地面可以覆盖。
要使用Pug和Koa,我们需要使用以下命令安装它。
$ npm install --save pug koa-pug
安装pug后,将其设置为应用的模板引擎。 将以下代码添加到app.js文件中。
var koa = require('koa');
var router = require('koa-router');
var app = koa();
var Pug = require('koa-pug');
var pug = new Pug({
   viewPath: './views',
   basedir: './views',
   app: app //Equivalent to app.use(pug)
});
var _ = router(); //Instantiate the router
app.use(_.routes()); //Use the routes defined using the router
app.listen(3000);
现在,创建一个名为views的新目录。 在目录中,创建名为first_view.pug的文件,并在其中输入以下数据。
doctype html
html
   head
      title = "Hello Pug"
   body
      p.greetings#people Hello Views!
要运行此页面,请将以下路由添加到您的应用程序。
_.get('/hello', getMessage); // Define routes
function *getMessage(){
   this.render('first_view');
};
您将收到输出 -
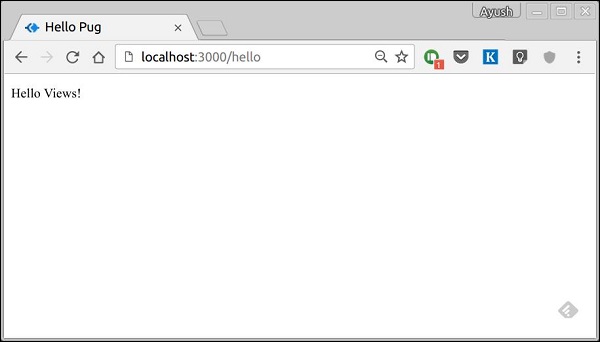
Pug所做的是,它将这个非常简单的标记转换为html。 我们不需要跟踪关闭我们的标签,也不需要使用class和id关键字,而是使用'。' 和'#'来定义它们。 上面的代码首先转换为
<!DOCTYPE html>
<html>
   <head>
      <title>Hello Pug</title>
   </head>
   <body>
      <p class = "greetings" id = "people">Hello Views!</p>
   </body>
</html>
Pug能够做的不仅仅是简化HTML标记。 让我们来探讨一下帕格的一些特征。
简单标签
标签根据其缩进嵌套。 就像在上面的例子中一样, 《title》在《head》标签中缩进,因此它位于其中。 然而, 《body》标签在同一个缩进上,因此它是《head》标签的兄弟。
我们不需要关闭标签。 一旦Pug在相同或外部缩进级别遇到下一个标记,它就会为我们关闭标记。
将文本放入标记内有三种方法 -
- 空间分开 -
h1 Welcome to Pug
- 管道文本 -
div
   | To insert multiline text,
   | You can use the pipe operator.
- 文本块 -
div.
   But that gets tedious if you have a lot of text.
   You can use "." at the end of tag to denote block of text.
   To put tags inside this block, simply enter tag in a new line and
   indent it accordingly.
注释 (Comments)
Pug使用与JavaScript(//)相同的语法来创建注释。 这些注释转换为html注释()。 例如,
//This is a Pug comment
此评论转换为 -
<!--This is a Pug comment-->
属性 (Attributes)
为了定义属性,我们在括号中使用逗号分隔的属性列表。 类和ID属性具有特殊表示。 以下代码行包含定义给定html标记的属性,类和ID。
div.container.column.main#division(width = "100",height = "100")
这行代码转换为 -
<div class = "container column main" id = "division" width = "100" height = "100"></div>
将值传递给模板
当我们渲染Pug模板时,我们实际上可以从路由处理程序中传递一个值,然后我们可以在模板中使用它。 使用以下代码创建新的路由处理程序。
var koa = require('koa');
var router = require('koa-router');
var app = koa();
var Pug = require('koa-pug');
var pug = new Pug({
viewPath: './views',
basedir: './views',
app: app // equals to pug.use(app) and app.use(pug.middleware)
});
var _ = router(); //Instantiate the router
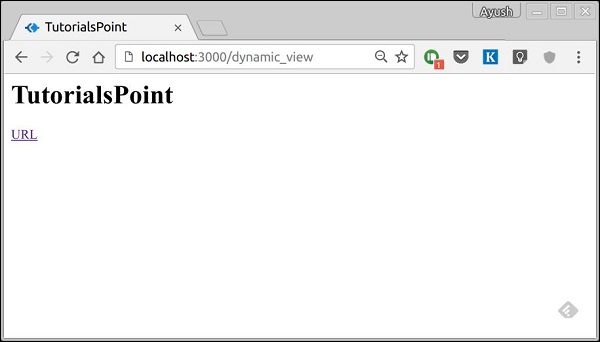
_.get('//dynamic_view', dynamicMessage); // Define routes
function *dynamicMessage(){
this.render('dynamic', {
name: "IoWiki",
url:"https://www.iowiki.com"
});
};
app.use(_.routes()); //Use the routes defined using the router
app.listen(3000);
然后,使用以下代码在views目录中创建一个名为dynamic.pug的新视图文件。
html
   head
      title = name
   body
      h1 = name
      a(href = url) URL
在浏览器中打开localhost:3000/dynamic ,以下应该是输出。 -
我们也可以在文本中使用这些传递的变量。 要在标记文本之间插入传递的变量,我们使用#{variableName}语法。 例如,在上面的示例中,如果我们要从IoWiki插入Greetings,那么我们必须使用以下代码。
html
   head
      title = name
   body
      h1 Greetings from #{name}
      a(href = url) URL
这种使用值的方法称为插值。
条件(Conditionals)
我们也可以使用条件语句和循环结构。 考虑这个实际示例,如果用户登录,我们想要显示“嗨,用户”,如果没有,那么我们想要向他显示“登录/注册”链接。 为实现这一目标,我们可以定义一个简单的模板,例如 -
html
   head
      title Simple template
   body
      if(user)
         h1 Hi, #{user.name}
      else
         a(href = "/sign_up") Sign Up
当我们使用我们的路线渲染时,如果我们传递一个像 -
this.render('/dynamic',{user:
   {name: "Ayush", age: "20"}
});
它会显示Hi,Ayush的消息。 但是,如果我们没有传递任何对象或传递没有用户密钥的对象,那么我们将获得一个注册链接。
包含和组件
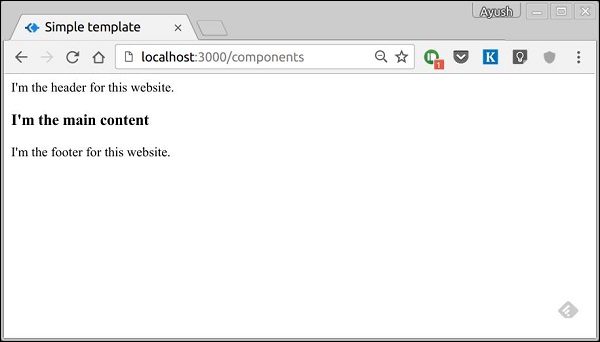
Pug提供了一种非常直观的方式来为网页创建组件。 例如,如果您看到新闻网站,则标识和类别的标题始终是固定的。 我们可以使用包含,而不是将其复制到每个视图。 以下示例显示了我们如何使用包含 -
使用以下代码创建三个视图 -
header.pug
div.header.
   I'm the header for this website.
content.pug
html
   head
      title Simple template
   body
      include ./header.pug
      h3 I'm the main content
      include ./footer.pug
footer.pug
div.footer.
   I'm the footer for this website.
为此创建一个路由,如下所示。
var koa = require('koa');
var router = require('koa-router');
var app = koa();
var Pug = require('koa-pug');
var pug = new Pug({
   viewPath: './views',
   basedir: './views',
   app: app //Equivalent to app.use(pug)
});
var _ = router(); //Instantiate the router
_.get('/components', getComponents);
function *getComponents(){
   this.render('content.pug');
}
app.use(_.routes()); //Use the routes defined using the router
app.listen(3000);
转到localhost:3000/components ,你应该得到以下输出。
include也可以用于包括明文,CSS和JavaScript。
帕格还有许多其他功能。 但是,这些不在本教程的范围内。 您可以在Pug进一步探索Pug 。
Koa.js - Form Data
表格是网络不可分割的一部分。 我们访问的几乎每个网站都为我们提供了提交或获取一些信息的表格。 要开始使用表单,我们将首先安装koa-body。 要安装它,请转到您的终端并使用 -
$ npm install --save koa-body
用以下代码替换app.js文件内容。
var koa = require('koa');
var router = require('koa-router');
var bodyParser = require('koa-body');
var app = koa();
//Set up Pug
var Pug = require('koa-pug');
var pug = new Pug({
   viewPath: './views',
   basedir: './views',
   app: app //Equivalent to app.use(pug)
});
//Set up body parsing middleware
app.use(bodyParser({
   formidable:{uploadDir: './uploads'},
   multipart: true,
   urlencoded: true
}));
_.get('/', renderForm);
_.post('/', handleForm);
function * renderForm(){
   this.render('form');
}
function *handleForm(){
   console.log(this.request.body);
   console.log(this.req.body);
   this.body = this.request.body; //This is where the parsed request is stored
}
app.use(_.routes());
app.listen(3000);
我们在这里做的新事物是导入身体解析器和multer。 我们使用body解析器来解析json和x-www-form-urlencoded标头请求,而我们使用multer来解析multipart/form-data。
让我们创建一个html表单来测试它! 使用以下代码创建名为form.pug的新视图。
html
   head
      title Form Tester
   body
      form(action = "/", method = "POST")
         div
            label(for = "say") Say:
            input(name = "say" value = "Hi")
         br
         div
            label(for = "to") To:
            input(name = "to" value = "Koa form")
         br
         button(type = "submit") Send my greetings
使用 - 运行您的服务器
nodemon index.js
现在转到localhost:3000 /并填写表单,然后提交。 你会收到回复 -
看看你的控制台,它会向你展示你的请求正文作为JavaScript对象。 例如 -

this.request.body对象包含已解析的请求正文。 要使用该对象中的字段,只需将它们用作普通的JS对象即可。
这只是发送请求的一种方式。 还有很多其他方法,但这些方法与此无关,因为我们的Koa应用程序将以相同的方式处理所有这些请求。 要阅读有关提出请求的不同方式的更多信息,请查看this页面。
Koa.js - File Uploading
Web应用程序需要提供允许文件上载的功能。 让我们看看如何从客户端接收文件并将它们存储在我们的服务器上。
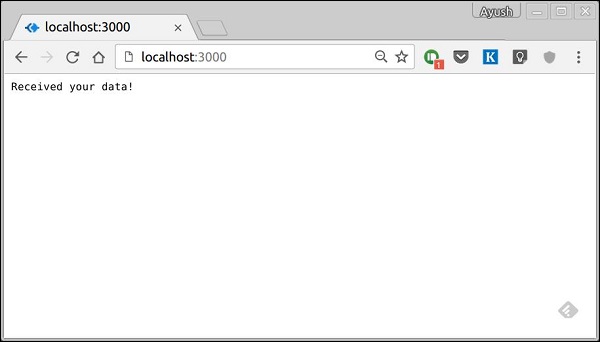
我们已经使用koa-body中间件来解析请求。 此中间件还用于处理文件上载。 让我们创建一个表单,允许我们上传文件,然后使用Koa保存这些文件。 首先使用以下内容创建名为file_upload.pug的模板。
html
   head
      title File uploads
   body
      form(action = "/upload" method = "POST" enctype = "multipart/form-data")
         div
            input(type = "text" name = "name" placeholder = "Name")
         div
            input(type = "file" name = "image")
         div
            input(type = "submit")
请注意,您需要在表单中提供与上面相同的编码类型。 现在让我们在服务器上处理这些数据。
var koa = require('koa');
var router = require('koa-router');
var bodyParser = require('koa-body');
var app = koa();
//Set up Pug
var Pug = require('koa-pug');
var pug = new Pug({
   viewPath: './views',
   basedir: './views',
   app: app
});
//Set up body parsing middleware
app.use(bodyParser({
   formidable:{uploadDir: './uploads'},    //This is where the files would come
   multipart: true,
   urlencoded: true
}));
var _ = router(); //Instantiate the router
_.get('/files', renderForm);
_.post('/upload', handleForm);
function * renderForm(){
   this.render('file_upload');
}
function *handleForm(){
   console.log("Files: ", this.request.body.files);
   console.log("Fields: ", this.request.body.fields);
   this.body = "Received your data!"; //This is where the parsed request is stored
}
app.use(_.routes());
app.listen(3000);
运行此时,您将获得以下表单。

提交时,您的控制台将生成以下输出。
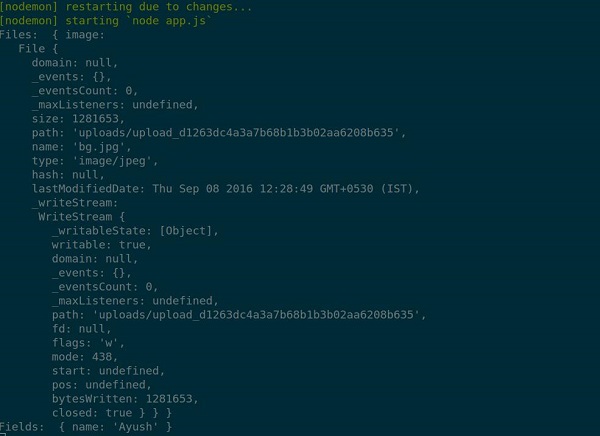
上载的文件存储在上述输出的路径中。 您可以使用this.request.body.files以及this.request.body.files在该请求中的字段来访问请求中的this.request.body.fields 。
Koa.js - Static Files
静态文件是客户端从服务器下载的文件。 创建一个新目录public 。 Express,默认情况下不允许您提供静态文件。
我们需要一个中间件来达到这个目的。 继续安装koa-serve -
$ npm install --save koa-static
现在我们需要use这个中间件。 在此之前创建一个名为public的目录。 我们将在此存储所有静态文件。 这使我们能够保证我们的服务器代码安全,因为客户端无法访问此公用文件夹上方的任何内容。 创建公共目录后,使用您喜欢的任何内容在其中创建名为hello.txt的文件。 现在将以下内容添加到app.js.
var serve = require('koa-static');
var koa = require('koa');
var app = koa();
app.use(serve('./public'));
app.listen(3000);
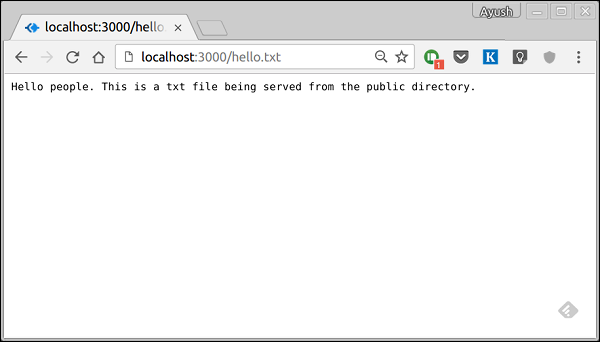
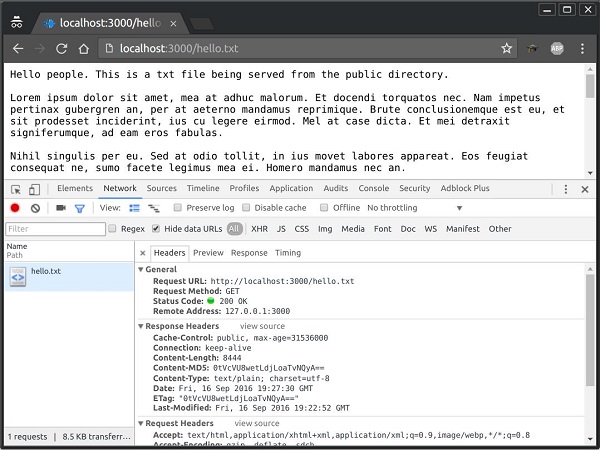
Note - Koa查找相对于静态目录的文件,因此静态目录的名称不是URL的一部分。 根路由现在设置为您的公共目录,因此您加载的所有静态文件都将公共作为根目录。 要测试这是否正常,请运行您的应用程序并访问https://localhost:3000/hello.txt
你应该得到以下输出。 请注意,这不是HTML文档或Pug视图,而是一个简单的txt文件。
多个静态目录
我们还可以使用 - 设置多个静态资产目录
var serve = require('koa-static');
var koa = require('koa');
var app = koa();
app.use(serve('./public'));
app.use(serve('./images'));
app.listen(3000);
现在,当我们请求文件时,Koa将搜索这些目录并将匹配文件发送给我们。
Koa.js - Cookies
Cookie是简单的小文件/数据,通过服务器请求发送到客户端并存储在客户端。 每次用户加载网站时,都会随请求一起发送此cookie。 这有助于跟踪用户的操作。 HTTP Cookie有很多用途。
- 会话管理
- 个性化(推荐系统)
- 用户跟踪
要使用Koa中的cookie,我们有以下函数: ctx.cookies.set()和ctx.cookies.get() 。 要设置新的Cookie,我们在Koa应用中定义一条新路线。
var koa = require('koa');
var router = require('koa-router');
var app = koa();
_.get('/', setACookie);
function *setACookie() {
   this.cookie.set('foo', 'bar', {httpOnly: false});
}
var _ = router();
app.use(_.routes());
app.listen(3000);
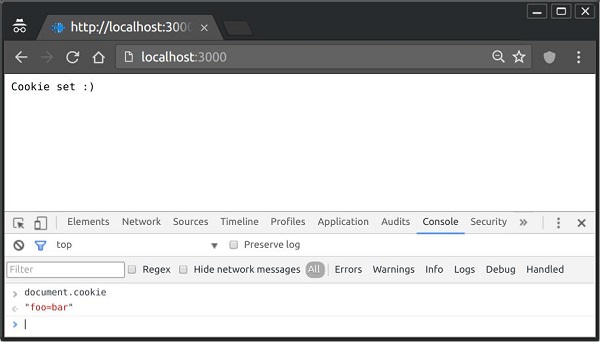
要检查cookie是否已设置,只需转到浏览器,启动控制台,然后输入 -
console.log(document.cookie);
这将产生以下输出(您可能由于浏览器中的扩展而设置了更多的cookie)。
"foo = bar"
以下是上述示例。
浏览器每次查询服务器时都会发回cookie。 要在服务器上查看cookie,请在路由中的服务器控制台上,将以下代码添加到该路由。
console.log('Cookies: foo = ', this.cookies.get('foo'));
下次向此路由发送请求时,您将获得以下输出。
Cookies: foo = bar
添加有效期限的Cookie
您可以添加过期的Cookie。 要添加过期的cookie,只需将属性“expires”设置的对象传递给您希望它到期的时间。 例如,
var koa = require('koa');
var router = require('koa-router');
var app = koa();
_.get('/', setACookie);
function *setACookie(){
   //Expires after 360000 ms from the time it is set.
	this.cookies.set('name', 'value', {
      httpOnly: false, expires: 360000 + Date.now() });
}
var _ = router();
app.use(_.routes());
app.listen(3000);
删除现有Cookie
要取消设置cookie,只需将cookie设置为空字符串即可。 例如,如果需要清除名为foo的cookie,请使用以下代码。
var koa = require('koa');
var router = require('koa-router');
var app = koa();
_.get('/', setACookie);
function *setACookie(){
   //Expires after 360000 ms from the time it is set.
   this.cookies.set('name', '');
}
var _ = router();
app.use(_.routes());
app.listen(3000);
这将取消设置所述cookie。 请注意,如果不在客户端代码中使用cookie,则应将HttpOnly选项保留为true。
Koa.js - Sessions
HTTP是无状态的,因此为了将请求与任何其他请求相关联,您需要一种在HTTP请求之间存储用户数据的方法。 Cookie和URL参数都是在客户端和服务器之间传输数据的合适方式。 但是,它们在客户端都是可读的。 Sessions解决了这个问题。 您为客户端分配一个ID,并使用该ID进行所有进一步的请求。 与客户端关联的信息存储在链接到此ID的服务器上。
我们需要koa-session,因此使用 - 安装它
npm install --save koa-session
我们将把koa-session中间件放到位。 在这个例子中,我们将使用RAM来存储会话。 切勿在生产环境中使用它。 会话中间件处理所有内容,即创建会话,设置会话cookie以及在上下文对象中创建会话对象。
每当我们再次从同一客户端发出请求时,我们就会将它们的会话信息与我们一起存储(假设服务器未重新启动)。 我们可以为此会话对象添加更多属性。 在以下示例中,我们将为客户端创建一个视图计数器。
var session = require('koa-session');
var koa = require('koa');
var app = koa();
app.keys = ['Shh, its a secret!'];
app.use(session(app));  // Include the session middleware
app.use(function *(){
   var n = this.session.views || 0;
   this.session.views = ++n;
   if(n === 1)
      this.body = 'Welcome here for the first time!';
   else
      this.body = "You've visited this page " + n + " times!";
})
app.listen(3000);
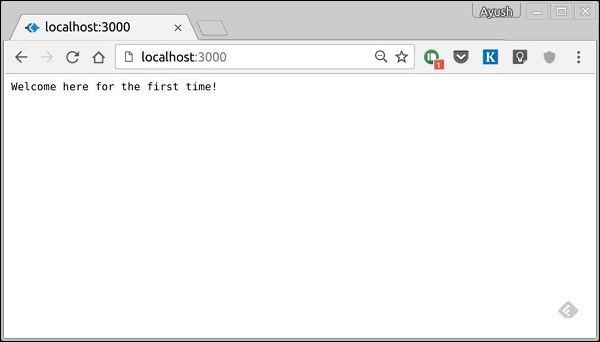
上述代码的作用是,当用户访问该站点时,它会为该用户创建一个新会话并分配一个cookie。 下次用户访问时,将检查cookie并相应地更新page_view会话变量。
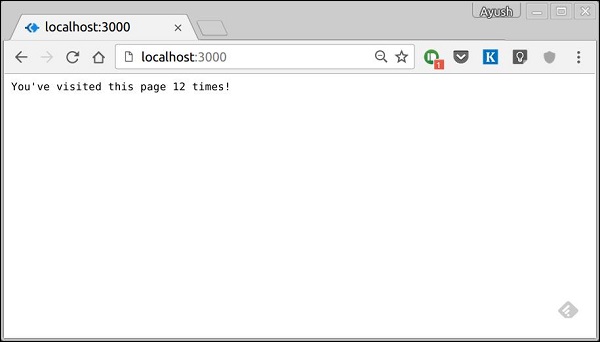
现在,如果您运行该应用程序并转到localhost:3000,您将收到以下响应。
如果您再次访问该页面,页面计数器将会增加。 在这种情况下,页面刷新了12次。
Koa.js - Authentication
身份验证是将提供的凭据与本地操作系统或身份验证服务器中授权用户信息的数据库中的凭据进行比较的过程。 如果凭据匹配,则完成该过程并授予用户访问权限。
我们将创建一个非常基本的身份验证系统,它将使用Basic HTTP Authentication 。 这是实施访问控制的最简单方法,因为它不需要cookie,会话或其他任何东西。 要使用它,客户端必须发送Authorization标头以及它所做的每个请求。 用户名和密码未加密,但在单个字符串中连接,如下所示。
username:password
此字符串使用Base64进行编码,并将单词Basic放在此值之前。 例如,如果您的用户名是Ayush并且密码为India,则字符串"Ayush:India"将按照授权标头中的编码发送。
Authorization: Basic QXl1c2g6SW5kaWE=
要在您的koa应用程序中实现此功能,您需要koa-basic-auth中间件。 使用 - 安装 -
$ npm install --save koa-basic-auth
现在打开app.js文件并在其中输入以下代码。
//This is what the authentication would be checked against
var credentials = { name: 'Ayush', pass: 'India' }
var koa = require('koa');
var auth = require('koa-basic-auth');
var _ = require('koa-router')();
var app = koa();
//Error handling middleware
app.use(function *(next){
   try {
      yield next;
   } catch (err) {
      if (401 == err.status) {
         this.status = 401;
         this.set('WWW-Authenticate', 'Basic');
         this.body = 'You have no access here';
      } else {
         throw err;
      }
   }
});
// Set up authentication here as first middleware.
// This returns an error if user is not authenticated.
_.get('/protected', auth(credentials), function *(){
   this.body = 'You have access to the protected area.';
   yield next;
});
// No authentication middleware present here.
_.get('/unprotected', function*(next){
   this.body = "Anyone can access this area";
   yield next;
});
app.use(_.routes());
app.listen(3000);
我们创建了一个错误处理中间件来处理所有与身份验证相关的错误。 然后,我们创建了2条路线 -
/protected - 只有在用户发送正确的身份验证标头时才能访问此路由。 对于所有其他人,它会给出错误。
/unprotected - 任何人都可以访问此路由,无论是否具有身份验证。
现在,如果您在没有身份验证标头或凭据错误的情况下向/ protected发送请求,您将收到错误消息。 例如,
$ curl https://localhost:3000/protected
你会收到回复 -
HTTP/1.1 401 Unauthorized
WWW-Authenticate: Basic
Content-Type: text/plain; charset=utf-8
Content-Length: 28
Date: Sat, 17 Sep 2016 19:05:56 GMT
Connection: keep-alive
Please authenticate yourself
但是,使用正确的凭据,您将获得预期的响应。 例如,
$ curl -H "Authorization: basic QXl1c2g6SW5kaWE=" https://localhost:3000/protected -i
你会收到回复 -
HTTP/1.1 200 OK
Content-Type: text/plain; charset=utf-8
Content-Length: 38
Date: Sat, 17 Sep 2016 19:07:33 GMT
Connection: keep-alive
You have access to the protected area.
每个人仍然可以访问/未受保护的路线。
Koa.js - Compression
压缩是一种节省带宽和加快网站速度的简单有效方法。 它仅与现代浏览器兼容,如果您的用户也使用旧版浏览器,则应谨慎使用。
从服务器发送响应时,如果使用压缩,则可以大大缩短加载时间。 我们将使用一个名为koa-compress的中间件来处理文件的压缩以及设置适当的头文件。
继续使用 - 安装中间件 -
$ npm install --save koa-compress
现在在你的app.js文件中,添加以下代码 -
var koa = require('koa');
var router = require('koa-router');
var app = koa();
var Pug = require('koa-pug');
var pug = new Pug({
   viewPath: './views',
   basedir: './views',
   app: app //Equivalent to app.use(pug)
});
app.use(compress({
   filter: function (content_type) {
      return /text/i.test(content_type)
   },
   threshold: 2048,
   flush: require('zlib').Z_SYNC_FLUSH
}));
var _ = router(); //Instantiate the router
_.get('/', getRoot);
function *getRoot(next){
   this.render('index');
}
app.use(_.routes()); //Use the routes defined using the router
app.listen(3000);
这使我们的压缩中间件到位。 filter选项是一个检查响应内容类型以决定是否压缩的函数。 阈值选项是要压缩的最小响应大小(以字节为单位)。 这确保我们不会压缩每一个小响应。
以下是没有压缩的响应。

以下是压缩的类似响应。

如果你查看底部的尺寸标签,你可以很好地看到两者之间的差异。 当我们压缩文件时,有超过150%的改进。
Koa.js - Caching
缓存是存储可重用响应的术语,以便使后续请求更快。 每个浏览器都附带一个HTTP缓存实现。 我们所要做的就是确保每个服务器响应都提供正确的HTTP头指令,以指示浏览器在何时以及浏览器缓存响应的时间和长度。
以下是在您的网络应用程序中包含缓存的一些好处 -
您的网络成本会降低。 如果您的内容已缓存,则您需要为每个后续请求发送较少的内容。
您网站的速度和性能会提高。
即使您的客户离线,您的内容也可用。
我们将使用koa-static-cache中间件在我们的应用程序中实现缓存。 使用 - 安装这些中间件 -
$ npm install --save koa-static-cache
转到app.js文件并将以下代码添加到其中。
var koa = require('koa');
var app = koa();
var path = require('path');
var staticCache = require('koa-static-cache');
app.use(staticCache(path.join(__dirname, 'public'), {
   maxAge: 365 * 24 * 60 * 60  //Add these files to caches for a year
}))
app.listen(3000);
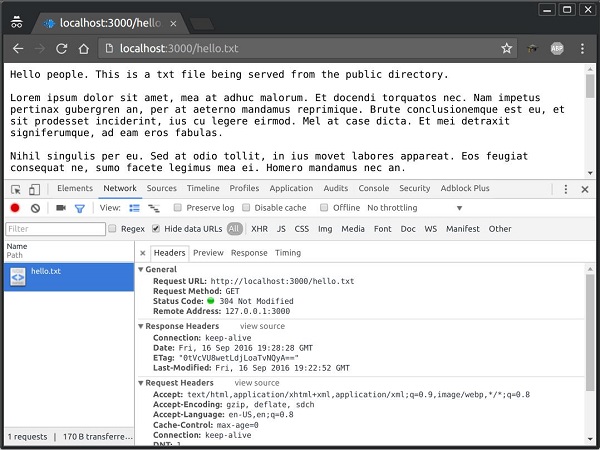
koa-static-cache中间件用于缓存客户端的服务器响应。 根据我们在初始化缓存对象时提供的选项设置cache-control头。 我们已将此缓存响应的到期时间设置为1年。 以下是我们在缓存文件之前和之后发送的请求的比较。
在缓存此文件之前,返回的状态代码为200,这是正常的。 响应头具有关于要缓存的内容的多个信息,并且还给出了内容的ETag 。
下次发送请求时,它与ETtag一起发送。 由于我们的内容在服务器上没有改变,它的相应ETag也保持不变,并且客户端被告知它本地的副本与服务器提供的内容是最新的,应该使用本地副本而不是请求再次。
Note - 要使任何缓存文件无效,只需更改其文件名并更新其引用即可。 这将确保您有一个新文件发送到客户端,客户端无法从缓存中加载它。
Koa.js - Database
我们收到了请求,但没有将它们存储在任何地方。 我们需要一个数据库来存储数据。 我们将使用一个名为MongoDB的着名NoSQL数据库。 要安装和阅读有关Mongo的信息,请访问此链接。
为了将Mongo与Koa一起使用,我们需要一个客户端API用于该节点。 我们有多种选择,但是对于本教程,我们将坚持使用mongoose 。 Mongoose用于Node for MongoDB中的document modeling 。 文档建模意味着,我们将创建一个Model (非常类似于面向文档的编程中的class ),然后我们将使用此模型生成documents (就像我们在OOP中创建documents of a class一样)。 我们所有的处理都将在这些“文档”上完成,最后,我们将在这些文档中编写这些文档。
设置Mongoose
现在我们安装了Mongo,让我们安装mongoose,就像我们安装其他节点包一样。
$ npm install --save mongoose
在我们开始使用mongoose之前,我们必须使用Mongo shell创建一个数据库。 要创建新数据库,请打开终端并输入“mongo”。 Mongo shell将启动,输入以下内容。
use my_db
将为您创建一个新数据库。 每当你打开Mongo shell时,它都默认为“test”db,你必须使用与上面相同的命令更改到你的数据库。
要使用mongoose,我们将在app.js文件中要求它,然后连接到在mongodb:// localhost上运行的mongod服务
var koa = require('koa');
var _ = require('koa-router')();
var app = koa();
var mongoose = require('mongoose');
mongoose.connect('mongodb://localhost/my_db');
app.use(_.routes());
app.listen(3000);
现在我们的应用程序已连接到我们的数据库,让我们创建一个新模型。 该模型将作为我们数据库中的集合。 要创建新模型,请在定义任何路径之前使用以下代码。
var koa = require('koa');
var _ = require('koa-router')();
var app = koa();
var mongoose = require('mongoose');
mongoose.connect('mongodb://localhost/my_db');
var personSchema = mongoose.Schema({
   name: String,
   age: Number,
   nationality: String
});
var Person = mongoose.model("Person", personSchema);
app.use(_.routes());
app.listen(3000);
上面的代码定义了一个人的模式,用于创建一个猫鼬模型Person 。
保存文件
现在我们将创建一个新的html表单,它将获取一个人的详细信息并将其保存到我们的数据库中。 要创建表单,请在views目录中创建一个名为person.pug的新视图文件,其中包含以下内容。
html
   head
      title Person
   body
      form(action = "/person", method = "POST")
         div
            label(for = "name") Name:
            input(name = "name")
         br
         div
            label(for = "age") Age:
            input(name = "age")
         br
         div
            label(for = "nationality") Nationality:
            input(name = "nationality")
         br
         button(type = "submit") Create new person
还要在index.js中添加一个新的get路由来呈现此文档。
var koa = require('koa');
var _ = require('koa-router')();
var app = koa();
var mongoose = require('mongoose');
mongoose.connect('mongodb://localhost/my_db');
var personSchema = mongoose.Schema({
   name: String,
   age: Number,
   nationality: String
});
var Person = mongoose.model("Person", personSchema);
_.get('/person', getPerson);
function *getPerson(next){
   this.render('person');
   yield next;
}
app.use(_.routes());
app.listen(3000);
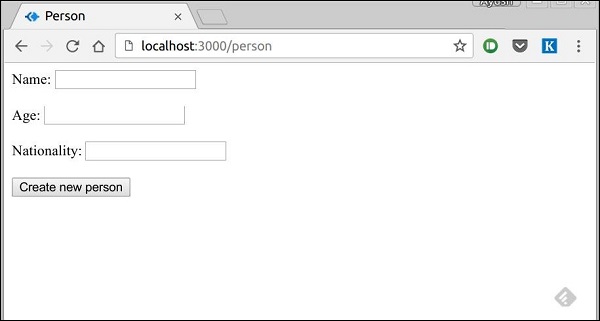
转到localhost:3000/person以检查我们的表单是否显示正确。 请注意,这只是UI,它还没有工作。 这就是我们表单的外观。
我们现在将在'/ person'中定义一个将处理此请求的邮政路由处理程序。
var koa = require('koa');
var _ = require('koa-router')();
var app = koa();
var mongoose = require('mongoose');
mongoose.connect('mongodb://localhost/my_db');
var personSchema = mongoose.Schema({
   name: String,
   age: Number,
   nationality: String
});
var Person = mongoose.model("Person", personSchema);
_.post('/person', createPerson);
function *createPerson(next){
   var self = this;
   var personInfo = self.request.body; //Get the parsed information
   if(!personInfo.name || !personInfo.age || !personInfo.nationality){
      self.render(
         'show_message', {message: "Sorry, you provided wrong info", type: "error"});
   } else {
      var newPerson = new Person({
         name: personInfo.name,
         age: personInfo.age,
         nationality: personInfo.nationality
      });
      yield newPerson.save(function(err, res) {
         if(err)
            self.render('show_message',
               {message: "Database error", type: "error"});
         else
            self.render('show_message',
               {message: "New person added", type: "success", person: personInfo});
      });
   }
}
app.use(_.routes());
app.listen(3000);
在上面的代码中,如果我们收到任何空字段或者没有收到任何字段,我们将发送错误响应。 但是,如果我们收到格式良好的文档,那么我们将从Person模型创建一个newPerson文档,并使用newPerson.save()函数将其保存到我们的DB中。 这是在mongoose中定义的,并接受回调作为参数。 此回调有两个参数, error和response 。 这将呈现show_message视图,因此我们也需要创建它。
要显示此路线的响应,我们还需要创建一个show_message视图。 使用以下代码创建新视图。
html
head
title Person
body
if(type = "error")
h3(style = "color:red") #{message}
else
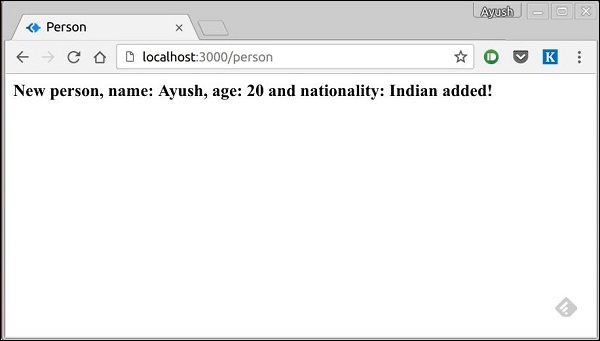
h3 New person, name:
#{person.name}, age:
#{person.age} and nationality:
#{person.nationality} added!
以下是我们在成功提交表单时收到的回复(show_message.pug)。
我们现在有一个创建人的界面!
检索文件
Mongoose提供了很多检索文档的功能,我们将重点关注其中的三个。 所有这些函数也将回调作为最后一个参数,就像save函数一样,它们的参数是错误和响应。
这三个功能是 -
Model.find(conditions, callback)
此函数查找与条件对象中的字段匹配的所有文档。 Mongo中使用的相同运算符也适用于mongoose。 例如,这将从人员集合中获取所有文档。
Person.find(function(err, response){
   console.log(response);
});
这将获取字段名称为“Ayush”且年龄为20的所有文档。
Person.find({name: "Ayush", age: 20},
   function(err, response){
      console.log(response);
   });
我们还可以提供我们需要的投影,即我们需要的字段。 例如,如果我们只想要nationality为"Indian"的人的names ,我们会使用 -
Person.find({nationality: "Indian"},
   "name", function(err, response) {
      console.log(response);
   });
Model.findOne(conditions, callback)
此函数始终提取单个最相关的文档。 它与Model.find()具有完全相同的参数。
Model.findById(id, callback)
此函数将_id (由mongo定义)作为第一个参数,一个可选的投影字符串和一个处理响应的回调。 例如,
Person.findById("507f1f77bcf86cd799439011",
   function(err, response){
      console.log(response);
   });
让我们创建一个查看所有人员记录的路线。
var koa = require('koa');
var _ = require('koa-router')();
var app = koa();
var mongoose = require('mongoose');
mongoose.connect('mongodb://localhost/my_db');
var personSchema = mongoose.Schema({
   name: String,
   age: Number,
   nationality: String
});
var Person = mongoose.model("Person", personSchema);
_.get('/people', getPeople);
function *getPeople(next){
   var self = this;
   yield Person.find(function(err, response){
      self.body = response;
   });
}
app.use(_.routes());
app.listen(3000);
更新文件
Mongoose提供了三种更新文档的功能。
Model.update(condition, updates, callback)
此函数采用条件并将对象更新为输入,并将更改应用于与集合中的条件匹配的所有文档。 例如,以下代码将更新所有Person文档以具有“American”国籍。
Person.update({age: 25},
   {nationality: "American"},
   function(err, response){
      console.log(response);
   });
Model.findOneAndUpdate(condition, updates, callback)
它完全符合所说的。 根据查询查找一个文档,并根据第二个参数进行更新。 它还将回调作为最后一个参数。 例如,
Person.findOneAndUpdate({name: "Ayush"},
   {age: 40},
   function(err, response){
      console.log(response);
   });
Model.findByIdAndUpdate(id, updates, callback)
此函数更新由其id标识的单个文档。 例如,
Person.findByIdAndUpdate("507f1f77bcf86cd799439011",
   {name: "James"},
   function(err, response){
      console.log(response);
   });
让我们创建一个更新人的路线。 这将是一个PUT路由,其中id为参数,有效载荷中包含详细信息。
var koa = require('koa');
var _ = require('koa-router')();
var app = koa();
var mongoose = require('mongoose');
mongoose.connect('mongodb://localhost/my_db');
var personSchema = mongoose.Schema({
   name: String,
   age: Number,
   nationality: String
});
var Person = mongoose.model("Person", personSchema);
_.put('/people/:id', updatePerson);
function *updatePerson() {
   var self = this;
   yield Person.findByIdAndUpdate(self.params.id,
      {$set: {self.request.body}}, function(err, response){
      if(err) {
         self.body = {
            message: "Error in updating person with id " + self.params.id};
      } else {
         self.body = response;
      }
   });
}
app.use(_.routes());
app.listen(3000);
要测试此路线,请在终端中输入以下内容(将ID替换为已创建人员的ID)。
curl -X PUT --data "name = James&age = 20&nationality = American" https://localhost:3000/people/507f1f77bcf86cd799439011
这将使用上述详细信息更新与路径中提供的id相关联的文档。
删除文件
我们已经介绍了C reate, R ead和U pdate,现在我们将看到如何使用mongoose来删除文档。 这里有三个功能,就像更新一样。
Model.remove(condition, [callback])
此函数将条件对象作为输入,并删除与条件匹配的所有文档。 例如,如果我们需要移除所有20岁的人,
Person.remove({age:20});
Model.findOneAndRemove(condition, [callback])
此函数根据条件对象删除single最相关的文档。 例如,
Person.findOneAndRemove({name: "Ayush"});
Model.findByIdAndRemove(id, [callback])
此函数删除由其id标识的单个文档。 例如,
Person.findByIdAndRemove("507f1f77bcf86cd799439011");
现在让我们创建一条从数据库中删除人员的路线。
var koa = require('koa');
var _ = require('koa-router')();
var app = koa();
var mongoose = require('mongoose');
mongoose.connect('mongodb://localhost/my_db');
var personSchema = mongoose.Schema({
   name: String,
   age: Number,
   nationality: String
});
var Person = mongoose.model("Person", personSchema);
_.delete('/people/:id', deletePerson);
function *deletePerson(next){
   var self = this;
   yield Person.findByIdAndRemove(self.params.id, function(err, response){
      if(err) {
         self.body = {message: "Error in deleting record id " + self.params.id};
      } else {
         self.body = {message: "Person with id " + self.params.id + " removed."};
      }
   });
}
app.use(_.routes());
app.listen(3000);
要测试它,请使用以下curl命令 -
curl -X DELETE https://localhost:3000/people/507f1f77bcf86cd799439011
这将删除具有给定id的人,产生以下消息。 -
{message: "Person with id 507f1f77bcf86cd799439011 removed."}
这包含了我们如何使用MongoDB,mongoose和Koa创建简单的CRUD应用程序。 要进一步探索mongoose,请阅读API文档。
Koa.js - RESTful APIs
要创建移动应用程序,单页面应用程序,使用AJAX调用并向客户端提供数据,您需要一个API。 如何构造和命名这些API和端点的流行架构风格称为REST(Representational Transfer State) 。 HTTP 1.1的设计考虑了REST原则。 REST由Roy Fielding于2000年在他的论文Fielding Dissertations中介绍。
RESTful URI和方法为我们提供了处理请求所需的几乎所有信息。 下表总结了如何使用各种谓词以及如何命名URI。 我们将在最后创建一个电影API,所以让我们讨论它将如何构建。
| 方法 | URI | 细节 | 功能 |
|---|---|---|---|
| GET | /movies | Safe, cachable | 获取所有电影及其详细信息的列表 |
| GET | /movies/1234 | Safe, cachable | 获取Movie id 1234的详细信息 |
| POST | /movies | N/A | 创建一个提供详细信息的新电影。 Response包含此新创建资源的URI。 |
| PUT | /movies/1234 | Idempotent | 修改影片ID 1234(如果尚不存在,则创建一个)。 Response包含此新创建资源的URI。 |
| DELETE | /movies/1234 | Idempotent | 应删除电影ID 1234(如果存在)。 响应应包含请求的状态。 |
| DELETE or PUT | /movies | Invalid | 应该是无效的。 DELETE和PUT应指定他们正在处理的资源。 |
现在让我们在Koa中创建这个API。 我们将使用JSON作为我们的传输数据格式,因为它易于使用JavaScript并具有许多其他好处。 用以下内容替换index.js文件 -
INDEX.JS
var koa = require('koa');
var router = require('koa-router');
var bodyParser = require('koa-body');
var app = koa();
//Set up body parsing middleware
app.use(bodyParser({
   formidable:{uploadDir: './uploads'},
   multipart: true,
   urlencoded: true
}));
//Require the Router we defined in movies.js
var movies = require('./movies.js');
//Use the Router on the sub route /movies
app.use(movies.routes());
app.listen(3000);
现在我们已经设置了应用程序,让我们专注于创建API。 首先设置movies.js文件。 我们没有使用数据库来存储电影,而是将它们存储在内存中,因此每次服务器重新启动时,我们添加的电影都将消失。 这可以使用数据库或文件(使用节点fs模块)轻松模仿。
导入koa-router,创建路由器并使用module.exports导出它。
var Router = require('koa-router');
var router = Router({
  prefix: '/movies'
});  //Prefixed all routes with /movies
var movies = [
   {id: 101, name: "Fight Club", year: 1999, rating: 8.1},
   {id: 102, name: "Inception", year: 2010, rating: 8.7},
   {id: 103, name: "The Dark Knight", year: 2008, rating: 9},
   {id: 104, name: "12 Angry Men", year: 1957, rating: 8.9}
];
//Routes will go here
module.exports = router;
GET路线
定义获取所有电影的GET路线。
router.get('/', sendMovies);
function *sendMovies(next){
   this.body = movies;
   yield next;
}
而已。 要测试这是否正常,运行您的应用程序,然后打开您的终端并输入 -
curl -i -H "Accept: application/json" -H "Content-Type: application/json" -X GET localhost:3000/movies
你会得到以下回应 -
[{"id":101,"name":"Fight
Club","year":1999,"rating":8.1},{"id":102,"name":"Inception","year":2010,"rating":8.7},
{"id":103,"name":"The Dark Knight","year":2008,"rating":9},{"id":104,"name":"12 Angry
Men","year":1957,"rating":8.9}]
我们有一条获得所有电影的路线。 现在让我们创建一个通过其id获取特定电影的路线。
router.get('/:id([0-9]{3,})', sendMovieWithId);
function *sendMovieWithId(next){
   var ctx = this;
   var currMovie = movies.filter(function(movie){
      if(movie.id == ctx.params.id){
         return true;
      }
   });
   if(currMovie.length == 1){
      this.body = currMovie[0];
   } else {
      this.response.status = 404;//Set status to 404 as movie was not found
      this.body = {message: "Not Found"};
   }
   yield next;
}
这将根据我们提供的ID为我们提供电影。 要对此进行测试,请在终端中使用以下命令。
curl -i -H "Accept: application/json" -H "Content-Type: application/json" -X GET localhost:3000/movies/101
你会收到回复 -
{"id":101,"name":"Fight Club","year":1999,"rating":8.1}
如果您访问无效路由,它将产生一个无法GET错误,而如果您访问一个ID不存在的有效路由,它将产生404错误。
我们完成了GET路线。 现在,让我们继续进行POST路由。
POST路线
使用以下路由处理POSTed数据。
router.post('/', addNewMovie);
function *addNewMovie(next){
   //Check if all fields are provided and are valid:
   if(!this.request.body.name ||
      !this.request.body.year.toString().match(/^[0-9]{4}$/g) ||
      !this.request.body.rating.toString().match(/^[0-9]\.[0-9]$/g)){
      this.response.status = 400;
      this.body = {message: "Bad Request"};
   } else {
      var newId = movies[movies.length-1].id+1;
      movies.push({
         id: newId,
         name: this.request.body.name,
         year: this.request.body.year,
         rating: this.request.body.rating
      });
      this.body = {message: "New movie created.", location: "/movies/" + newId};
   }
   yield next;
}
这将创建一个新电影并将其存储在电影变量中。 要测试此路线,请在终端中输入以下内容 -
curl -X POST --data "name = Toy%20story&year = 1995&rating = 8.5"
https://localhost:3000/movies
你会得到以下回应 -
{"message":"New movie created.","location":"/movies/105"}
要测试是否已将其添加到movies对象,请再次运行/ movies/105的get请求。 你会得到以下回应 -
{"id":105,"name":"Toy story","year":"1995","rating":"8.5"}
让我们继续创建PUT和DELETE路由。
PUT路线
PUT路由几乎与POST路由完全相同。 我们将指定要更新/创建的对象的id。 以下列方式创建路线 -
router.put('/:id', updateMovieWithId);
function *updateMovieWithId(next){
   //Check if all fields are provided and are valid:
   if(!this.request.body.name ||
      !this.request.body.year.toString().match(/^[0-9]{4}$/g) ||
      !this.request.body.rating.toString().match(/^[0-9]\.[0-9]$/g) ||
      !this.params.id.toString().match(/^[0-9]{3,}$/g)){
      this.response.status = 400;
      this.body = {message: "Bad Request"};
   } else {
      //Gets us the index of movie with given id.
      var updateIndex = movies.map(function(movie){
         return movie.id;
      }).indexOf(parseInt(this.params.id));
      if(updateIndex === -1){
         //Movie not found, create new movies.push({
            id: this.params.id,
            name: this.request.body.name,
            year: this.request.body.year,
            rating: this.request.body.rating
         });
         this.body = {message: "New movie created.", location: "/movies/" + this.params.id};
      } else {
         //Update existing movie
         movies[updateIndex] = {
            id: this.params.id,
            name: this.request.body.name,
            year: this.request.body.year,
            rating: this.request.body.rating
         };
         this.body = {message: "Movie id " + this.params.id + " updated.", location: "/movies/" + this.params.id};
      }
   }
}
该路由将执行我们在上表中指定的功能。 它将使用新的详细信息更新对象(如果存在)。 如果它不存在,它将创建一个新对象。 要测试此路由,请使用以下curl命令。 这将更新现有的电影。 要创建新电影,只需将ID更改为不存在的ID。
curl -X PUT --data "name = Toy%20story&year = 1995&rating = 8.5"
https://localhost:3000/movies/101
响应 (Response)
{"message":"Movie id 101 updated.","location":"/movies/101"}
删除路线
使用以下代码创建删除路由。
router.delete('/:id', deleteMovieWithId);
function *deleteMovieWithId(next){
   var removeIndex = movies.map(function(movie){
      return movie.id;
   }).indexOf(this.params.id); //Gets us the index of movie with given id.
   if(removeIndex === -1){
      this.body = {message: "Not found"};
   } else {
      movies.splice(removeIndex, 1);
      this.body = {message: "Movie id " + this.params.id + " removed."};
   }
}
以与我们为其他人相同的方式测试路线。 删除成功后(例如id 105),您将获得 -
{message: "Movie id 105 removed."}
最后,我们的movies.js文件看起来像 -
var Router = require('koa-router');
var router = Router({
   prefix: '/movies'
});  //Prefixed all routes with /movies
var movies = [
   {id: 101, name: "Fight Club", year: 1999, rating: 8.1},
   {id: 102, name: "Inception", year: 2010, rating: 8.7},
   {id: 103, name: "The Dark Knight", year: 2008, rating: 9},
   {id: 104, name: "12 Angry Men", year: 1957, rating: 8.9}
];
//Routes will go here
router.get('/', sendMovies);
router.get('/:id([0-9]{3,})', sendMovieWithId);
router.post('/', addNewMovie);
router.put('/:id', updateMovieWithId);
router.delete('/:id', deleteMovieWithId);
function *deleteMovieWithId(next){
   var removeIndex = movies.map(function(movie){
      return movie.id;
   }).indexOf(this.params.id); //Gets us the index of movie with given id.
   if(removeIndex === -1){
      this.body = {message: "Not found"};
   } else {
      movies.splice(removeIndex, 1);
      this.body = {message: "Movie id " + this.params.id + " removed."};
   }
}
function *updateMovieWithId(next) {
   //Check if all fields are provided and are valid:
   if(!this.request.body.name ||
      !this.request.body.year.toString().match(/^[0-9]{4}$/g) ||
      !this.request.body.rating.toString().match(/^[0-9]\.[0-9]$/g) ||
      !this.params.id.toString().match(/^[0-9]{3,}$/g)){
      this.response.status = 400;
      this.body = {message: "Bad Request"};
   } else {
      //Gets us the index of movie with given id.
      var updateIndex = movies.map(function(movie){
         return movie.id;
      }).indexOf(parseInt(this.params.id));
      if(updateIndex === -1){
         //Movie not found, create new
         movies.push({
            id: this.params.id,
            name: this.request.body.name,
            year: this.request.body.year,
            rating: this.request.body.rating
         });
         this.body = {message: "New movie created.", location: "/movies/" + this.params.id};
      } else {
         //Update existing movie
            movies[updateIndex] = {
            id: this.params.id,
            name: this.request.body.name,
            year: this.request.body.year,
            rating: this.request.body.rating
         };
         this.body = {message: "Movie id " + this.params.id + " updated.",
            location: "/movies/" + this.params.id};
      }
   }
}
function *addNewMovie(next){
   //Check if all fields are provided and are valid:
   if(!this.request.body.name ||
      !this.request.body.year.toString().match(/^[0-9]{4}$/g) ||
      !this.request.body.rating.toString().match(/^[0-9]\.[0-9]$/g)){
      this.response.status = 400;
      this.body = {message: "Bad Request"};
   } else {
      var newId = movies[movies.length-1].id+1;
      movies.push({
         id: newId,
         name: this.request.body.name,
         year: this.request.body.year,
         rating: this.request.body.rating
      });
      this.body = {message: "New movie created.", location: "/movies/" + newId};
   }
   yield next;
}
function *sendMovies(next){
   this.body = movies;
   yield next;
}
function *sendMovieWithId(next){
   var ctx = this
   var currMovie = movies.filter(function(movie){
      if(movie.id == ctx.params.id){
         return true;
      }
   });
   if(currMovie.length == 1){
      this.body = currMovie[0];
   } else {
      this.response.status = 404;//Set status to 404 as movie was not found
      this.body = {message: "Not Found"};
   }
   yield next;
}
module.exports = router;
这样就完成了我们的REST API。 现在,您可以使用这种简单的架构风格和Koa创建更复杂的应用程序。
Koa.js - Logging
在创建Web应用程序时,日志记录非常有用,因为它们会告诉我们哪些地方出了问题。 我们还得到了出错的背景,并为此提出了可能的解决方案。
要在Koa中启用日志记录,我们需要中间件koa-logger 。 使用以下命令安装它。
$ npm install --save-dev koa-logger
现在,在您的应用程序中,添加以下代码以启用日志记录。
var logger = require('koa-logger')
var koa = require('koa')
var app = koa()
app.use(logger())
app.use(function*(){
   this.body = "Hello Logger";
})
app.listen(3000)
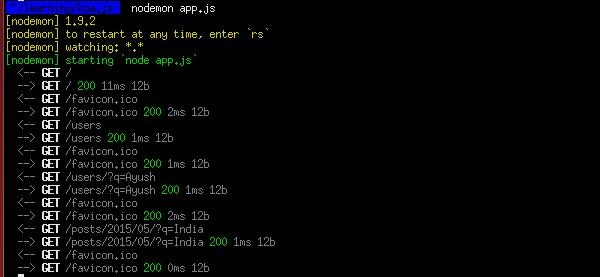
运行此服务器并访问服务器上的任何路由。 你应该看到日志像 -
现在,如果您在特定路由或请求上收到错误,这些日志应该可以帮助您找出每个路由或错误。
Koa.js - Scaffolding
脚手架允许我们轻松地skeleton for a web application创建skeleton for a web application 。 我们手动创建了我们的公共目录,添加了中间件,创建了单独的路径文件等。脚手架工具为我们设置了所有这些东西,以便我们可以直接开始构建我们的应用程序。
我们将使用的脚手架叫做Yeoman 。 它是为Node.js构建的脚手架工具,但也有几个其他框架的生成器(如flask,rails,django等)。 要安装yeoman,请在终端中输入以下命令。
$ npm install -g yeoman
Yeoman使用生成器来构建应用程序。 要查看npm上可用的发电机与yeoman一起使用,请到here 。 出于本教程的目的,我们将使用'generator-koa'。 要安装此生成器,请在终端中输入以下命令。
$ npm install -g generator-koa
要使用此生成器,请输入 -
yo koa
然后它将创建一个目录结构,并为您创建以下文件。 它还将为您安装必要的npm模块和割草机组件。
create package.json
create test/routeSpec.js
create views/layout.html
create views/list.html
create public/styles/main.css
create public/scripts/.gitkeep
create controllers/messages.js
create app.js
create .editorconfig
create .jshintrc
I'm all done. Running npm install & bower install for you to install
the required dependencies.
If this fails, try running the command yourself.
这台发电机为我们创造了一个非常简单的结构
.
├── controllers
│   └── messages.js
├── public
|   ├── scripts
|   └── styles
|       └── main.css
├── test
|   └── routeSpec.js
├── views
|   ├── layout.html
|   └── list.html
├── .editorconfig
├── .jshintrc
├── app.js
└── package.json
探索适用于Koa的众多发电机,并选择适合您的发电机。 使用所有发电机的步骤是相同的。 你需要安装一个生成器,使用yeoman运行它,它会问你一些问题,然后根据你的答案为你的应用程序创建一个框架。
Koa.js - Resources
以下是我们在开发本教程时使用的资源列表 -
Koajs - 示例社区创建的示例列表
使用koa.js的CRUD API - 在Koa.js中创建CRUD API的简短截屏视频
