JasmineJS - 写作文本和执行( Writing Text & Execution)
在本章中,我们将创建一个hello world app ,它将测试我们的“helloworld.js”文件。 在开发hello world应用程序之前,请回到上一章,确保您的环境已准备好使用Jasmine进行测试。
Step 1 − Create a Web application in your IDE
在这里,我们使用NetBeans 8.1在Jasmine中开发我们的hello world应用程序。 在NetBeans中,转到文件→新建项目→Html5/JS应用程序并创建项目。 创建项目后,项目目录应如下面的屏幕截图所示。 我们将我们的项目命名为Jasmine_Demo 。

Step 2 − Include the Jasmine lib file into the application
创建演示项目后,您需要做的就是在创建的应用程序的Unit Tests文件夹中包含Jasmine库的unzip文件夹。 将所有库文件添加到我们的应用程序文件夹后,我们项目的结构将如下面的屏幕截图所示。

spec和src文件夹下给出的文件是Jasmine团队提供的演示文件。 删除这些文件,因为我们将创建自己的测试文件和测试用例。 删除这些JavaScript文件时,我们需要删除我们的输出html文件SpecRunner.html的那些文件的引用。
以下是SpecRunner.html文件的屏幕截图,其中将删除spec和src中不同JavaScript文件的引用。
Step 3 − Create a JavaScript file
在这一步中,我们将在src文件夹下创建一个名为helloworld.js的JavaScript文件。 这是我们将通过Jasmine测试的文件。 创建JavaScript文件后,在文件中附加以下代码集。
/*
* This is the JavaScript file that need to be tested through jasmine
* Below is the helloworld function that will return 'Hello World'
*
*/
var helloworld = function(){
   return 'Hello World';
};
Step 4 − Create a test case
在此步骤中,我们将创建另一个JavaScript文件,其中包含上述JavaScript文件的测试用例。 继续在“Spec”文件夹下创建一个JavaScript文件,并将其命名为“HelloWorldsSpec.js” 。 将以下代码行添加到此js文件中。
/*
* This is the file which will call our java script file that need to be tested.
* Each describe block is equivalent to one test case
*
*/
describe("Hello World", function(){
   it("should Return Hello world",function(){
      expect(helloworld()).toEqual('Hello World');
   });
});
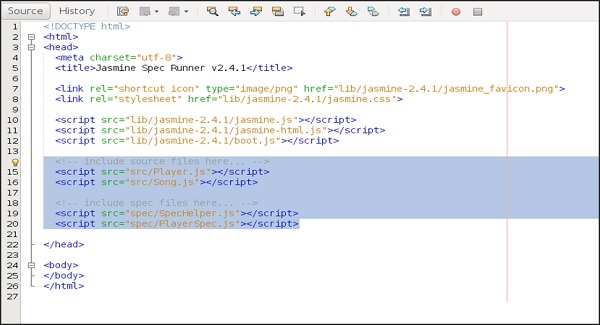
Step 5 − Add reference to the output file
我们成功创建了自己的待测文件和相应的测试用例。 我们把它放在两个不同的文件夹下。 在此步骤中,我们将修改“SpecRunner.html”以包含这两个新创建的文件的引用。
<!DOCTYPE html>
<html>
   <head>
      <meta charset = "utf-8">
      <title>Jasmine Spec Runner v2.4.1</title>
      <link rel = "shortcut icon" type = "image/png" href =
      "lib/jasmine2.4.1/jasmine_favicon.png">
      <link rel = "stylesheet" href = "lib/jasmine-2.4.1/jasmine.css">
      <script src = "lib/jasmine-2.4.1/jasmine.js"></script>
      <script src = "lib/jasmine-2.4.1/jasmine-html.js"></script>
      <script src = "lib/jasmine-2.4.1/boot.js"></script>
      <!--Lines to be deleted
      <script src = "src/Player.js"></script>
      <script src = "src/Song.js"></script>
      <script src = "spec/SpecHelper.js"></script>
      <script src = "spec/PlayerSpec.js"></script> -->
      <!--adding the reference of our newly created file --->
      <script src = "src/helloworld.js"></script>
      <script src = "spec/HelloWorldsSpec.js"></script>
   </head>
   <body>
   </body>
</html>
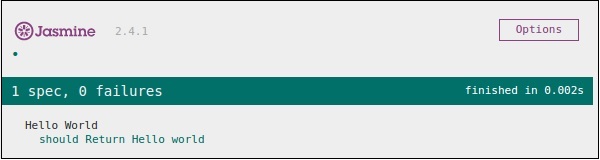
Step 6 − Execute by running SpecRunner.html
这是我们应用程序开发的最后一步。 在您喜欢的任何浏览器中运行SpecRunner.html。 以下屏幕截图将作为结果显示。 绿色屏幕表示成功,而红色表示测试用例失败。
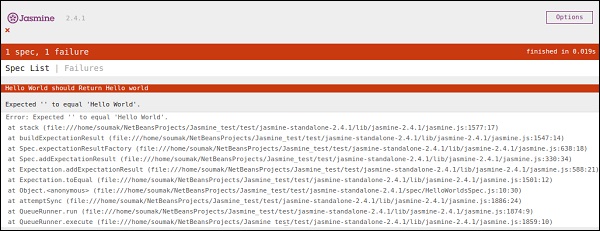
Step 7 − Understand the failure case
到目前为止,我们已经看到了hello world应用程序的success测试用例。 现在让我们看看如果出现问题并且测试失败了。 要实现失败案例,我们需要编写失败测试用例。 为此,我们将使用以下代码修改helloworld.js文件。
var helloworld = function (){
   return '';
};
// we are not returning any string whereas in the spec file
//we are expecting a // string as “Hello World”
上面的代码肯定会失败,因为我们的spec文件没有得到期望的字符串作为helloworld()的输出。 specRunner.html文件的以下屏幕截图描述了其红色指示符出错。