Grunt - 快速指南
Grunt - Overview
什么是Grunt?
Grunt是一个JavaScript Task Runner,可用作JavaScript对象的命令行工具。 它是一个在NodeJS之上编写的任务管理器。
为什么要使用Grunt?
Grunt可以非常轻松地执行重复性任务,例如编译,单元测试,缩小文件,运行测试等。
Grunt包含扩展插件和脚本功能的内置任务。
Grunt的生态系统是巨大的; 你可以用很少的努力自动化任何东西。
历史 (History)
第一行源代码在2011年被添加到GruntJS.Grunt v0.4于2013年2月18日发布.Grunt v0.4.5于2014年5月12日发布.Grunt的稳定版本为1.0.0 rc1于2016年2月11日发布。
优势 (Advantages)
使用Grunt,您可以轻松地执行文件的缩小,编译和测试。
Grunt统一了Web开发人员的工作流程。
您可以使用Grunt轻松使用新的代码库,因为它包含的基础架构较少。
它加快了开发工作流程并提高了项目的性能。
缺点 (Disadvantages)
每当更新npm包时,您需要等到Grunt的作者更新它。
每项任务都旨在完成指定的工作。 如果要扩展指定的任务,则需要使用一些技巧来完成工作。
Grunt包含各个插件的大量配置参数。 通常,Grunt配置文件的长度更长。
Grunt - Features
Grunt是一个基于JavaScript的任务运行器,这意味着它可以在工作流中自动执行重复任务,它可以用作JavaScript对象的命令行工具。
下面列出了GruntJS的一些最突出的功能 -
Grunt使工作流程像编写设置文件一样简单。
您可以轻松地自动执行重复性任务。
Grunt是一个基于NodeJS的流行任务运行器。 它灵活且广泛采用。
它有一个简单的方法,包括JS中的任务和JSON中的配置。
Grunt缩小JavaScript,CSS文件,测试文件,编译CSS预处理器文件(SASS,LESS)等。
Grunt包含扩展插件和脚本功能的内置任务。
它加快了开发工作流程并提高了项目的性能。
您可以使用Grunt轻松使用新的代码库,因为它包含的基础架构较少。
Grunt的生态系统是巨大的; 你可以用很少的努力自动化任何东西。
Grunt减少了在执行重复性任务时出错的几率。
Grunt目前拥有超过4000个插件。
它可以用于大型生产现场。
Grunt - Installing
本章提供了如何在系统上安装Grunt的分步过程。
Grunt的系统要求
Operating System - 跨平台
Browser Support - IE(Internet Explorer 8+),Firefox,谷歌浏览器,Safari,Opera
安装Grunt
Step 1 - 我们需要NodeJ来运行Grunt。 要下载NodeJs,请打开链接https://nodejs.org/en/ ,您将看到如下所示的屏幕 -
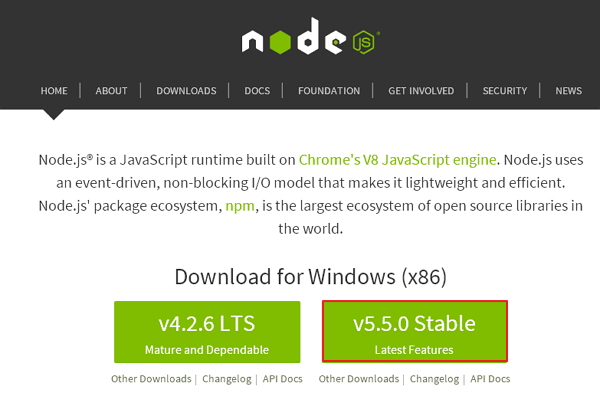
下载zip文件的Latest Features版本。
Step 2 - 接下来,运行安装程序以在您的计算机上安装NodeJs 。
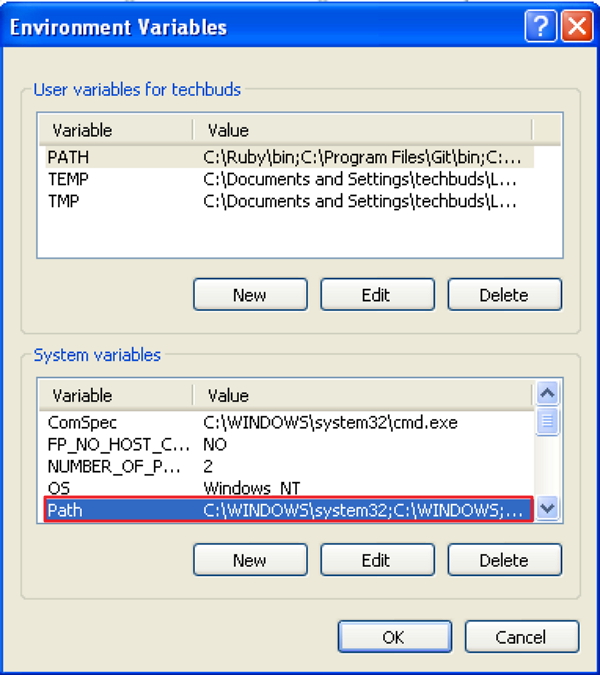
Step 3 - 接下来,您需要设置environment variables 。
Path User Variable
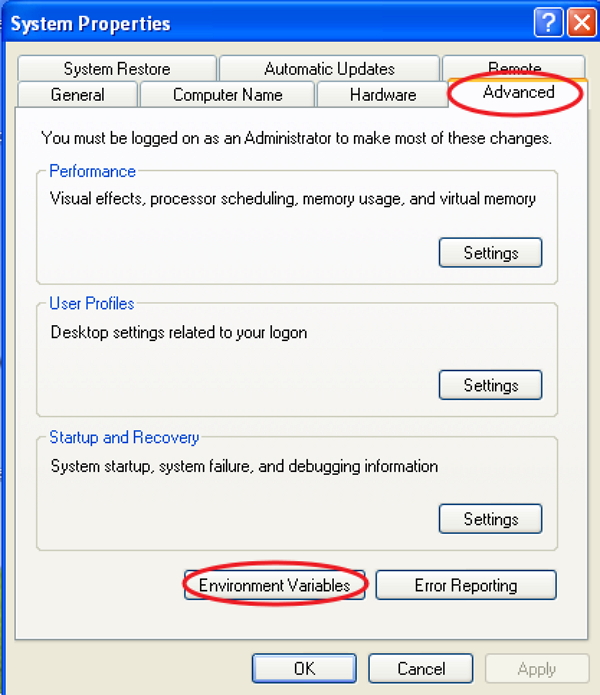
- 右键单击“ My Computer 。
- 选择Properties 。
- 接下来,选择Advanced选项卡,然后单击Environment Variables 。
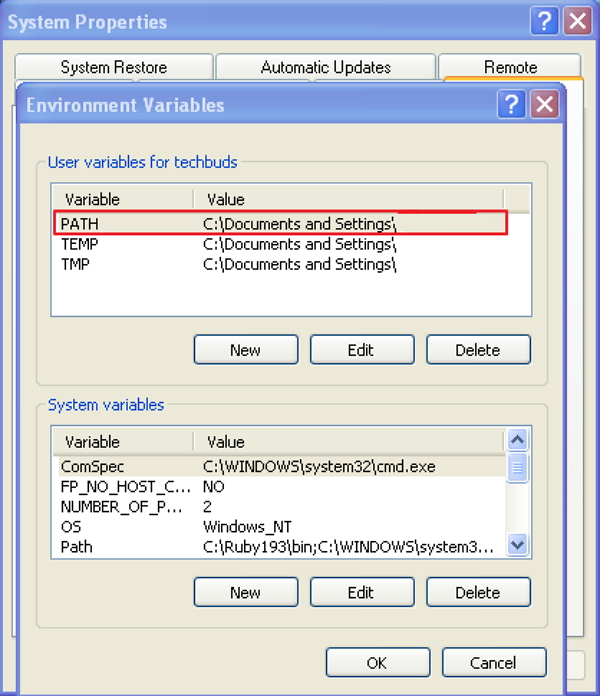
在Environment Variables窗口下,双击PATH ,如屏幕所示。
您将看到一个Edit User Variable窗口,如图所示。 将“ Variable Value字段中的NodeJs文件夹路径添加为C:\Program Files\nodejs\node_modules\npm 。 如果已经为其他文件设置了路径,则需要在此之后添加分号(;)并添加NodeJs路径,如下所示 -
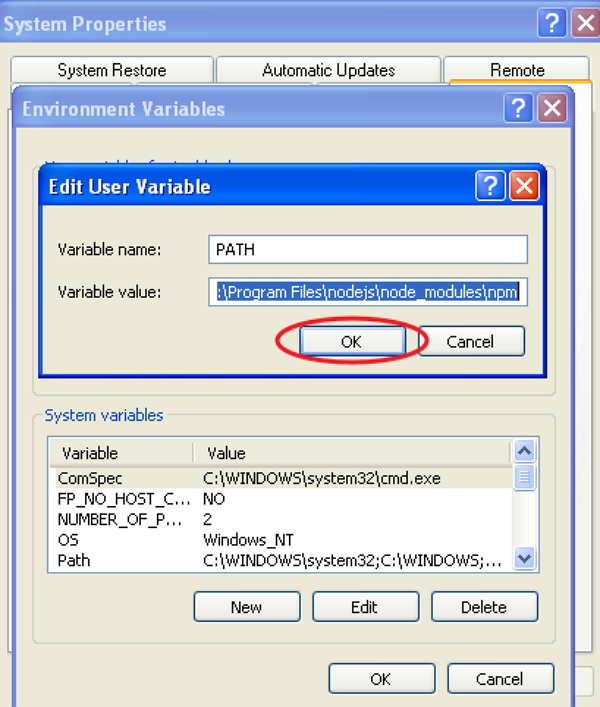
最后,单击“ OK按钮。
System Variable
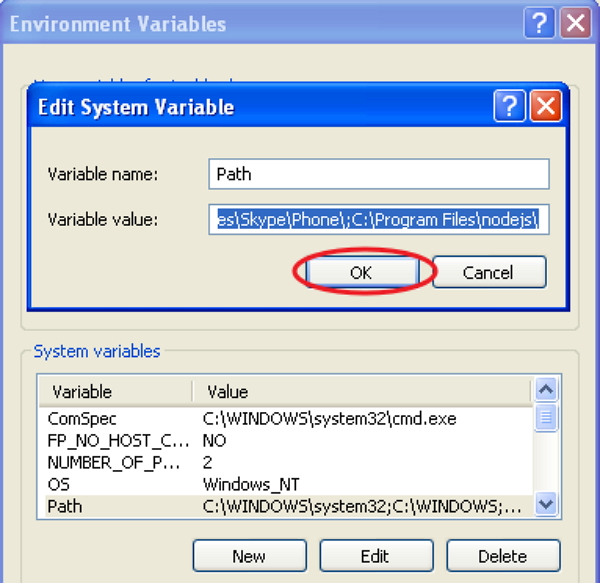
在“ System variables ,双击“ Path ,如以下屏幕所示。
您将看到一个Edit System Variable窗口,如图所示。 将“ Variable Value字段中的NodeJs文件夹路径添加为C:\Program Files\nodejs\ ,然后单击“ OK ,如下所示 -
Step 4 - 要在系统上安装grunt,您需要全局安装Grunt的命令行界面(CLI),如下所示 -
npm install -g grunt-cli
运行上面的命令会将grunt命令放入系统路径,这使它可以从任何目录运行。
安装grunt-cli不会安装Grunt任务运行器。 grunt-cli的作用是运行已安装在Gruntfile旁边的Grunt版本。 它允许机器同时安装多个版本的Grunt。
Step 5 - 现在,我们将创建configuration files以运行Grunt。
package.json
package.json文件放在项目的根目录中,旁边是Gruntfile 。 每当您在与package.json相同的文件夹中运行命令npm install时, package.json用于正确运行每个列出的依赖项。
可以通过在命令提示符下键入以下命令来创建基本的package.json -
npm init
基本的package.json文件如下所示 -
{
   "name": "iowiki",
   "version": "0.1.0",
   "devDependencies": {
      "grunt-contrib-jshint": "~0.10.0",
      "grunt-contrib-nodeunit": "~0.4.1",
      "grunt-contrib-uglify": "~0.5.0"
   }
}
您可以通过以下命令将Grunt和gruntplugins添加到现有的pacakge.json文件中 -
npm install <module> --save-dev
在上面的命令中,
例如,以下命令将安装最新版本的Grunt并将其添加到您的devDependencies -
npm install grunt --save-dev
Gruntfile.js
Gruntfile.js文件用于定义Grunt的配置。 这是我们的设置将被写入的地方。 基本的Gruntfile.js文件如下所示 -
// our wrapper function (required by grunt and its plugins)
// all configuration goes inside this function
module.exports = function(grunt) {
   // CONFIGURE GRUNT
   grunt.initConfig({
      // get the configuration info from package.json file
      // this way we can use things like name and version (pkg.name)
      pkg: grunt.file.readJSON('package.json'),
      // all of our configuration goes here
      uglify: {
         // uglify task configuration
         options: {},
         build: {}
      }
   });
   // log something
   grunt.log.write('Hello world! Welcome to IoWiki!!\n');
   // Load the plugin that provides the "uglify" task.
   grunt.loadNpmTasks('grunt-contrib-uglify');
   // Default task(s).
   grunt.registerTask('default', ['uglify']);
};
Grunt - Getting Started
要使用Grunt,您需要安装Node.js. Node.js的安装已在chapter解释过。 您可以使用Node.js包管理器安装Grunt和Grunt插件。
在系统上设置Grunt之前,您可以使用以下命令更新Node包管理器 -
npm update -g npm
如果您使用的是Mac或Linux,则需要在命令行的开头使用sudo word来授予管理员访问权限,如下所示 -
sudo npm update -g npm
CLI安装
CLI代表命令行界面,它运行已安装的Grunt版本。 要开始使用Grunt,您需要全局安装Grunt的命令行界面(CLI),如下所示 -
npm install -g grunt-cli
运行上面的命令会将grunt命令放入系统路径,这使它可以从任何目录运行。 您无法通过安装grunt-cli来安装Grunt任务运行器。 它允许机器同时安装多个版本的Grunt。
CLI的工作
每当运行Grunt时,CLI都会使用require()系统查找系统上已安装的Grunt。 使用grunt-cli ,您可以从项目的任何目录运行Grunt。 如果您使用的是本地安装的Grunt,则grunt-cli使用本地安装的Grunt库并应用Grunt文件中的配置。
使用现有的新项目
如果您正在使用包含package.json和Gruntfile的已配置项目,请按照下面指定的简单步骤进行操作 -
- 找到项目根目录的路径。
- 您可以使用npm install命令安装依赖项。
- 使用grunt命令运行Grunt。
如果要创建新项目,请将package.json和Gruntfile这两个文件包含在项目中。
package.json - package.json文件放在项目的根目录中,每当您在同一文件夹中运行命令npm install时,它就会用于运行每个列出的依赖项。
Gruntfile.js - Gruntfile.js文件用于编写项目的配置设置。
package.json
package.json文件放在项目的根目录中,位于Gruntfile旁边,用于在同一文件夹中运行命令npm install时运行每个列出的依赖项。
您可以使用以下列出的不同方式创建package.json -
- 你可以通过grunt-init来创建package.json文件。
- 您还可以使用npm-init命令创建package.json文件。
您可以编写如下所示的规格 -
{
   "name": "iowiki",
   "version": "0.1.0",
   "devDependencies": {
      "grunt-contrib-jshint": "~0.10.0",
      "grunt-contrib-nodeunit": "~0.4.1",
      "grunt-contrib-uglify": "~0.5.0"
   }
}
您可以使用以下命令将Grunt和gruntplugins添加到现有的pacakge.json文件中 -
npm install <module> --save-dev
这里,
例如,以下命令将安装最新版本的Grunt并将其添加到您的devDependencies -
npm install grunt --save-dev
Gruntfile (Gruntfile)
Gruntfile.js文件是一个默认位置,您的配置设置将用于Grunt。 Grunt文件包括以下部分 -
- 包装函数
- 项目和任务配置
- 加载Grunt插件和任务
- 自定义任务
基本的Gruntfile.js文件如下所示 -
// our wrapper function (required by grunt and its plugins)
// all configuration goes inside this function
module.exports = function(grunt) {
   // CONFIGURE GRUNT
   grunt.initConfig({
      // get the configuration info from package.json file
      // this way we can use things like name and version (pkg.name)
      pkg: grunt.file.readJSON('package.json'),
      // all of our configuration goes here
   });
   // Load the plugin that provides the "uglify" task
   grunt.loadNpmTasks('grunt-contrib-uglify');
   // Default task(s)
   grunt.registerTask('default', ['uglify']);
};
包装功能
在上面的代码中, module.exports是一个包装函数,整个配置都在这个函数中。 这是一种向其他应用程序显示配置的方法。
module.exports = function(grunt) {
   //do grunt-related things here
}
项目和任务配置
一旦Grunt配置准备就绪,您就可以配置Grunt任务。 项目配置可以在grunt.initConfig()部分中编写。 在grunt.initConfig()函数内部,从package.json文件中获取配置信息并将其保存到pkg 。 您可以使用pkg.name调用项目名称,使用pkg.name调用版本。
加载Grunt插件和任务
使用grunt.loadNpmTasks方法从指定的插件加载任务。 您可以使用npm在本地安装插件,它必须相对于Gruntfile。 您可以使用一个简单的命令加载插件,如下所示 -
grunt.task.loadNpmTasks(pluginName)
自定义任务
当您通过命令行运行Grunt时,Grunt将查找default任务。 在上面的代码中,我们使用了一个名为uglify的任务,它可以使用grunt命令运行。 这与显式运行grunt uglify命令相同,您可以指定数组中的任务数。
grunt.registerTask('default', ['uglify']);
Grunt - Configuring Tasks
您可以在Gruntfile.js file为Grunt定义项目特定的配置数据。
Grunt配置
可以使用grunt.initConfig()方法在grunt.initConfig()初始化任务配置数据。 在grunt.initConfig()函数内部,从package.json文件中获取配置信息。 配置将包含名为properties和任意数据的任务。
grunt.initConfig({
   jshint: {
      // configuration for jshint task
   },
   cssmin: {
      // configuration for cssmin task
   },
   // Arbitrary non-task-specific properties
   my_files: ['dir1/*.js', 'dir2/*.js'],
});
任务配置和目标
在运行任务时,Grunt会在任务命名属性下查找配置。 我们将使用多个配置和目标选项定义任务,如下所示 -
grunt.initConfig({
   jshint: {
      myfile1: {
         // configuration for "myfile1" target options
      },
      myfile2: {
         // configuration for "myfile2" target options
      },
   },
   cssmin: {
      myfile3: {
         // configuration for "myfile3" target options
      },
   },
});
这里, jshint任务有myfile1和myfile2目标, cssmin任务有myfile3目标。 当您运行grunt jshint ,它将遍历任务和目标以处理指定目标的配置。
选项 (Options)
在任务配置中定义options属性,该属性将覆盖任务默认值。 每个目标都包含覆盖任务级选项的options属性。 它将具有以下格式 -
grunt.initConfig({
   jshint: {
      options: {
         // task-level options that overrides task defaults
      },
      myfile: {
         options: {
            // "myfile" target options overrides task defaults
         },
      },
      myfile1: {
         // there is no option, target will use task-level options
      },
   },
});
Files
Grunt提供了一些想法,用于指定任务应该在哪些文件上运行,并使用不同的方式来指定src-dest文件映射。 以下是src和dest映射支持的一些其他属性 -
filter - 这是一个指定匹配的src文件路径并返回true或false值的函数。
nonull - 当设置为true时,它定义非匹配模式。
dot - 它匹配以句点或其他开头的文件名。
matchBase - 它匹配包含斜杠的模式和路径的基本名称。
expand - 它处理src-dest文件映射。
紧凑格式
它指定每个目标的src-dest文件映射,该映射可用于只读任务,并且只需要src属性且不需要dest属性。
grunt.initConfig({
   jshint: {
      myfile1: {
         src: ['src/file1.js','src/file2.js']
      },
   },
   cssmin: {
      myfile2: {
         src: ['src/file3.js','src/file4.js'],
         dest: 'dest/destfile.js',
      },
   },
});
文件对象格式
它指定每个目标的src-dest文件映射,其中属性名称为dest文件,其值为src文件。
grunt.initConfig({
   jshint: {
      myfile1: {
         files: {
            'dest/destfile.js':['src/file1.js','src/file2.js'],
            'dest/destfile1.js':['src/file3.js','src/file4.js'],
         },
      },
      myfile2: {
         files: {
            'dest/destfile2.js':['src/file22.js','src/file23.js'],
            'dest/destfile21.js':['src/file24.js','src/file25.js'],
         },
      },
   },
});
文件数组格式
它通过使用每个映射的附加属性指定每个目标的src-dest文件映射。
grunt.initConfig({
   jshint: {
      myfile1: {
         files: [
            {src:['src/file1.js','src/file2.js'],dest:'dest/file3.js'},
            {src:['src/file4.js','src/file4.js'],dest:'dest/file5.js'},
         ],
      },
      myfile2: {
         files: [
            {src:['src/file6.js','src/file7.js'],dest:'dest/file8/', nonull:true},
            {src:['src/file9.js','src/file10.js'],dest:'dest/file11/', filter:'isFalse'},
         ],
      },
   },
});
较旧的格式
dest-as-target文件格式存在于多任务之前,其中目标文件路径是目标的名称。 不推荐使用以下格式,不在代码中使用。
grunt.initConfig({
   jshint: {
      'dest/destfile2.js':['src/file3.js','src/file4.js'],
      'dest/destfile5.js':['src/file6.js','src/file7.js'],
   },
});
自定义过滤功能
您可以使用filter属性以更高的详细程度帮助目标文件。 仅当文件与实际文件匹配时,以下格式才会清除文件。
grunt.initConfig({
   clean: {
      myfile:{
         src: ['temp/**/*'],
         filter: 'isFile',
      },
   },
});
全球模式
Globbing意味着扩展文件名。 Grunt通过使用built-in node-glob和minimatch libraries来支持globbing。 通配模式包括以下几点 -
- *匹配任意数量的字符,但不匹配/ 。
- ? 匹配单个字符,但不匹配/ 。
- **匹配包括/的多个字符。
- {}指定逗号分隔的“或”表达式列表。
- ! 将在开始时否定模式匹配。
例如 -
{src: 'myfile/file1.js', dest: ...} // it specifies the single file
{src: 'myfile/*.js', dest: ...} //it matches all the files ending wth .js
{src: 'myfile/{file1,file2}*.js', dest: ...} //defines the single node glob pattern
{src: ['myfile/*.js', '!myfile/file1.js'], dest: ...} // all files will display in alpha
// order except for file1.js
动态构建文件对象
使用单个文件时,可以使用其他属性动态构建文件列表。 将expand属性设置为true时,它将启用以下某些属性 -
cwd将所有src与此路径匹配。
src匹配相对于cwd匹配的模式。
dest属性指定目标路径前缀。
ext将使用dest路径中生成的值替换现有扩展。
extDot表示指示扩展名的句点所在的位置。 它使用first期或last期; 默认情况下,它设置为第first句点
flatten从dest路径中删除所有路径部分。
rename指定包含新目标和文件名的字符串。
重命名属性
它是一个唯一的JavaScript函数,它返回一个字符串,你不能使用字符串值进行重命名。 在以下示例中, copy任务将创建README.md的备份。
grunt.initConfig({
   copy: {
      backup: {
         files: [{
            expand: true,
            src: ['docs/README.md'],    // creating a backup of README.md
            rename: function () {       // specifies the rename function
               return 'docs/BACKUP.txt'; // returns a string with the complete destination
            }
         }]
      }
   }
});
模板(Templates)
您可以使用《% %》分隔符指定模板。 当从配置中读取它们时,它们将自动扩展。 它包括两种类型的属性 -
《%= prop.subprop %》属性用于扩展配置中prop.subprop的值,该值可以引用字符串值,数组和其他对象。
《% %》属性执行用于控制流或循环的内联JavaScript代码。
例如 -
grunt.initConfig({
   concat: {
      myfile: {
         options: {
            banner: '/* <%= val %> */\n',
         },
         src: ['<%= myval %>', 'file3/*.js'],
         dest: 'build/<%= file3 %>.js',
      },
   },
   // properties used in task configuration templates
   file1: 'c',
   file2: 'b<%= file1 %>d',
   file3: 'a<%= file2 %>e',
   myval: ['file1/*.js', 'file2/*.js'],
});
导入外部数据
您可以从package.json file导入外部数据。 grunt-contrib- uglify插件可用于缩小源文件,并使用元数据创建横幅注释。 您可以使用grunt.file.readJSON和grunt.file.readYAML导入JSON和YAML数据。
例如 -
grunt.initConfig({
   pkg: grunt.file.readJSON('package.json'),
   uglify: {
      options: {
         banner: '/*! <%= pkg.name %> <%= grunt.template.today("yyyy-mm-dd") %> */\n'
      },
      dist: {
         src: 'src/<%= pkg.name %>.js',
         dest: 'dist/<%= pkg.name %>.min.js'
      }
   }
});
Grunt - Sample File
在本章中,让我们使用以下插件创建一个简单的Grunt文件 -
- grunt-contrib-uglify
- grunt-contrib-concat
- grunt-contrib-jshint
- grunt-contrib-watch
安装以上所有插件并按照下面给出的步骤创建一个简单的Gruntfile.js -
Step 1 - 您需要创建一个wrapper函数,它封装了Grunt的配置。
module.exports = function(grunt) {};
Step 2 - 初始化配置对象,如下所示 -
grunt.initConfig({});
Step 3 - 接下来,将package.json文件中的项目设置读入pkg属性。 它使我们能够引用package.json文件中的属性值。
pkg: grunt.file.readJSON('package.json')
Step 4 - 接下来,您可以定义任务的配置。 让我们创建我们的第一个任务concat来连接src/文件夹中存在的所有文件,并将连接的.js文件存储在dist/文件夹下。
concat: {
   options: {
      // define a string to insert between files in the concatenated output
      separator: ';'
   },
   dist: {
      // files needs to be concatenated
      src: ['src/**/*.js'],
      // location of the concatenated output JS file
      dest: 'dist/<%= pkg.name %>.js'
   }
}
Step 5 - 现在,让我们创建另一个名为uglify任务来缩小我们的JavaScript。
uglify: {
   options: {
      // banner will be inserted at the top of the output which displays the date and time
      banner: '/*! <%= pkg.name %> <%= grunt.template.today() %> */\n'
   },
   dist: {
      files: {
         'dist/<%= pkg.name %>.min.js': ['<%= concat.dist.dest %>']
      }
   }
}
上面的任务在dist /文件夹中创建一个文件,其中包含缩小的.js文件。 《%= concat.dist.dest %》将指示《%= concat.dist.dest %》缩小concat任务生成的文件。
Step 6 - 让我们通过创建jshint任务来配置jshint插件。
jshint: {
   // define the files to lint
   files: ['Gruntfile.js', 'src/**/*.js'],
   // configure JSHint
   options: {
      // more options here if you want to override JSHint defaults
      globals: {
         jQuery: true,
      }
   }
}
上面的jshint任务接受一个文件数组,然后接受一个选项对象。 上面的任务将查找Gruntfile.js和src/**/*.js Gruntfile.js文件中的任何编码违规。
Step 7 - 接下来,我们有watch任务,它会查找任何指定文件中的更改并运行您指定的任务。
watch: {
   files: ['<%= jshint.files %>'],
   tasks: ['jshint']
}
Step 8 - 接下来,我们必须加载已经通过_npm安装的Grunt插件。
grunt.loadNpmTasks('grunt-contrib-uglify');
grunt.loadNpmTasks('grunt-contrib-jshint');
grunt.loadNpmTasks('grunt-contrib-watch');
grunt.loadNpmTasks('grunt-contrib-concat');
Step 9 - 最后,我们必须定义default任务。
grunt.registerTask('default', ['jshint', 'concat', 'uglify']);
只需在命令行输入grunt命令即可运行default任务。
这是你完整的Gruntfile.js -
module.exports = function(grunt) {
   grunt.initConfig({
      pkg: grunt.file.readJSON('package.json'),
      concat: {
         options: {
            separator: ';'
         },
         dist: {
            src: ['src/**/*.js'],
            dest: 'dist/<%= pkg.name %>.js'
         }
      },
      uglify: {
         options: {
            banner: '/*! <%= pkg.name %> <%= grunt.template.today() %> */\n'
         },
         dist: {
            files: {
               'dist/<%= pkg.name %>.min.js': ['<%= concat.dist.dest %>']
            }
         }
      },
      jshint: {
         // define the files to lint
         files: ['Gruntfile.js', 'src/**/*.js'],
         // configure JSHint
         options: {
            // more options here if you want to override JSHint defaults
            globals: {
               jQuery: true,
            }
         }
      },
      watch: {
         files: ['<%= jshint.files %>'],
         tasks: ['jshint']
      }
   });
   grunt.loadNpmTasks('grunt-contrib-uglify');
   grunt.loadNpmTasks('grunt-contrib-jshint');
   grunt.loadNpmTasks('grunt-contrib-watch');
   grunt.loadNpmTasks('grunt-contrib-concat');
   grunt.registerTask('default', ['jshint', 'concat', 'uglify']);
};
Grunt - Creating Tasks
在本章中,让我们学习如何creating tasks 。 每当您运行Grunt时,都会指定一个或多个任务运行,以通知Grunt您希望它执行的操作。 如果指定default task ,则默认情况下将运行。
别名任务
每当指定任务列表时,新任务可以为一个或多个其他任务设置别名。 运行别名将依次运行taskList中的每个指定任务。 taskList参数应该是一个任务数组,如下所示 -
grunt.registerTask(taskName, [description, ] taskList)
例如,当您使用jshint , concat,和jshint任务定义taskList并将jshint指定为default ,如果执行Grunt而未指定任何任务,则将自动运行所有列出的任务。
grunt.registerTask('default', ['jshint', 'concat', 'uglify']);
您还可以指定任务参数,如下所示 -
grunt.registerTask('dist', ['concat:dist', 'uglify:dist']);
在上面的任务中,别名dist运行concat和uglify任务。
多任务
每当您运行多个任务时,Grunt都会在Grunt配置中搜索同名属性。 这些任务可以具有多个配置,这些配置将使用任意命名的targets进行定义。
指定任务和目标时,仅处理指定的目标配置。
grunt concat:foo
上面的命令只会运行目标foo 。
仅指定任务时,将处理所有目标。
grunt concat
上面的命令将遍历concat任务的所有目标。
使用grunt.task.renameTask重命名任务时,Grunt会在配置对象中搜索具有new任务名称的属性。
grunt.initConfig({
   log: {
      foo: [1, 2, 3],
      bar: 'Welcome to iowiki',
      sap: true
   }
});
grunt.registerMultiTask('log', 'Log stuff.', function() {
   grunt.log.writeln(this.target + ': ' + this.data);
});
在上面的例子中,多任务将记录foo: 1,2,3如果Grunt通过grunt log:foo运行,或者它将记录bar: Welcome to iowiki每次运行grunt log:bar时的bar: Welcome to iowiki 。 它将记录foo: 1,2,3然后bar: Welcome to iowiki然后sap: true当Grunt以grunt log运行时为sap: true 。
基本任务
无论何时运行基本任务,Grunt都不会搜索配置或环境。 相反,它运行指定的任务函数,传递作为函数参数指定的任何冒号分隔的参数。
grunt.registerTask(taskName, [description, ] taskFunction)
在以下示例中,任务记录foo, testing 123如果通过grunt foo:testing:123命令执行Grunt,则grunt foo:testing:123 。 每当任务在没有参数的情况下运行为grunt foo ,任务将log foo, no args 。
grunt.registerTask('foo', 'A simple task to logs stuff.', function(arg1, arg2) {
   if (arguments.length === 0) {
      grunt.log.writeln(this.name + ", no args");
   } else {
      grunt.log.writeln(this.name + ", " + arg1 + " " + arg2);
   }
});
自定义任务
如果您不想遵循multi task结构,可以定义自定义任务,如下所示 -
grunt.registerTask('default', 'My "default" task description.', function() {
  grunt.log.writeln('Currently running the "default" task.');
});
可以在另一个任务中运行任务,如下所示 -
grunt.registerTask('foo', 'My "foo" task.', function() {
   // Enqueue bar and baz tasks, to run after foo completes, in-order.
   grunt.task.run('bar', 'baz');
   // Or:
   grunt.task.run(['bar', 'baz']);
});
您还可以创建异步任务,如下所示 -
grunt.registerTask('asyncfoo', 'My "asyncfoo" task.', function() {
   // Force task into async mode and grab a handle to the done() function.
   var done = this.async();
   // Run some sync stuff.
   grunt.log.writeln('Processing your task..');
   // Run some async stuff.
   setTimeout(function() {
      grunt.log.writeln('Finished!');
      done();
   }, 1000);
});
您可以创建可以访问其名称和参数的任务,如下所示 -
grunt.registerTask('foo', 'My task "foo" .', function(a, b) {
   grunt.log.writeln(this.name, a, b);
});
// Usage:
// grunt foo
//   logs: "foo", undefined, undefined
// grunt foo:bar
//   logs: "foo", "bar", undefined
// grunt foo:bar:baz
//   logs: "foo", "bar", "baz"
您可以创建任务,只要记录任何错误,任务就会失败,如下所示 -
grunt.registerTask('foo', 'My task "foo" .', function() {
   if (failureOfSomeKind) {
      grunt.log.error('This is an error message.');
   }
   // If this task had errors then fail by returning false
   if (ifErrors) { return false; }
   grunt.log.writeln('This is success message');
});
每当任务失败时,除非指定了--force ,否则将终止每个后续任务。
grunt.registerTask('foo', 'My task "foo" .', function() {
   // Fail synchronously.
   return false;
});
grunt.registerTask('bar', 'My task "bar" .', function() {
   var done = this.async();
   setTimeout(function() {
      // Fail asynchronously.
      done(false);
   }, 1000);
});
任务可以依赖于其他任务来成功执行。 请记住, grunt.task.requires实际上不会执行其他任务,而只会检查它是否已执行但未失败。
grunt.registerTask('foo', 'My task "foo" .', function() {
   return false;
});
grunt.registerTask('bar', 'My task "bar" .', function() {
   // Fail task if foo task failed or never ran.
   grunt.task.requires('foo');
   // This code executes if the foo task executed successfully.
   grunt.log.writeln('Hello, World.. Welcome to IoWiki!..');
});
// Usage:
// grunt foo bar doesn't log, because foo failed to execute.
// **Note: This is an example of space-separated sequential commands,
// (similar to executing two lines of code: `grunt foo` then `grunt bar`)
// grunt bar doesn't log, because foo never ran.
只要找不到所需的配置属性,任务甚至可能会失败。
grunt.registerTask('foo', 'My task "foo" .', function() {
   // Fail task if <i>meta.name</i> config properties is missing
   // Format 1: String
   grunt.config.requires('meta.name');
   // or Format 2: Array
   grunt.config.requires(['meta', 'name']);
   // Log... conditionally.
   grunt.log.writeln('This only log if meta.name is defined in the config.');
});
任务可以访问配置属性,如下所示 -
grunt.registerTask('foo', 'My task "foo" .', function() {
   // Log the value of the property. Returns null if the property is undefined.
   grunt.log.writeln('The meta.name property is: ' + grunt.config('meta.name'));
   // Also logs the value of the property. Returns null if the property is undefined.
   grunt.log.writeln('The meta.name property is: ' + grunt.config(['meta', 'name']));
});
